

Thank you for putting a link to this tutorial, whenever you display your realization of that tag on a website, on a group or in a mail !
**********************
You'll find some versions of that tag in my gallery HERE
******************************
To realize that tag, you'll just need the material zip down below :

**************
*It is forbidden to suppress watermarks on the material provided , to alter, mist or rename the tubes in order to respect the work of the tubers
- The tube of the woman is by Titine
- The tube of the trees is by Sabine
You'll be able to get their tubes by joining in their sharing group here
The mask I have used is a present from Kikirou. Thank you my friend !
Le tube du chateau a été fait à partir d'un tube de Guismo : Calguismist1989
You'll be able to find her tubes on Dakara' s site here
and you can join in her sharing group here
- The tube Coraline-element15 is by Katussia
You'll be able to get their tubes by joining in their sharing group here
The other elements have been found on the net
******************
Preparation
Duplicate your tubes and your mask. Close the originals and minimize the copies for now.
*****************
Click here to print the tutorial
*******************
You can use my arrow to follow your work

***************
1- Open a new transparent image of 800 by 650 pixels
2- Set your material palette with two colours out of your main tube
My choice : Foreground : light colour d2dfe5 
Background : white (or a colour of your choice )
Set your foreground with a linear gradient, angle 45, repeat 0, turn on the Invert checkbox
3- Flood fill your transparent layer with that gradient
4- Add a new raster layer and flood fill it with another colour out of your main tube
I have chosen that grey 808080 
5- Layers / new mask layer / from image / choose Kikiroumask5.jpeg / only turn on the Source Luminance check box
Adjust / sharpness / sharpen more
Merge group
6- Set the mode of that layer to Luminance legacy or a mode of your choice
7- Add a new raster layer and select all
8- Open the tube Graphsabine-design192, copy it and paste it into the selection
Select none
9- Adjust / Hue and saturation / Colorize / 141, 60 for me
10- Open the tube "amoureux" that I have prepared or a tube of your choice but lower its opacity (I have colorized mine as on step 9 and lowered its opacity to 47), copy it and paste it as a new layer
Place as on the tag or to your liking
11- Open the tube "chateau" or a tube of your choice, copy it and paste it as a new layer ( I have set the mode of that layer on Luminance heritage and lowered its opacity at 50)
Place that tube in the bottom right hand corner of your tag
12- Open the tube "nuages", copy it and paste it as a new layer
Place the first cloud in the bottom right hand side of your tag
13- Layers / duplicate
Image / mirror
Move that second cloud towards the left
You may lower the opacity of the clouds to your liking
( The opacity of my first cloud is on 76 and the second is on 65 )
14- Add a new raster layer and select all
Open the tube Kt's Coraline-element15, copy it and paste it into the selection
Select none
15- Colorize that tube as on step 9
- Set the mode of that layer to Multiply
16- Open the tube TRtube1730 or a tube of your choice, copy it and paste it as a new layer
Place at the right place and don't move it afterwards !!
If you have a misted tube like me you can do that : ( if not, go to step 18)
I have set the mode of that first layer with my princess on Overlay and lowered its opacity to 30
Then, I have duplicated that layer and set the mode of it to Multiply and lowered its opacity to 85
It's up to you to find the good combinations that makes your tube come out nicely
Now, this is what I did to make that tube clearer :
17- I activated my layer raster 2 ( the one where the mask has been applied )
With my rubber set as below , I rubbed off the part of the mask which is underneath my princess ( all you have to do is to apply your rubber all over the princess body )

18- Activate your top layer !!!
Add a new raster layer and select all
Flood fill that layer with a dark colour of your choice ( I have chosen a dark blue )
19 - Selections / contract by 3 pixels
Flood fill that new selection in white ( on the same layer !)
20- Selections / contract by 2 pixels
Flood fill that new selection with your dark colour
21- Selections / contract by 3 pixels
Hit delete
Deselect
The frame of your tag is now done !
22- Add a new raster layer and apply your signature
23- We're going to place the birds to prepare the animation
If you don't feel like doing the animation, all you have to do is place one or several birds on the tag ( or other fancy tubes of your choice ), merge all and save your work as a jpeg file !
**********
Animation
1- Open the psp file with all the tubes of birds that I have prepared for you; copy all the tubes, one by one and paste them as new layers onto your tag; place them as shown below
( I have closed most of my layers so you can see the birds better )

Name those layers from 1 to 9
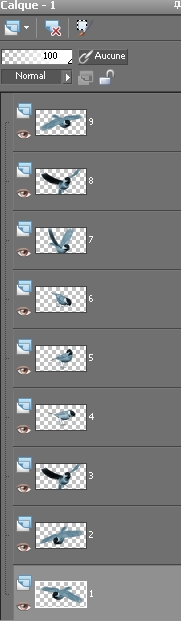
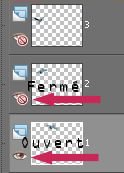
2- Activate the layer 1 as shown above but close all the other layers with the birds
( All through the animation , you'll have to play with those eyes below to open and close the layers one by one !)
3- Edit / copy special / copy merged
4- Open your Animation shop
Edit / Paste as a new animation
5- In your Psp :
Close your layer bird 1
Activate your layer bird 2 and open it ( open the eye)
Edit / copy special / copy merged
6- In your Animation shop
Edit / paste after current frame
7- In your Psp :
Close your layer bird 2
Activate your layer bird 3 and open it
Edit / copy special / copy merged
8- In your Animation shop
Edit / paste after current frame
9- Repeat steps 7 and 8 until you are on layer 9
10- In your Animation shop you should get this if you
Edit /Select all
View / zoom out by 5 once or twice

You can see that each picture shows a different time : D : 30, 50, 60 etc ...That means the bigger the number is, the longer the picture will show on ! At this moment, I suppose all your pictures show this time : D: 10 ( Duration : 10 secondes )
11- Activate picture 1:1
Go to Animation / Frame property and write the number 30
Then activate all the other pictures one by one and put the right numbers ( mine or yours !!) Picture 6 is the picture where the birds kisses the princess so I decide to leave this picture on 70 secondes !
12- Just play around with the numbers and see what you prefer:
Edit / Select all
Check your animation, in your animation shop, by clicking here

Stop the animation by clicking at the same place
13- If you like it , all you have to do is save your work as a gif file , in your animation shop !
14- You may resize your file in your Animation shop :
Animation / Resize animation / choose the right size in pixels
***************
That's it !! You've done it !!
If you 've enjoyed doing my tutorial, it would be nice to write a few words in my guest book ! If you 've had the slightest problem, please, send me a mail so I can see to the problem !
Tutorial translated on the 15th of november 2009
*************
Other versions of that tag