Thank you for putting a link to this tutorial, whenever you display your realization of that tag on a website, on a group or in a mail !
**************************
You'll find some versions of that tag in my gallery here
**********************************
To make that tag, you'll need the filters :
- Mirror rave / Quadrant flip, to install in Filters Unlimited if necessary.
- Bkg Designer sf 10 II / FH patchwork to install in Filters Unlimited. Filtre ici
- FM tile tools / Blend emboss.
- Filters Factory V / Inside out.
- AFS import / Sqborder 2 to install in Filters Unlimited if necessary. Filtre ici
and the material zip down below :

**************
*It is forbidden to suppress watermarks on the material provided , to alter, mist or rename the tubes in order to respect the work of the tubers
- The tube of the girl is by Jhanna
You may join her sharing group here.
- The other elements that I haven't created, have been found on the net.
******************
Preparation
To be on the safe side, duplicate your tubes and image in your Psp :
-
Window / Duplicate
- Close the originals and work with the copies !
*****************
Click here to print the tutorial
**********************
You can use my arrow to follow your work
Click on it and drag it all along the tutorial !

***************
Tutorial made with PSP XV

- If you have decided to use my colours, here is what you can do :
- Open the colour palette "Fairymist_Palette_Jeannette", in your Psp and using your dropper tool, pick out my colours to set your Material palette ( left click for your foreground / right click for your background )

1 - Set your Material palette with two colours out of your main tube.
- My choice : Foreground : light colour d5cbc6
Background : dark colour 3e3b36
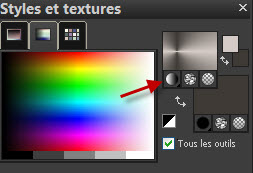
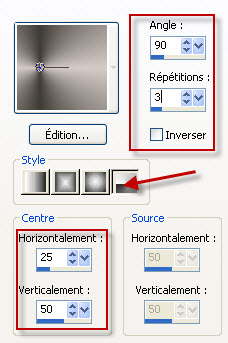
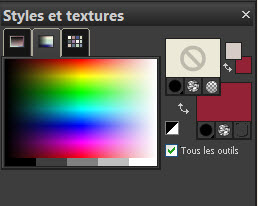
- Set your foreground with a gradient as below :
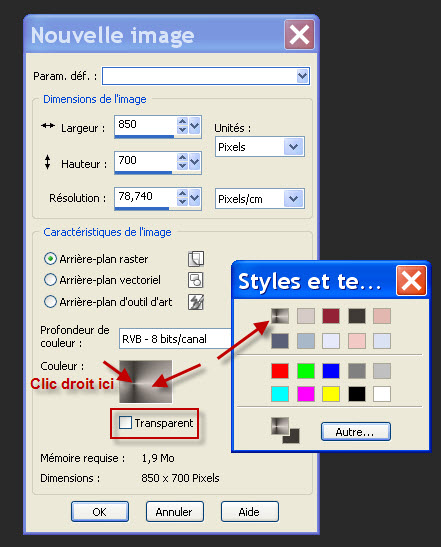
2- Open a new image of 850 by 700 pixels.
- Uncheck Transparent and do a right click on the square as shown below. Choose the gradient you have just made and press ok.
3- Adjust / Blur / Gaussian blur at 20.
4- Effects / Plugins / Filters Unlimited 2.0 / Filtre Mirror rave / Quadrant flip default (133, 120, 125, 122)
5- Layers / Duplicate.
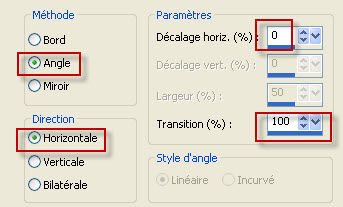
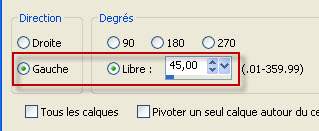
6- Image / Free rotation as below :

7- Edit / cut.
8- Selections / select all.
9- Edit / Paste into the selection. Deselect all.
10- In your layers palette, lower the opacity of that layer at 50.
11- Layers / Merge visible.
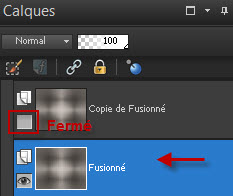
12- Layers / Duplicate.
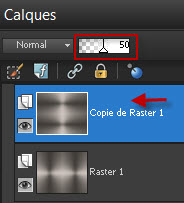
13- In your layers palette, close temporarly that layer and activate the layer which is just underneath as shown below :
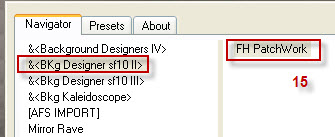
14- Effects / Plugins / Filters Unlimited 2.0 / Bkg Designer sf 10 II / FH patchwork / 15.
15- Effects / Plugins / FM tile tools / Blend emboss default
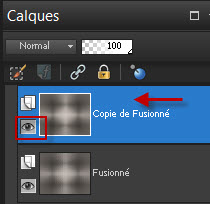
16- In your layers palette, activate and open the top layer as shown below :
17- Effects / Plugins / Filters Factory V / Inside out / 210.
18- Image / resize at 85% / Resize all the layers, NOT checked.
19- Effects / Edge effects / enhance.
20- Layers / Duplicate.
21- Image / resize at 25% / Resize all the layers NOT checked.
22- Image / resize at 50% / Resize all the layers NOT checked.
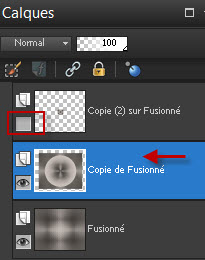
23- In your layers palette, close that layer and activate the layer just underneath as shown below :
24- Image / Free rotation libre as below :

25- Effects / Image effects / seamless tiling as below :
26- In your layers palette, activate and open your top layer as shown below :

27- Selections / select all.
- Selections / Float .
- Selections / Defloat.
28- ADD A NEW RASTER LAYER.
- With your light foreground colour (take the gradient off), flood fill the selection on that new layer.
29- Selections / Modify / contract by 2 pixels.
- Hit the delete key of your keyboard. Deselect all.
30- Layers / Merge down.
31- Image / Free rotation as previously (point 24).
32- Open the tube "Fairymist_jeannette_deco_cerise.pspimage" or another tube that matches your tag and copy it.
33- Paste it as a new layer on to your tag.
34- Layers / Merge down.
35- Layers / Duplicate. (twice).
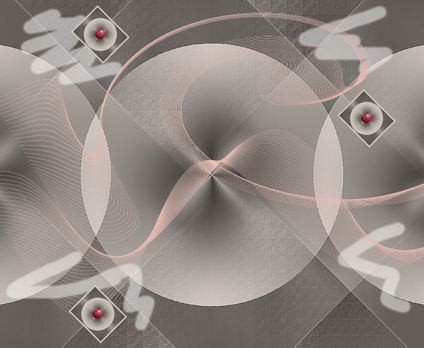
36- Place these three layers as on my tag or to your liking.
37- In your layers palette, activate the layer Copy of merged (second layer from the bottom)
- Open the tube "Fairymist_jeannette_deco_volutes.pspimage" and copy it.
- Paste it as a new layer on to your tag.
- If you don't use my colors, it is up to you to colorize that decoration so that it matches your tag.
- ADD A NEW RASTER LAYER.
38- Activate your brush tool, set as below :

- Draw zigzags on your new layer with your light foreground colour as below :
39- Adjust / Blur / Gaussian blur at 30.
40- In your layers palette, set the mode of that layer on to Dodge.
41- Layers / Duplicate.
- Lower the opacity of that layer on to about 45.
42- Activate the layer on top of the pile.
- Selections / select all.
- Selections / modify / contract by 15 pixels.
43- ADD A NEW RASTER LAYER.
44- Flood fill the selection (in the center of the tag) on your new layer with your foreground colour.
45- Selections / modify / contract by 20 pixels. Hit the delete key of your keyboard.
- Deselect all.
46- Effects / Plugins / Filters Unlimited 2.0 / AFS import / Sqborder 2 default.
47- Effects / Edge effects / enhance.
48- Image / add some symmetrical borders of 2 pixels with a colour of your choice.
I have chosen my foreground colour.
49- Layers / Promote background layer.
50- Edit / Copy.
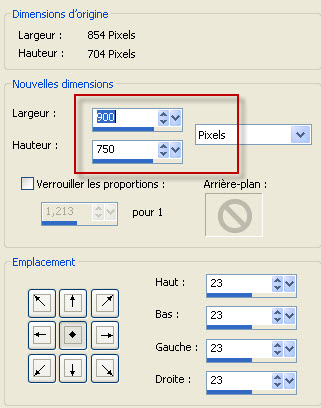
51- Image / Canvas size as below :
52- ADD A NEW RASTER LAYER.
53- Layers / Arrange / Move down.
54- Selections / select all.
55- Paste into the selection. Deselect all.
56- Adjust / Blur / Gaussian blur at 20.
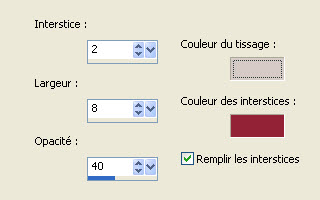
57- Effects / Texture effects / Weave as below :
- "Couleur tissage" = Foreground colour for me .
- "Couleur des interstices" = colour 932336 for me.
58- Activate the layer on top of the pile (your tag).
59- Effects / 3d effects / drop shadow / 2, 2, 50, 3, black for me. Then repeat with : - 2, - 2 in horizontal and vertical.
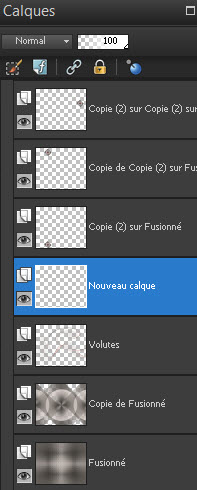
60- Set your layers palette as below :
- Close your foreground..
- Set your background with a colour matching your tag, to write your text.
- I have chosen the colour 932336.
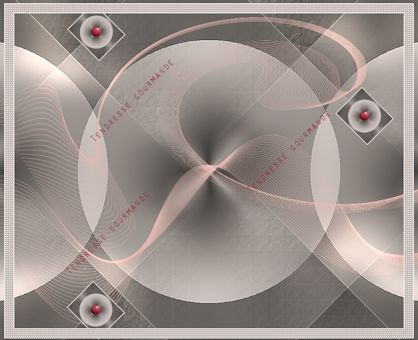
61- Activate your text tool, set as below to write down your own message (Tendresse gourmande for me).

- Confirm your writing and convert your vectorial layer into a raster one.
60- Image / free rotation as below :
62- Layers / Duplicate (twice).
63- Place the 3 texts as on my tag or to your liking.
64- In your layers palette, make sure your top layer is activated !
- Layers / Merge down (twice)
The 3 texts are now on the same layer.
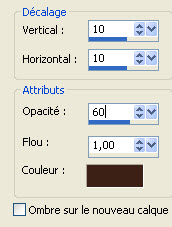
65- Effects / 3d effects / drop shadow as below :
- Colour of the shadow : brown 3C2015
66- Open the tube "JHanna_641" or a tube of your choice and copy it.
67- Paste it as a new layer on to your tag.
68- Place it as on my tag or to your liking.
Make sure it is against the bottom side of your tag.
69- Effects / 3d effects 3d / drop shadow as below :
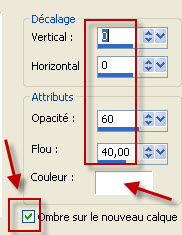
- Don't forget to uncheck "Shadow on a new layer" once your effect has been applied !
70- In your layers palette, set the mode of the shadow layer on to Dodge (lower its opacity if it is too bright).
71- Apply your signature.
72- Image / add some symmetrical borders of 2 pixels with a colour of your choice.
I have chosen white.
73 - Save your work as a jpeg file.
***************
That's it !! You've done it !!
If you 've enjoyed doing my tutorial, it would be nice to write a few words in my guest book ! If you 've had the slightest problem, please, send me a mail so I can see to the problem
Tutorial translated on the 20th of april 2013
*************
You'll find some versions of that tag in my gallery here