Thank you for putting a link to this tutorial, whenever you display your realization of that tag on a website, on a group or in a mail !
**************************
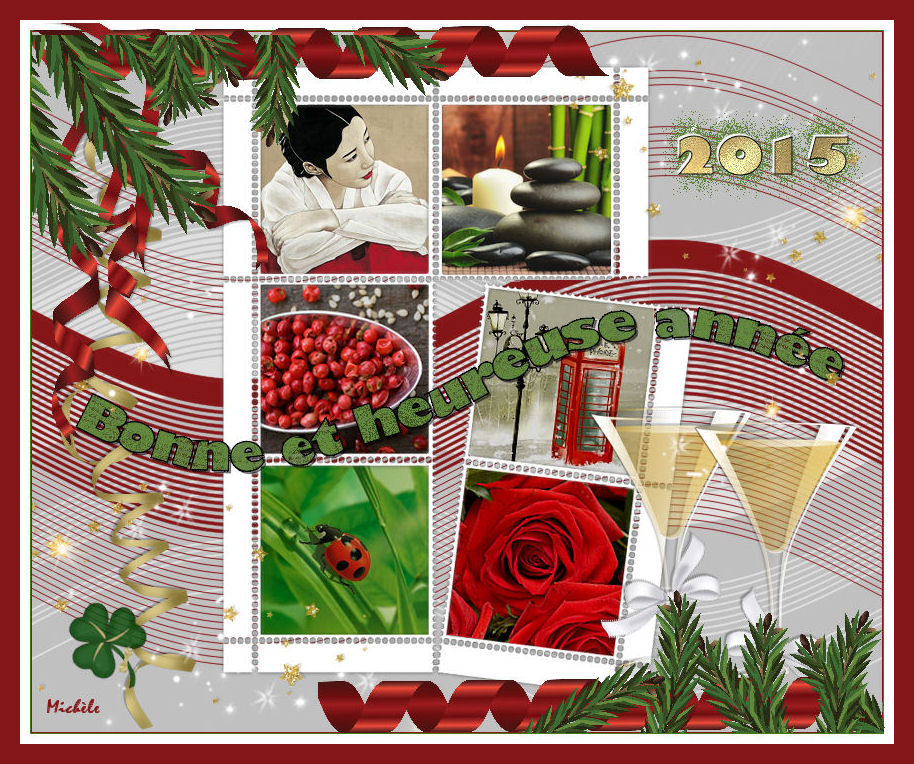
You'll find some versions of that tag in my gallery Here
***********************
To make that tag, you'll need the filter :
- Graphic plus / Cross shadow.
and the material zip down below :

**************
*It is forbidden to suppress watermarks on the material provided , to alter, mist or rename the tubes in order to respect the work of the tubers
- The small images I have used have been found on the net.
- The Christmas decoration had been found on the site of Sihirperisi
- The New Year elements of scrap have been found on the site of Fantasy Moments (they don't seem as though they can be uploaded any more).
- The title of that tutorial has been written with the Font Angelots.
- The other elements that I haven't created, have been found on the net.
******************
Preparation
To be on the safe side, duplicate your tubes and image in your Psp :
-
Window / Duplicate
- Close the originals and work with the copies !
- Place the texture "Circular-motif" in the texture folder of your Psp files.
- Place the pattern "Goldtile" in the pattern folder of your Psp files.
Open the font outside your Psp if you have Windows Xp or place it in the Font folder of Windows if you have Win7.
*****************
Click here to print the tutorial
**********************
You can use my arrow to follow your work
Click on it and drag it all along the tutorial !

***************
Tutorial made with PSP XIII
1 - Open a new transparent image of 850 by 700 pixels
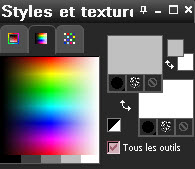
2 - Set your Material palette with two colours of your choice.
- My choice : Foreground : Light grey c0c0c0.
- Background : white.
3 - Flood fill your transparent image with your foreground colour.
4- ADD A NEW RASTER LAYER.
5- Flood fill that layer with your background colour.
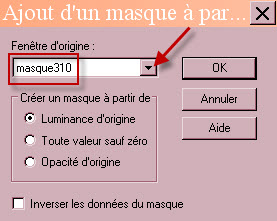
7- Open the mask 310 in your Psp and minimize it.
- Layers / New mask layer / from image / set as below :
- Adjust / Sharpness / Sharpen more.
- Layers / Merge group.
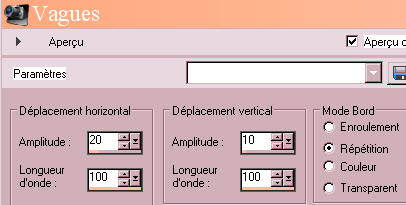
8- Effects / Distortion effects / Wave as below :
9- Layers / Duplicate.
- Image / Flip.
10- Selections / select all.
- Selections / Float.
- Selections / Defloat.
11- ADD A NEW RASTER LAYER. !!!!!!!!!
12- Set the foreground of your Material palette with another colour of your choice.
- I have chosen Red 851618.
13- Flood fill your selection, on that new layer, with your new foreground colour.
- Selections / Select none.
14- Close the eye of your layer "Copie de groupe raster 2".
- Lower the opacity of that layer "Groupe Raster 2" as shown below :
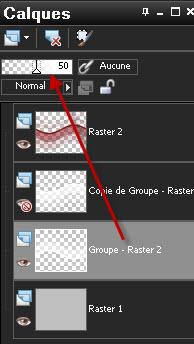
15- Activate the layer on top of the pile.
- Save your work !
...............................
We are now going to use these wavy lines to write our message on !
16- Activate your Pen tool (letter V) and set it like me :
- Choose Draw point to point, Bezier curves.

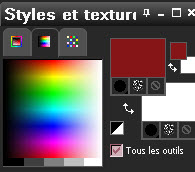
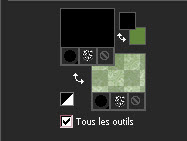
17- Set your Material palette like me :
- Close your background and set your foreground with black.
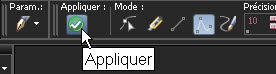
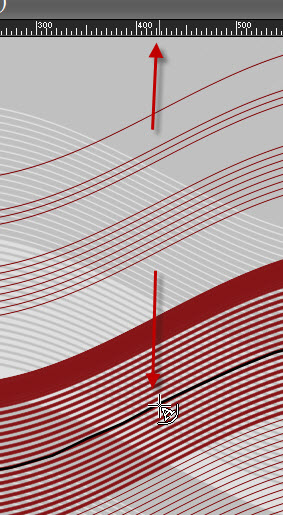
18- With your Pen tool, click all along one of those curvy lines in order to make a curved path for your writing.
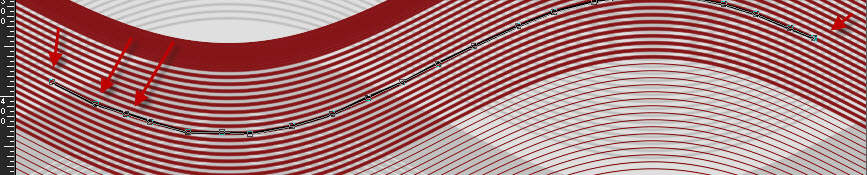
- When you have finished with it, Click on Apply as shown below :
- Save your work again ! Writing on curves may shut your Psp !
19- We are now going to write down on that vectorial line.
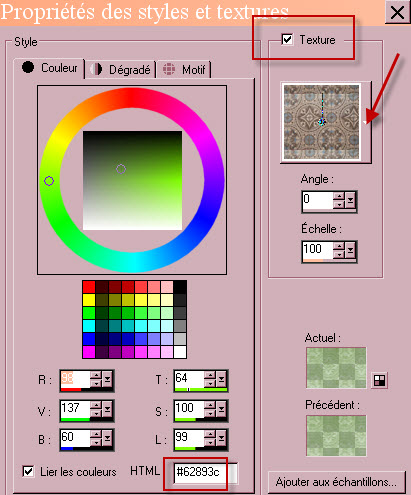
- Before writing, I have set my Material palette as below :
- Foreground : Black.
- Background : Green 62893c for me.
- I have added a texture effect on that background pattern as below :

20- Activate now your text tool and set it as below if you use the font Gill Sans Ultra Bold like me :

21- As I work with Psp 13, I have to add a new raster layer otherwise my writing will be done on the same layer as my wavy line !
- It is up to you to see if that new layer is necessary for you, depending on your Psp version.
- Click on the middle of your wavy line as shown below to start writing your text :
- Apply your text and convert your vectorial layer to a raster one.
(Layers / Convert to a raster layer).
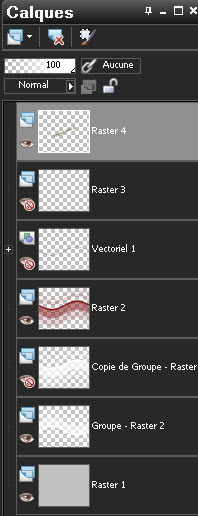
- Close the eye of the layer on which there is your wavy path.
- I have closed layer raster 3 that my Psp has created !
- You may delete these two layers if you prefer (raster 3 and Vectoriel) 1 !
22- Activate the layer on top of the pile.
- Layers / Duplicate.
- I have set the mode of that layer on to Dissolve.
23- In your layers palette, activate the layer just beneath:
- Effects / 3d effects / drop shadow of your choice / 2, 2, 70, 1 black for me.
24- Activate the layer on top of the pile.
- Layers / Merge down.
- Temporarily close the eye of that layer and activate the layer just beneath :

25- Open the tube "cadre-vignettes" in your Psp and copy it.
- Paste it as a new layer on to your tag.
26-You will have now to choose 6 images that match your colours and that mean something to you !
27- Open the first image of your choice, in your Psp.
28- Activate your rectangle selection tool and choose the "Square" shape.
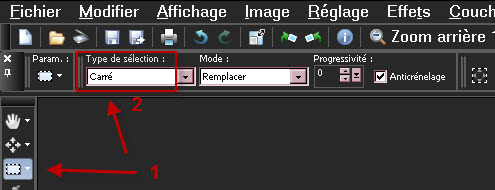
29- On that first image, draw a square on the best part of that image.
- Image / Crop to selection.
- Image / Resize so that this new square image is slightly larger than the square slide of the frame in which you are going to paste it.
- Copy that resized image.
30- On your tag : With your magic wand, set as below, click in the center of one of those slides of the white frame.
(Dont use, for the moment, the slides that are tilted !).

31- Selections / Modify / Expand by 5 pixels.
32- ADD A NEW RASTER LAYER.
33- Paste INTO THE SELECTION.
- Selections / Select none.
34- Layers / Arrange / Move down.
35- In your layers palette, activate the layer on which your white frame is.
36 - Repeat steps 29 to 35 with 3 other images and fill in all the slides that are not tilted.
37- For the tilted slides, we are going to work in a different way so they don't get distorted !
38 - On the first image, draw a square on the part of it that you like best.
- Image / Crop to selection.
- Image / Resize so that this new square image is slightly larger than the square slide of the frame in which you are going to paste it.
- Copy that resized image.
39- Paste that image as A NEW RASTER LAYER.
40- Layers / Arrange / Move down.
41- Image / Free rotate / 7 or 8 degrees on the right . Replace the image under the slide.
42- On your tag : With your magic wand, set as previously, click in the center of one of those tilted slides.
Selections / Modify / Expand by 5 pixels.
- Selections / Invert.
- On the layer of the image you have pasted : Hit the delete key of your keyboard.
- Selections / Select none.
43- In your layers palette, activate the layer on which your white frame is.
44- Repeat steps 38 to 42 with your second image.
45- Open the tube of the glasses "FM-Happy New Year Element-16" in your Psp and copy it.
46- Paste it as a new layer on to your tag.
- Place like me or to your liking.
47- Effects / 3d effects / drop shadow / - 2, - 2, 26,1, black.
48- Open the tube of the ribbon "FM-Happy New Year Element-39"in your Psp and copy it.
46- Paste it as a new layer on to your tag.
- Place like me or to your liking.
49- Effects / 3d effects / drop shadow / - 2, - 2, 26,1, black.
50- Open the tube of the clover "FM-Happy New Year Element-1"in your Psp and copy it.
46- Paste it as a new layer on to your tag.
- Place like me or to your liking.
47- Effects / 3d effects / drop shadow / - 2, - 2, 26,1, black.
53- Activate your text tool again, set as on point 20 :

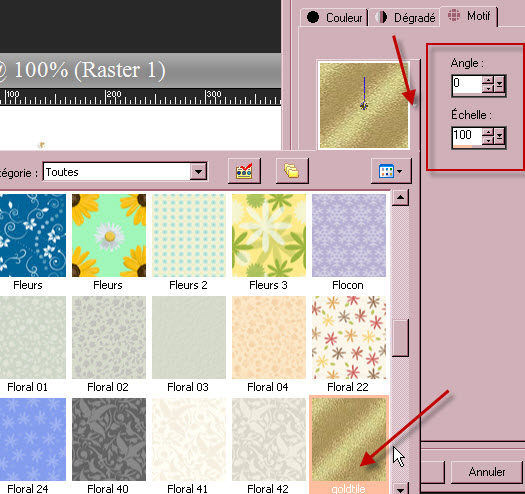
- Set your background with your "goldtile" pattern as shown below :

54- Write down : 2015 / Apply / Convert your vectorial layer into a raster one.
55- Effects / Plugins / Graphic plus / Cross shadow / 50, 50, 50, 50, 50, 50, 50, 128.
- Place your text at the right place.
56- Effects / 3d effects / drop shadow / - 2, - 2, 100, 1, white.
57- Effects / 3d effects / drop shadow / Shadow on new layer / 10, 4, 100, 20, green : 5e833a.
- I have set the mode of the shadow layer on to Dissolve and lowered its opacity at 65.
58- Go back on the layer where your writing is (2015) :
Effects / 3d effects / drop shadow / Shadow on new layer /- 10, - 4, 100, 20, green : 5e833a.
- I have set the mode of the shadow layer on to Dissolve and lowered its opacity at 82.
59- Activate the layer on top of the pile and open its eye so that you can see your message again.
60- Open the tube "Etoiles"in your Psp and copy it.
61- Paste it as a new layer on to your tag.
- Place in the top right hand side corner of your tag.
62- Layers / Duplicate.
- Image / Mirror.
- Image / Flip).
63- Apply your signature.
64 - Make sure everything is at the right place !
- Image / add some symmetrical borders of 1pixel with the colour of your choice:
- red 851618 for me.
65 - Image / add some symmetrical borders of 1pixel with the colour of your choice:
- green 62893c for me.
66- Image / add some symmetrical borders of 10 pixels with the colour of your choice:
- white for me.
67- Open the tube "deco haut"in your Psp and copy it.
68- Paste it as a new layer on to your tag.
- Place in the top left hand side corner of your tag
69- Open the tube "deco bas" in your Psp and copy it.
70-Paste it as a new layer on to your tag.
- Place in the bottom right hand side corner of your tag
71- Image / add some symmetrical borders of 20 pixels with the colour of your choice:
- red 851618 for me.
72 - Save your work as a jpeg file
*************************
That's it !! You've done it !!
If you 've enjoyed doing my tutorial, it would be nice to write a few words in my guest book !
If you 've had the slightest problem, please, send me a mail so I can see to the problem
Tutorial translated on the
***********************
You'll find some versions of that tag in my gallery Here