Thank you for putting a link to this tutorial, whenever you display your realization of that tag on a website, on a group or in a mail !
**************************
You'll find some versions of that tag in my gallery HERE
********************
To realize that tag, you'll need the plugin :
- Unplugged tools here
and the material zip down below :

**************
*It is forbidden to suppress watermarks on the material provided , to alter, mist or rename the tubes in order to respect the work of the tubers
- The tube of the persons is by PapyJack
The other elements have been found on the net
******************
Preparation
Duplicate your tubes, mask and image. Close the originals and minimize the copies for now
Place the textures in your Texture folder ( Unless they are already in that folder !)
*****************
Click here to print the tutorial
*******************
You can use my arrow to follow your work

***************
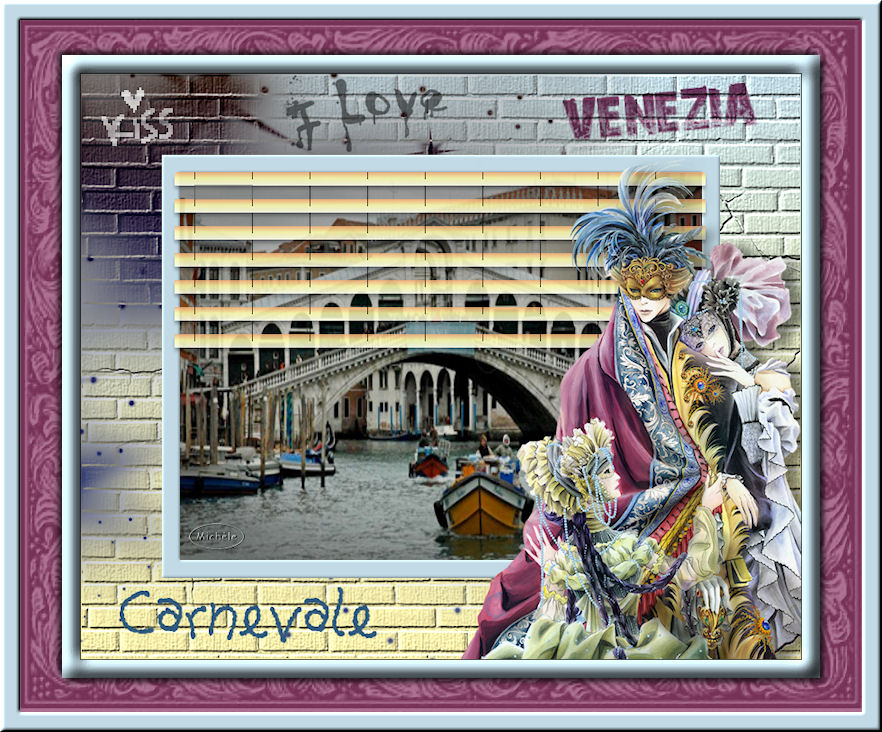
Open a new transparent image of 800 by 650 pixels
2- Set your colour palette with two colours matching your main tube
My choice : Foreground : colour faf0ac 
Background : colour c1dae5 
Set your foreground with a linear gradient as below !

3- Flood fill your transparent layer with that gradient
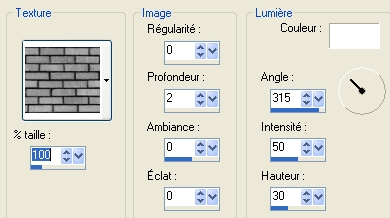
4- Effects /texture effects / Texture / Brique as below
5- Effects /texture effects / Texture / Crack06, same settings as above
6- Open the tube "fond" included in my zip file, copy it and paste it as a new layer
Effects / image effects / Offset as below :

You may have to change the mode of that layer ( Mine is on Exclusion ) according to the colours you have chosen !
7- Add a new raster layer and select all
8- Selections / modify / contract by 90 pixels
Flood fill that selection with one of the colours you have chosen
I have chosen my light blue background colour
9- Selections / modify / contract by 20 pixels
Hit the delete key of your keyboard
Keep the selection !
10- Add a new raster layer
Selections / Modify / expand by 5 pixels
Keep the selection !
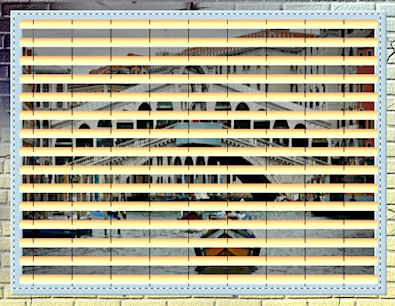
11- Open the image "la-place-saint-marc" or an image of your choice, copy it and paste it into the selection ( it will be pasted on your new layer )
Select none
Adjust / Sharpness / sharpen / if necessary
12- Layers / arrange / move down
Your picture is now underneath your frame
13- Activate, now, ( in your layer palette ) the layer where your frame is
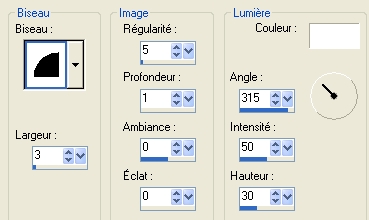
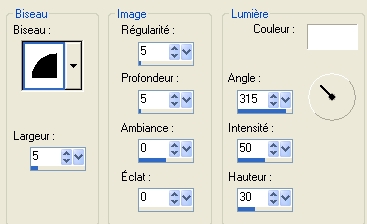
Effects /3d effects / inner bevel as below :
14- With your magic wand, set as below, select the inside of your frame

Selections / modify / expand by 5 pixels
15- Add a new raster layer
Flood fill that layer with a contrasting colour
(I have chosen a darker blue : 335a7e  but it doesn't really matter as it is going to be deleted later on )
Select none !
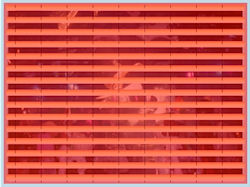
16- Effects /plugins / Unplugged tools / Jalusi as below :

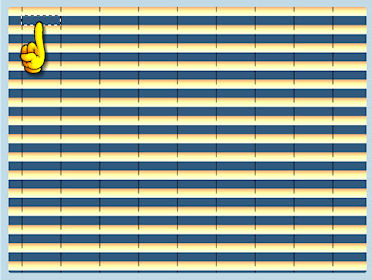
17- With your magic wand, selected as previously , select one of the gaps of the blind as shown down below :
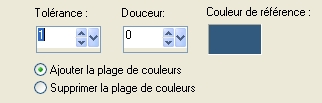
18- Selections / modify / Select colour range as below :
( The reference colour is the colour you have chosen on step 15 )
Hit the delete key of your keyboard
Select none
19- With your rectangular selection tool, set as below , draw a rectangle around your blind as shown down below :

20- Selections / Edit selection !!
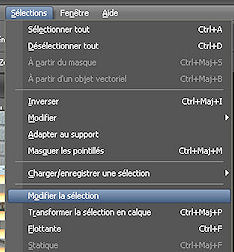
Your selection will become red !
21- Activate your Raster deform tool ( letter D) and pull down the handle as shown below
22- Selections / Edit the selection
You'll get your selection back !!
Hit the delete key in order to suppress the bottom part of your blind
Select none
Click on the move tool ( letter M) to get rid of the Deform tool
23- It is up to you now, to leave the blind where it is or to pull it down ( layers / move down ) so it looks behind the window frame
24- Effects /3d effects, on your blind / drop shadow as below :

I have lowered the opacity of that layer to 85
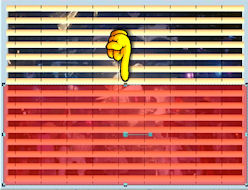
25- Open the tube Carnaval-PapyJack or a tube of your choice, copy it and paste it as a new layer
I have resized that tube at 65%
Place the tube at the right place ( in the bottom right hand side corner of the tag for me )
26- Effects / 3d effects / drop shadow of your choice
For me : 4, 15, 50, 20, black
27- Add a new raster layer
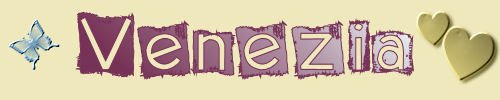
Activate your text tool and choose the font "28days left", size 60 to write your first word ( VENEZIA for me )

I have used these colours to write my word :
Foreground : ddc3d3
Background : 853a62
Place the text at the right place
- Image / free rotation / 5° / left
Set the mode ot that layer to Multiply
28- With your text tool, set as below, I have written Carnevale with the blue colour used on step 15

Place the word at the right place
29- You will have to add as many layers as words you want to write or brushes you want to apply, on the wall
It is up to you to play around with the modes and the opacity of your layers until you get something you like !
You may use my layers with brushes ( included in the zip ) if you wish
30- Add a new raster layer and apply your signature
31- Make sure everything is in the right place
Image / add some symmetrical borders of 1 pixel in black
The next part of the tutorial is optionnal ; you may decide to make a different border if you wish !!
*********
32- Image / add some symmetrical borders of 20 pixels with a colour of your choice
I have chosen my background colour ( pale blue ) used in step 2
33- With your magic wand , set as previously , select this border
Effects / 3d effects / inner bevel as below :

Select none
34- Layers / Promote Background layer
35- Image / resize at 90% ( Resize all the layers NOT checked )
36- Effects / 3d effects / drop shadow / 4, 4, 50, 8, black / do the same thing with - 4 vert and horiz
37- Add a new raster layer
Layers / arrange / move down
38- Flood fill that layer with a colour of your choice
I have chosen the colour 853a62 from step 27 that exists in the man's coat
39- Add a new raster layer and select all
Flood fill the selection in white
Selections / modify / contract by 50 pixels
Hit the delete key
Select none
40- Layers / new mask layer / from image / choose "maskdeco" / only check Source Luminance
Adjust / sharpness / sharpen more
Layers / Merge group
I have set the mode of that layer to Soft light / see what is best for you !
41- Image / add some symmetrical borders of 20 pixels with a colour of your choice ( light blue for me )
Select that border with your magic wand
42- Effects /3d effects / Inner bevel as below
Select none
43- Save your work as a jpeg file and resize your tag if necessary
***************
That's it !! You've done it !!
If you 've enjoyed doing my tutorial, it would be nice to write a few words in my guest book ! If you 've had the slightest problem, please, send me a mail so I can see to the problem !
Tutorial translated on the 13th of February 2010
*************
You'll find some versions of that tag in my gallery HERE