
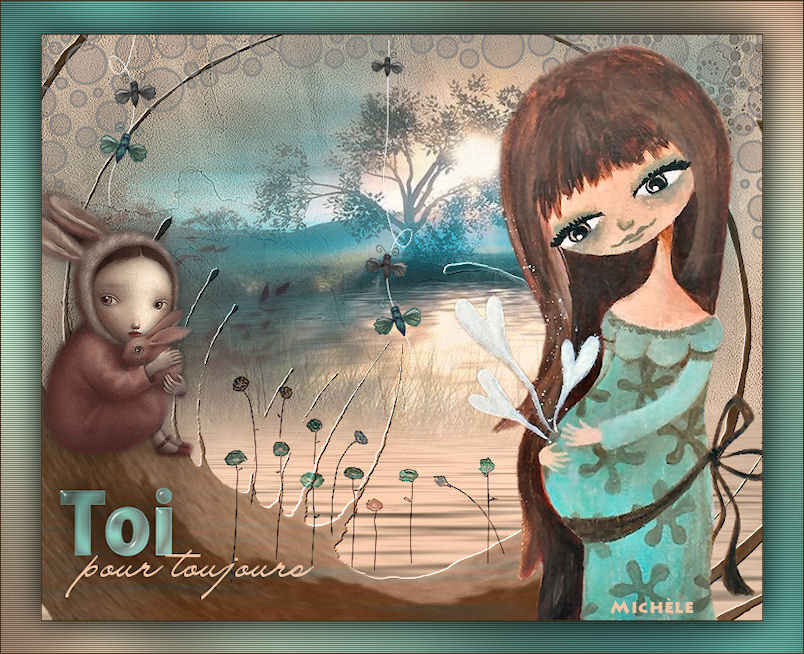
Thank you for putting a link to this tutorial, whenever you display your realization of that tag on a website, on a group or in a mail !
**************************
You'll find some versions of that tag in my gallery HERE
************************
To realize that tag, you'll need the plugins :
- Flaming Pear / Flood here
- Mura's seamless C / Emboss at alpha here
- Graphic plus / Cross shadow here
- Jeux de lignes / Entrelacement here
and the material zip down below :

**************
*It is forbidden to suppress watermarks on the material provided , to alter, mist or rename the tubes in order to respect the work of the tubers
- The tube of the woman is by Kikirou
- The tube of the scenery is by Guismo
You can find some of her tubes on Dakara's site here or join her sharing group here
- The tube of the little girl and the Background are by JHanna
you can join in her sharing group here
The other elements have been found on the net
******************
Preparation
Duplicate your tubes. Close the originals and minimize the copies for now.
*****************
Click here to print the tutorial
*******************
You can use my arrow to follow your work

***************
1- Open a transparent image of 800 by 650 pixels
2- Set your colour palette with two colours of your choice
My choice : Foreground : colour 9d8b77 
Background : colour ffd3b5 
Set your foreground with a sunburst gradient set as below
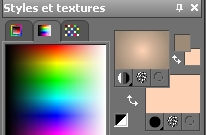
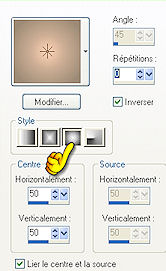
3- Flood fill your transparent layer with your gradient
4- Effects / plugins / Flaming pear / Flood with these settings :
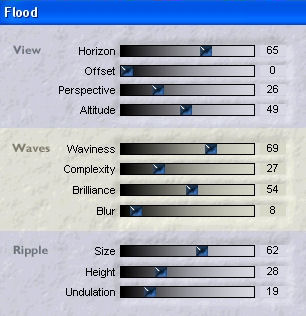
5- Add a new raster layer and select all
6- Open the picture "JHanna_131 bground.jpg" or a background of your choice, copy it and paste it as a new layer
Select none
Set the mode of that layer to Luminance Legacy ( I have lowered the opacity to 65 )
7- Open the scenery tube " calguismistscenery2499" or a big tube of your choice, copy it and paste it as a new layer
I have slightly changed the colour of that tube to match my main tube, in that way :
- Adjust / Hue and saturation / Hue map

8- Effects / image effects / Offset as below :

9- Open the tube "ditab blot1b.pspimage", copy it and paste it as a new layer
Set the mode of that layer to Luminance Legacy
10- Effects / distortion effects / Polar coordinates / check Rectangular to polars and Transparent
11- Effects / Plugins / Mura's seamless / Emboss at alpha default
12- Open the tube "Jen-fleurs"of your choice, copy it and paste it as a new layer
For my tube : image effects / Offset as below :
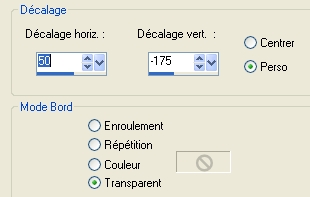
I have set the mode of that tube to Difference to get a turqoise colour in harmony with the other tubes !
- You may choose to use a brush of your own on a new layer !
13- Open the tube "ronds" or a decorative tube of your choice, copy it and paste it as a new layer
I have placed my tube in that way :
Effects / image effects / Offset as below :
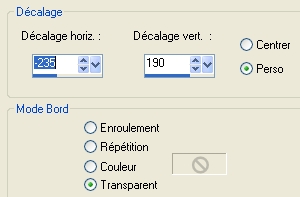
I have set the mode of that layer to Exclusion and lowered its opacity to 40
It is up to you to find the mode and the opacity that suits your tag, according to your own colours !
14- Layers / Duplicate
Image / Mirror
15- Open the tube "JHanna_85a.pspimage"or a tube of your choice, copy it and paste it as a new layer
I did : Image / mirror and have resized my tube by 50% ( Adjust / sharpness / sharpen
Place the tube at the right place
16- Effects /3d effects / drop shadow / 0, -1, 40, 42, black
17- Open the tube "kikirou1366_pregnant_les_toiles_daz.pspimage"or a tube of your choice, copy it and paste it as a new layer
Place the tube at the right place
18- Apply on your tube a drop shadow of your choice
I repeated the drop shadow used on step 16
19- Open the tube "sbs_wufreebie_border2.pspimage"or a tube of your choice, copy it and paste it as a new layer
Place at the right place ( on the top left hand side or your tag )
I have duplicated that tube / Image / mirror and I have moved the copy towards the right
20- Open the tube texte "titre1_toi_fairymist.pspimage" , copy it and paste it as a new layer
Place at the right place
Repeat that step on the tube "titre2_toi_fairymist.pspimage
- You may prefer to write your own text or use a tube or a brush of your choice !
21- Add a new raster layer and apply your signature
22- Make sure everything is in place
Image / add some symmetrical borders of 1 pixel with a colour of your choice
I have chosen a dark brown : 45321d
23- Layers / Promote Background layer
24- Image / resize at 90% ( Resize all the layers NOT checked )
25- Effects /3d effects / drop shadow / 0, 0, 100, 50, black
26- Add a new raster layer
Layers / arrange / move down
27-Set your colour palette with two colours matching your tag
My choice : Foreground : colour 70c2b3
Background : colour f3c4a4
Set your foreground with a linear gradient as follows :
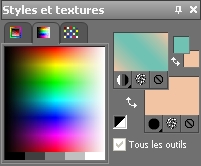
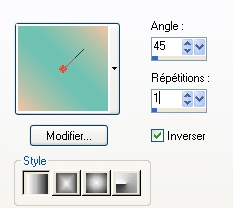
28- Flood fill your transparent layer with that gradient
29- Effects /plugins / Graphic plus / cross shadow default
30- Effects / plugins / Jeux de lignes / Entrelacement as below :
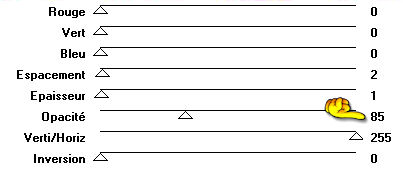
31- Image / add some symmetrical borders of 1 pixel with a colour of your choice
I have chosen a dark brown : 45321d
32- Save your work as a jpeg file and resize it if necessary
***************
That's it !! You've done it !!
If you 've enjoyed doing my tutorial, it would be nice to write a few words in my guest book !
If you 've had the slightest problem, please, send me a mail so I can see to the problem !
Tutorial translated on the 10th of April 2010
*************
You'll find some versions of that tag in my gallery HERE
****************
