
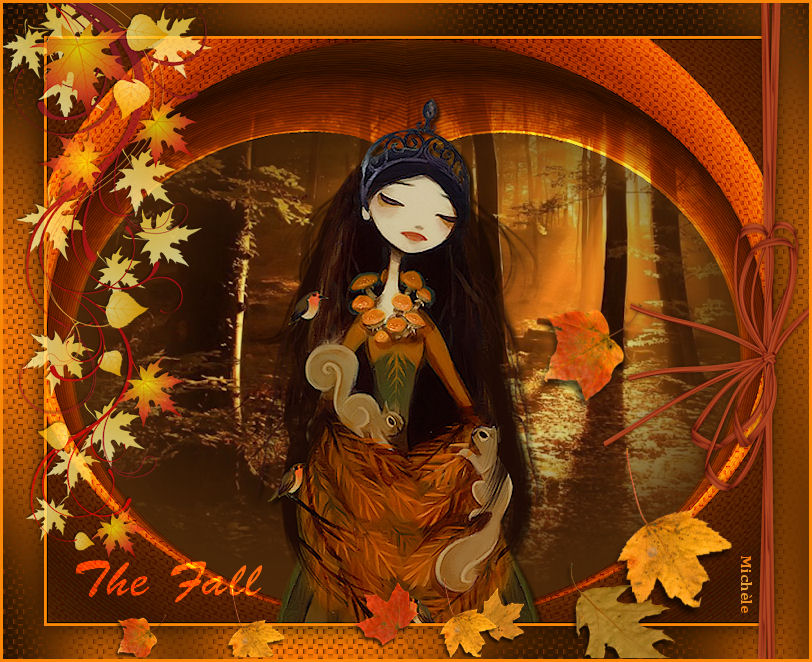
Other versions of that tag
***********************
To realize that tag, you'll need the plugins :
- Filters Unlimited / Paper textures
- Graphic plus / cross shadow
and the material zip down below :

**************
*It is forbidden to suppress watermarks on the material provided , to alter, mist or rename the tubes in order to respect the work of the tubers
- The tube of the woman is by Jhanna
You'll be able to get her tubes by joining in her sharing group here
-The tube of the scenery is by Guismo
You'll be able to find her tubes on Dakara' s site here
and you can join in her sharing group here
- The floral decoration element is by Katussia
The other elements have been found on the net
******************
Preparation
- Duplicate your tubes and image. Close the originals and minimize the copies for now.
- Put the selections into your Psp selection folder
- Place the gradient in you Psp gradient folder
-Put the picture tube in your Psp picture tube folder
*****************
Click here to print the tutorial
*******************
You can use my arrow to follow your work

***************
1- Ouvrir une image transparente de 800 par 650 pixels
2- Set your colour palette with two colours matching your main tube
My choice : Foreground : light colour e f47502
Background : dark colour 4a2708
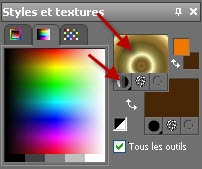
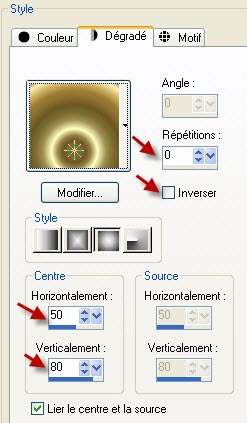
Set your foreground with a sunburst gradient " Laiton métallique" as below :
3- Flood fill your transparent layer with your dark background colour ( right click )
4- Add a new raster layer
Flood fill that new layer with your foreground gradient " laiton métallique" ( left click )
5- Set the mode of that layer to Overlay or a mode of your choice
6- Effects / plugins / Filters Unlimited 2.0 / Paper textures / Striped paper, coarse / 74, 87
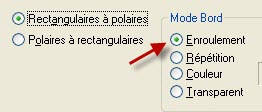
7- Effects / distortion effects / Polar cordinates as below :
8- Selections / load a selection / from disk / choose "fairymist_thefall1.PspSelection" / check Source Luminance and Replace the selection
Hit the delete key of your keyboard to suppress the inside of your selection
Keep the selection !
9-Add a new raster layer
Activate the scenery tube "calguismistforet5910.pspimage" or a tube of your choice, copy it and paste it into the selection
Select none
10- Layers / arrange / move down
11- Activate your top layer
Layers / duplicate
12- Effects / distortion effects / Polar cordinates as on step 7
13- Layers / duplicate
Layers / Merge down
14- With your selection tool, set as below, select the shape which is in the middle of your layer as below

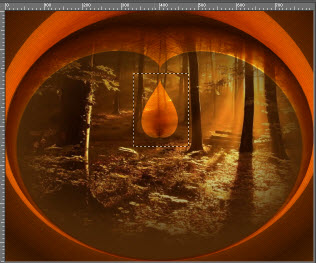
Hit the delete key of your keyboard to suppress the unwanted shape
Select none
15- Activate layer raster 2 as below
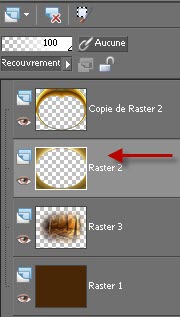
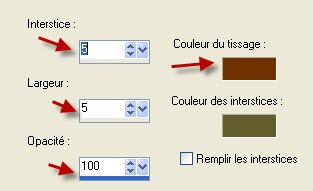
Effects / texture effects / weave as follows ( weave color lighter than your dark colour : 723000 )
16- Activate now your top layer
Activate the tube " JHanna_375 tube©Krista Huot.pspimage" or a tube of your choice, copy it and paste it as a new layer
Place to your liking
17- Effects /3d effects / drop shadow of your choice / 4, 4, 70, 5, black for me
18- Make sure everything is in the right place
Image / add some symmetrical borders of 3 pixels with a colour of your choice ( Yellow fa8707 for me )
19-Layers / Promote Background layer
20- Image / resize at 90 °% (Resize all the layers NOT checked )
21- Effects / 3d effects / drop shadow / 0, 0, 80, 40, black
22 - Add a new raster layer
Layers / arrange / move down
23- Set your colour palette like that ( same colours as on step 2)
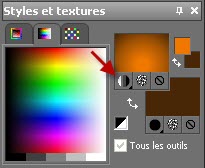
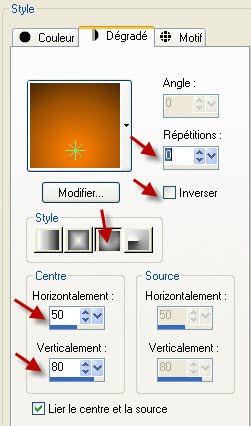
24- Flood fill that transparent layer with your foreground gradient
25- Effects / plugins / Graphic plus / Cross shadow as below
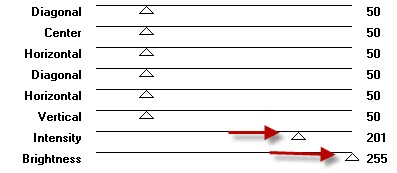
You may have to change these settings according to your own colours !
26- Effects / texture effects / weave as on step 15
27- Activate your top layer !
Activate the tube " ifel17 bv.pspimage"or a tube of your choice, copy it and paste it as a new layer
Place as on my tag or to your liking
28- Effects /3d effects / drop shadow / 0, 0, 50, 5, black
29- Activate the tube " The_fall_Autumn_Ornaments1.pspimage"or a tube of your choice, copy it and paste it as a new layer
Place as on my tag or to your liking
30- Activate the tube "titre_the_fall_fairymist.pspimage", copy it and paste it as a new layer
I set that layer on the Dodge mode , but it is up to you to see what mode you prefer
You can write your own title or don't put any at all !
31-Add a new raster layer and apply your signature
32-Add a new raster layer
Activate the picture tube tool set as below

Apply the picture tube "Feuilles d'automne" on several layers , changing the scale of the picture to get different sizes
Place your leaves like me or to your liking
33- Make sure everything is in the right place
Image / add some symmetrical borders of 3 pixels with a colour of your choice ( Yellow fa8707 for me )
34- Save your work as a jpeg file and resize it if necessary
***************
That's it !! You've done it !!
If you 've enjoyed doing my tutorial, it would be nice to write a few words in my guest book !
If you 've had the slightest problem, please, send me a mail so I can see to the problem !
Tutorial translated on the 9th of october 2010
*************
Other versions of that tag
