
Thank you for putting a link to this tutorial, whenever you display your version of that tag on a website, on a group or in a mail !
**************************
You'll find some versions of that tag in my gallery Here
***********************
To make that tag, you'll need the filters :
- Filters Unlimited 2.0.
- FM Tile Tools / Blend Emboss.
and the material zip down below :

**************
*It is forbidden to suppress watermarks on the material provided , to alter, mist or rename the tubes in order to respect the work of the tubers
- The other elements that I haven't created, have been found on the net.
******************
Preparation
To be on the safe side, duplicate your tubes and image in your Psp :
-
Window / Duplicate
- Close the originals and work with the copies !
*****************
Click here to print the tutorial
**********************
You can use my arrow to follow your work
Click on it and drag it all along the tutorial !

***************
Tutorial made with PSP 2018
********************
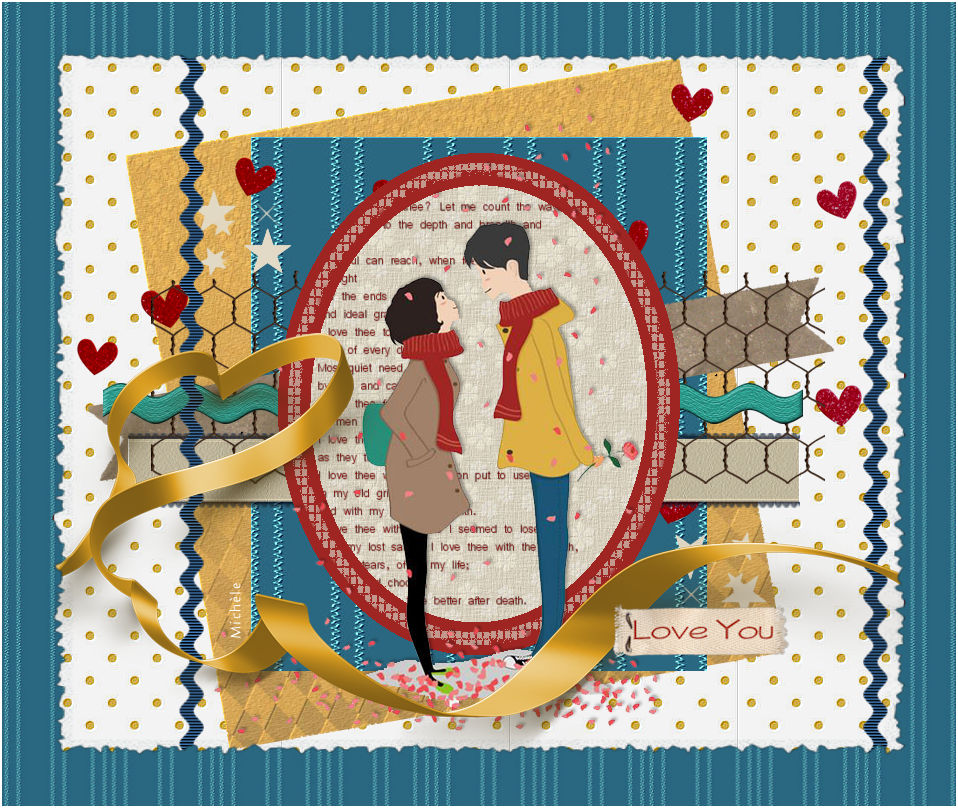
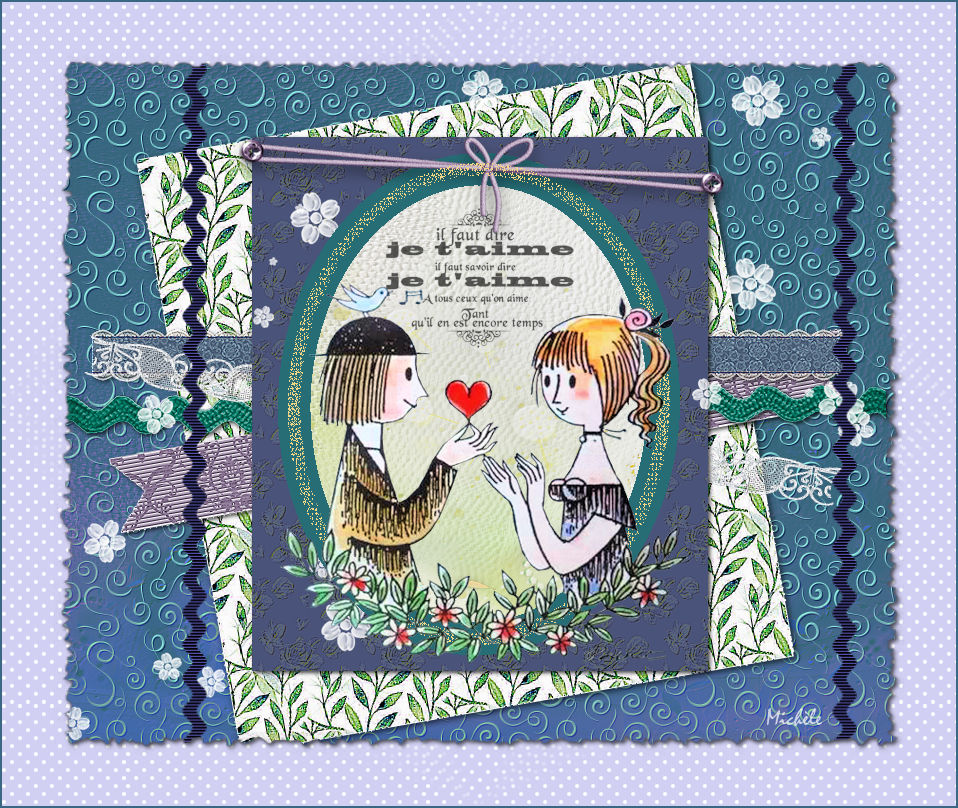
1 - Open my file "tagtemplatestvalentin.psp image".
- Window / Duplicate.
- Close the original file.
- Save the copy of the file and name it as you wish.
2- In your Layers palette, activate the layer RASTER 1.
- Flood fill that layer with a pattern of your choice.
- I have chosen the pattern just below.
- Open that square tile "Pois jaunes" or the tile of your choice, in your PSP and minimize it.
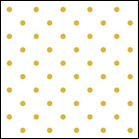
- In your Material palette, click on the tab Pattern of your foreground :
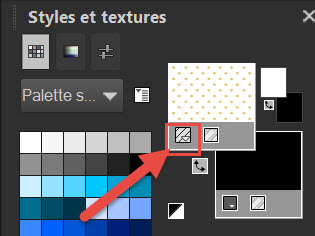
- Look for the tile "Pois jaunes" as shown below :
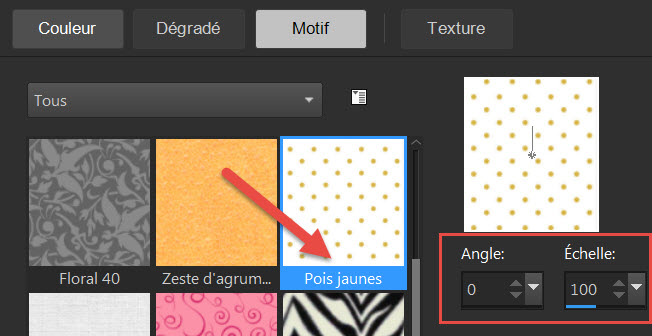
- On your work, flood fill Raster 1 with that pattern.
3 - On that new dotted background, I have applied an emboss effect :
- Effects / Plugins / FM Tile Tools / Blend Emboss default.
4- In the Layers palette, activate layer RASTER 2.
- With your magic wand, set as below, select the grey rectangle of that layer.

5- Flood fill that selection with a pattern of your choice
or paste into that selection, like me, a background ("Paper 1") on Raster 2.
- Selections / Select none.
6- I have applied an emboss effect on Raster 2 :
- Effects / Plugins / FM Tile Tools / Blend Emboss default.
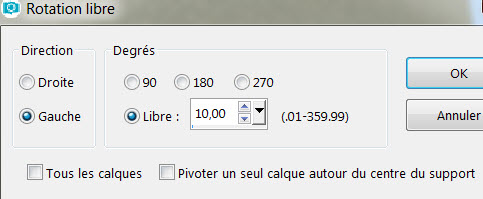
7- Image / Free rotate of your choice or like me :
8- I have slightly moved that layer towards the left hand side of the tag :
- Effects / Image effects / Offset / - 25 / 0 / Boxes Custom and transparent checked.
9- In your Layers palette, activate Layer RASTER 3.
- With your magic wand set as before, select that new grey rectangle.
10- Flood fill that selection with a pattern of your choice
or paste into the selection a background like me ("Paper 2") on Raster 3.
- Selections / Select none.
- You may apply a rotation of that layer if you wish. I left mine as it is.
11- Open the tube "Coeurs" or a similar tube of your choice in your PSP and copy it.
- Paste it as a new layer (Raster 4).
- That tube may be colorized.
- I have moved my tube with hearts that way :
- Effects / Image Effects / Offset / -50 / 100 / Boxes Custom and transparent checked.
12- In your Layers palette, activate Layer RASTER 5.
- With your magic wand set as before, select that new grey rectangle.
13- Flood fill that selection with a pattern of your choice.
- I have chosen the pattern " Brun tacheté".
- Open the square tile "Brun tacheté" or the tile of your choice, in your PSP and minimize it.
- In your Material palette, click on your foreground and look for the chosen tile.
- Flood fill the selection with that pattern.
- Selections / Select none.
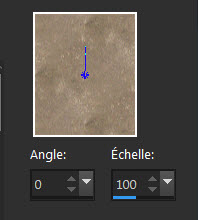
- I have applied the following rotation on that layer :
14- Open the tube "Ruban 1" or a similar tube of your choice in your PSP and copy it.
- Paste it as a new layer on your tag (Raster 6).
- Place it like me or to your liking.
15- Open the tube "Grillage"or a similar tube of your choice in your PSP and copy it.
- Paste it as a new layer on your tag (Raster 7).
- Place it like me or to your liking.
16- Open the tube "Ruban zig zag horizontal" or a similar tube of your choice in your PSP and copy it.
- Paste it as a new layer on your tag (Raster 8).
- Place it like me or to your liking.
17- In your Layers palette, activate Layer RASTER 9 where there is a white oval.
- With your magic wand, set as before, select that white oval.
18- Flood fill the selection with a discrete pattern of your choice.
- I have chosen the pattern " Fleurs beiges".
- Open the square tile "Fleurs beiges" or a tile of your choice, in your PSP and minimize it.
- In your Material palette, click on your foreground and look for the chosen tile.
- Flood fill the selection with that pattern.
- Keep Selection !
19- Open the tube "Texte"or a text of your choice in your PSP and copy it.
- Paste it INTO THE SELECTION, on your painted oval.
20- In your Layers palette, activate Layer RASTER 10 that contains a black oval frame.
- With your magic wand, set as before, select that black oval frame.
21- Flood fill that selection with a colour of your choice.
- I have chosen the red colour "9f2522 ".
- Keep selection !
22- Selections / Modify / Contract by10 pixels.
- Selections / Promote selection to Layer (Raster 11).
23- Flood fill that selection with a colour of your choice (My choice : Beige d2cbbb).
- Keep selection !
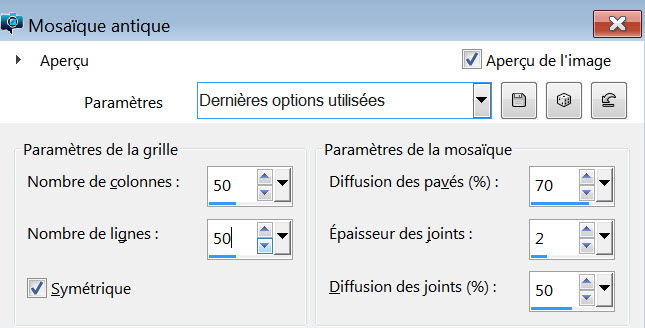
24- Effects / Texture Effects / Mosaic- Antique as below :
- Selections / Select none.
- I have lowered the opacity of that layer at 70.
25- Open the tube "Couple"or a similar tube of your choice in your PSP and copy it.
- Paste it as a new layer on your tag (Raster 12).
- Place it like me or to your liking.
26- Open the tube "Stars"or a similar tube of your choice in your PSP and copy it.
- Paste it as a new layer on your tag (Raster 13).
- Place it like me or to your liking.
- I have duplicated that layer and did this :
- Image / Mirror.
- Image / Flip (Raster 14).
27- Open the tube "Ruban zig zag vertical" or a similar tube of your choice in your PSP and copy it.
- Paste it as a new layer on your tag (Raster 15).
- Place it like me or to your liking.
- I have duplicated that layer and did this :
- Image / Mirror (Raster 16).
- Place that tube like me, not too near the right hand border of your tag !
28- Open the tube "Ruban 2" or a similar tube of your choice in your PSP and copy it.
- Paste it as a new layer on your tag (Raster 17).
- Place it like me or to your liking.
29- Open the tube "Message" or a similar tube of your choice in your PSP and copy it.
- Paste it as a new layer on your tag (Raster 18).
- Place it like me or to your liking.
30- You can now add some slight drop shadows on your tubes or images if you wish.
- I have only added a shadow on the tube of the couple (2, 2, 32, 8, black).
- Apply your signature.
31- Image / Add some symmetrical borders of 8 pixels with a colour of your choice
(white for me). That border will be delete later on !
32- Layers / Promote background layer.
33- Effects / Plugins / Filters Unlimited 2.0 / Edges, Square / Square Edge 17.
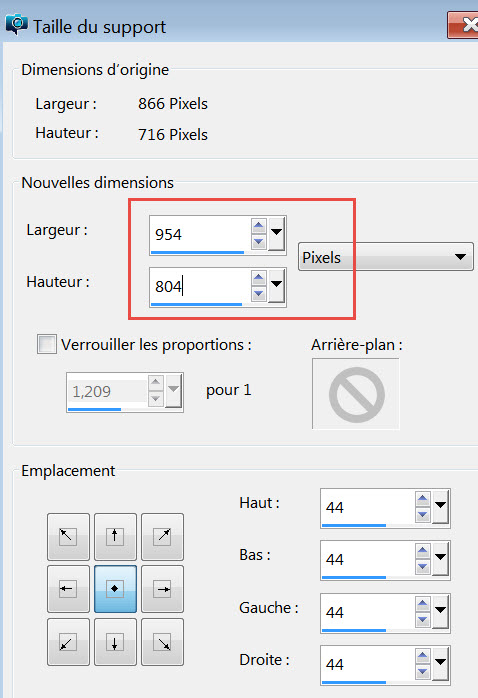
34- Image / Canvas size / Set as below :
- ADD A NEW RASTER LAYER.
- Layers / Arrange / Send to Bottom.
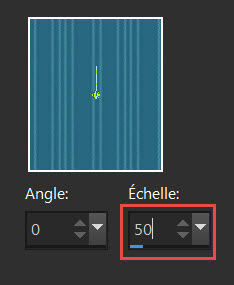
35 - Open the square tile "Bleu rayé" or a tile of your choice, in your PSP and minimize it.
- Click on your foreground and look for the chosen tile.
- Flood fill your new layer with that pattern (Scale 50)
36- Image / Add some symmetrical borders of 1 or 2 pixels with a colour of your choice
(white for me).
37- Save your work as a jpg file.
***************
That's it, you have done it !
If you have the slightest problem, don't hesitate to get in touch with me !
Tuto translated on the 12th of february 2018
*************
My second version of that tutorial
You'll find some versions of that tag in my gallery Here