
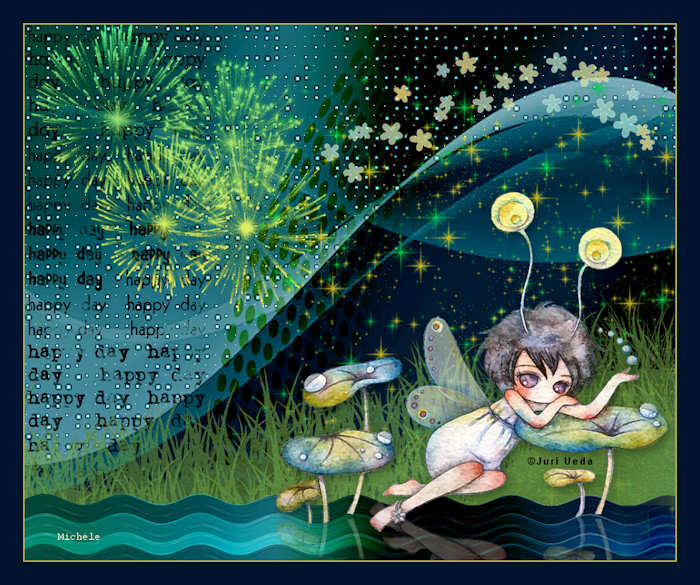
Thank you for putting a link to this tutorial, whenever you display your realization of that tag on a website, on a group or in a mail !
**********************
You'll find some versions of that tag in my gallery HERE
******************************
To realize that tag, you'll need the plugin :
- VM Natural / acid rain
and the material zip down below :

**************
*It is forbidden to suppress watermarks on the material provided , to alter, mist or rename the tubes in order to respect the work of the tubers
- The tubes of the stars and the fireworks are elements from the Freebie Brazil kit from Addictive Pleasure that you can download here
- The tubes coming from the Happy day kit by Jaelop Designs can be downloaded here
- The tube of the girl, made from a picture by Juri Ueda is by Kikirou.
The other elements that I haven't created, have been found on the net.
******************
Preparation
- To be on the safe side, duplicate your tube and image in your Psp :
-
Window / Duplicate
- Close the originals and work with the copies !
- Place the files "fairymist_stanis_1.PspSelection" and "fairymist_stanis_2.PspSelection" in the Selection folder of your Psp files.
*****************
Click here to print the tutorial
**********************
You can use my arrow to follow your work
Click on it and drag it all along the tutorial !

*************************
Tutorial realized with PSP XIII

Step 1 : The background of the tag
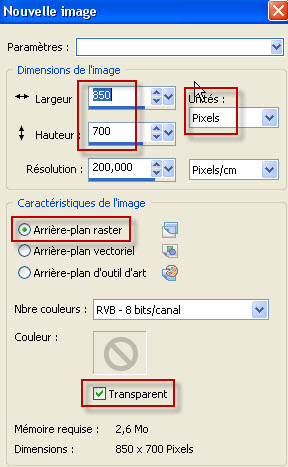
1 - Open a new transparent image of 850 by 700 pixels.
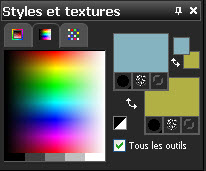
2 - Set your Material palette with two colours out of your main tube, as below :
My choice : Foreground : colour 86b3bf
Background : colour b1b046
3 - Flood fill your transparent image with your foreground colour .
4- Selections / load a selection / from Disk / Choose "fairymist_stanis_1.PspSelection" and set as below :

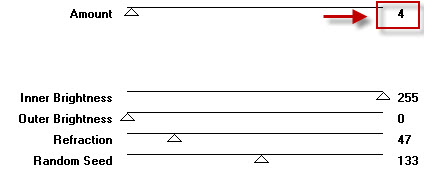
5- Effects / plugins / VM Natural / Acid rain as below :
- Deselect all.
6- ADD A NEW RASTER LAYER.
- Flood fill that new layer with your background colour .
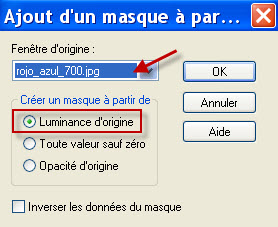
7- Layers / New mask layer / from image / Choose "rojo_azul_700.jpg" and set as below :
- Adjust / Sharpen / Sharpen more.
- Layers / Delete / Answer yes.
- Layers / Merge group.
- I have set the mode of that layer on to Burn . It is up to you to see which mode suits you better.
8-ADD A NEW RASTER LAYER.
- Flood fill that new layer with that dark colour : 3f3c36 
9- Layers / New mask layer / from image / Choose "ondas_700.jpg" and set as previously.
- Adjust / Sharpen / Sharpen more.
- Layers / Delete / Answer yes.
- Layers / Merge group.
- I have set the mode of that layer on to Burn . It is up to you to see which mode suits you better.
10- Layers / Merge all.

Step 2 : Stars and text
1- Open the tube "sparkles.pspimage" and copy it.
2- Paste it as a new layer on to your tag.
- I have placed the tube as shown below :
- Effects / image effects / offset as below :

3- If those stars don't match your colours, use the effect "Hue map " to change the colours ( if you use the colorize effect, you will only get one colour!) :
- Adjust / Hue and saturation / Hue map:
- To start with, click on the Default settings !
- Then play with the different cursors until you get a result you like !

4- Open the tube "wordart 3.pspimage" or a similar tube of your choice and copy it.
5- Paste it as a new layer on to your tag.
- I have resized my tube at 25%. ( Resize all the layers NOT checked )
- Place the tube against the left hand side of your tag.
- I have set the mode of that layer on to Multiply .It is up to you to see which mode gives the nicest effect.

Step 3 / The scenery
THE GRASS
1- Open the tube "grass.pspimage" or a similar tube and copy it.
2- Paste it as a new layer on to your tag.
- I have placed the tube as shown below :
- Effects / image effects / offset as below :

- You may colorize the grass if green doesn't match your colours !
*******
THE WAVES
3- Activate the layer at the bottom of the pile (Background )
- Selections / loade a selection / from Disk / choose "fairymist_stanis_2.PspSelection" and set as for the previous selection.
4- Selections / Promote selection to layer.
- Deselect all.
5- Image / Flip
6- Layers / Arrange / Bring to top.
7- Effects / Distortion effects / wind as below :

8- Effects / Distortion effects to the right this time !!
9- Effects / Distortion effects / wave as below :

10 - Effects / image effects / offset as below :
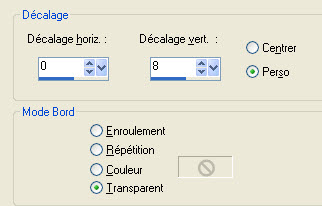
11- Layers / Duplicate.
12- Effects / image effects / offset as above but with these figures : 0, - 25
I have set the mode of that layer on to Screen and lowered its opacity at 85 .
13- Layers / Duplicate.
14- Effects / image effects / offset avec les chiffres : 0, - 25
I have set the mode of that layer on to Screen and lowered its opacity at 85 .
15- Layers / Duplicate.
16- Effects / image effects / offset with these figures: 0, - 15
I have left the mode of that layer on to Normal but lowered its opacity at 85
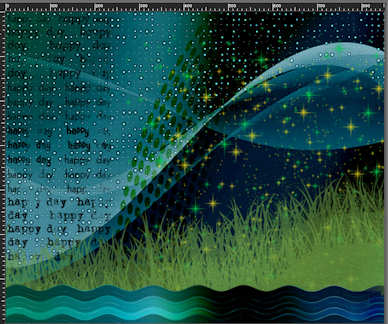
- It is really up to you to see which modes and which opacities are the best for these four wave layers!
Here is my choice :

THE FIREWORKS
17- Open the tube "fireworks.pspimage" or a tube of your choice and copy it.
18- Paste it as a new layer on to your tag.
- I have resized that tube at 75% ( Resize all the layers NOT checked )
- Place the tube in the top left hand side corner of your tag.
- You may use the Hue map effect, once more, to change the colours of my tube.
THE FLOWERS
19- Open the tube " 23.pspimage"or a tube of your choice and copy it.
Paste it as a new layer on to your tag.
- I have resized the tube at 25% and then at 50% ( Resize all the layers NOT checked )
20- Afterwards, I did :
- Image / Flip
- Image / Mirror
- Image / Free rotation : 45 left .
- Place the tube as on my tag.
- I have lowered the opacity of that layer at 80. See what is best for you !

Step 4 : The girl
1- Open the tube "KikiRou05.pspimage"or a tube of your choice and copy it.
2- Paste it as a new layer on to your tag.
- Place it as on my tag.
3- With your free hand selection tool, set as below, select the part of the stems of the leaves as shown below :


- Hit the delete key of your keyboard to delete the selected parts. Deselect all.
4- Effects / 3d effects / drop shadow of your choice / 4, 4, 40, 20, black for me
5- Layers / Duplicate.
6- Image / Flip
7- Move that copy down at the bottom of the tag, under the girl's legs and lower the opacity of that layer to your liking ( 30 for me ) to create the shadow in the water.
8- Layers / Arrange / Move down.

Step 5 : The borders
1 - Apply your signature
2 - Image / add some symmetrical borders of 2 pixels with a light colour of your choice :
b1b046 for me
3 - Image / add some symmetrical borders of 30 pixels with a dark colour of your choice :
00132c for me.
4 - Save your work as a jpeg file and resize it if necessary .
***************
That's it !! You've done it !!
If you 've enjoyed doing my tutorial, it would be nice to write a few words in my guest book !
If you 've had the slightest problem, please, send me a mail so I can see to the problem.
Tutorial translated on the 24th of March 2012
*************
You'll find some versions of that tag in my gallery HERE
*************
