
Thank you for putting a link to this tutorial, whenever you display your realization of that tag on a website, on a group or in a mail !
**************************
You'll find some versions of that tag in my gallery here
***********************
To make that tag, you'll need the plugins :
- Filters Unlimited 2.0
- Alien Skin Eye Candy 5 / Impact.
- VDL Adrenaline / Snowflakes
and the material zip down below :

**************
*It is forbidden to suppress watermarks on the material provided , to alter, mist or rename the tubes in order to respect the work of the tubers
- The tube of the children is by Alas. Gracias a mi amigo !
- The tube of the bird is by Luzcristina.
- The other elements that I haven't created, have been found on the net.
******************
Preparation
To be on the safe side, duplicate your tubes and image in your Psp :
-
Window / Duplicate
- Close the originals and work with the copies !
- Double click on the Alien skin preset, it will install itself automatically.
- Place the pattern in the pattern folder of your Psp files.
*****************
Click here to print the tutorial
**********************
You can use my arrow to follow your work
Click on it and drag it all along the tutorial !

***************
Tutorial made with PSP XIII
.........................
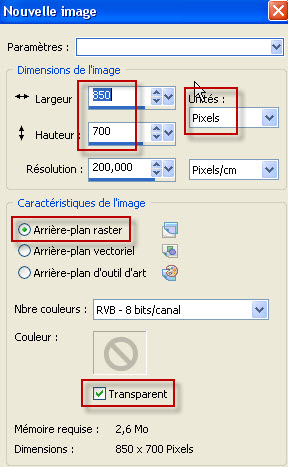
1 - Open a new transparent image of 850 by 700 pixels

2 - Select all.
3- Open the image "Paysage" or a scenery image of your choice in your Psp and copy it.
4- Paste it INTO THE SELECTION.
5- Keep selection !
- Selections / modify / Contract by 50 pixels.
- Selections / INVERT.
6- Set your Material palette with the pattern " Corel 08-074" called Beach or a pattern of your choice :

- I have set my pattern size to 25 but it is up to you to choose which size pattern suits you best.
7- ADD A NEW RASTER LAYER.
- Flood fill the selection, on that new layer, with your pattern
- DESELECT ALL.
8- Effects / Plugins / Filters Unlimited 2.0 / Convolution Filters / Engraver / 107, 175, 51.
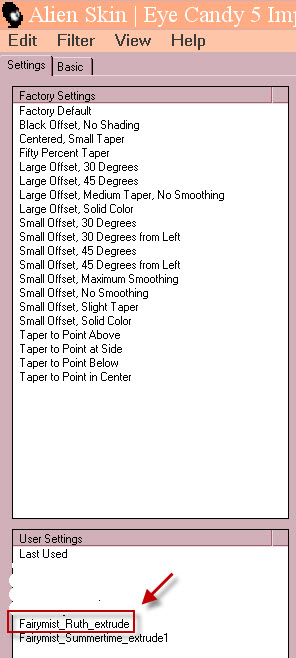
9- Effects / Plugins / Alien skin eye candy 5 / Impact / Extrude :
Click on the Fairymist_Ruth_extrude preset as shown down below :

10- Image / Mirror.
- Image / Flip.
- I have set the mode of that layer on to Luminance legacy and lowered its opacity at 75.
11- Effects / 3d effects / drop shadow / 4, 4, 60, 20, black.
12- Open the tube " happy holidays" or a tube of your choice , in your Psp and copy it.
13- Paste it as a new layer on to your tag.
- Place it like me or to your liking (not too close the bottom border of the tag).
14- Layers / Duplicate
- Image / Flip.
- Place the tube under the children's feet (shadow).
- Layers / arrange / Move down.
- I have set the mode of that layer on to Burn and lowered its opacity at 40.
15- Open the tube of the bird "198-Luzcristina"in your Psp and copy it.
16- Paste it as a new layer on to your tag.
- I have resized the tube at 40% (Resize all the layers NOT checked).
- Place it like me or to your liking
17- Effects / 3d effects / drop shadow of your choice / - 4, - 4, 40, 10, black for me.
18- ADD A NEW RASTER LAYER.
- We're now going to make some rain !
- I have found the way to make snow on this site :
http://tutographcity.canalblog.com/archives/2009/02/26/12723112.html
19- Effects / Plugins / VDL Adrénaline / Snowflakes as below :

- If you wish to have a lighter rain as me, you will have to use smaller numbers on Amount and Hardness !
20- Adjust / Blur / Motion blur as below :

- In your layers palette, close that first rain layer and call it Rain 1.
21- ADD A NEW RASTER LAYER.
- Effects / Plugins / VDL Adrénaline / Snowflakes as below :

22- Adjust / Blur / Motion blur as previously.
- In your layers palette, close that second rain layer and call it Rain 2.
23- ADD A NEW RASTER LAYER.
- Effects / Plugins / VDL Adrénaline / Snowflakes as below :

24- Adjust / Blur / Motion blur as previously.
- In your layers palette, close that third rain layer and call it Rain 3.
25- Activate Raster 2 (your frame with the pattern) :
- Layers / Arrange / Place at the top of the pile.
26- Open the tube "Fairymist_Ruth_frame" in your Psp and copy it.
27- Paste it as a new layer on to your tag.
- You may colorize that frame if you wish
or use another frame of your choice !
(You will then have to add a new layer, select all and paste YOUR frame into the selection !)
28- OPTIONNAL : Open the tube "Rideau"in your Psp and copy it.
29- Paste it as a new layer on to your tag.
- Place it like me or to your liking.
30- Apply your signature
31- Here is what I have in my layers palette : .
- Layers Rain 2 and 3 are closed. I have re-opened and activated layer Rain 1.

- If you don't wish to make an animation and only in that case,
you can merge all your layers, your tag is now finished !
RAIN ANIMATION
1- In your Psp :
- Edit / Copy special / Copy merged.
2- In your Animation Shop :
- Edit / Paste as new animation.
3- In your Psp :
- Close layer Rain 1, open and activate layer Rain 2.
- Edit / Copy special / Copy merged.
4- In your Animation Shop :
- Edit / Paste after current frame.
5- In your Psp :
- Close layer Rain 2, open and activate layer Rain 3.
- Edit / Copy special / Copy merged.
6- In your Animation Shop :
- Edit / Paste after current frame.
- Edit / Select all.
- Click where indicated below to visualize your animation and click there again to stop your animation.

- If the speed of the rain is too fast for you, you may slower it down as explained below :
- Animation / Frame properties / change the given number to one that suits you better :
- The bigger the number is the slower the animation will be.
- I have chosen speed 10 !
- When your result suits you, all you have to do is save your animation as a gif file, in your animation shop :
- File / save as / tagruth.gif
- You may resize your animation in Animation shop :
- Animation / resize animation / choose the right size for you in pixels or in percentage.
***************
That's it !! You've done it !!
If you 've enjoyed doing my tutorial, it would be nice to write a few words in my guest book !
If you 've had the slightest problem, please, send me a mail so I can see to the problem
Tutorial translated on the 23rd of November 2013
*************
Thank you Marie for testing my English translation.
*****************
You'll find some versions of that tag in my gallery HERE
*************
