
Thank you for putting a link to this tutorial, whenever you display your realization of that tag on a website, on a group or in a mail !
**************************
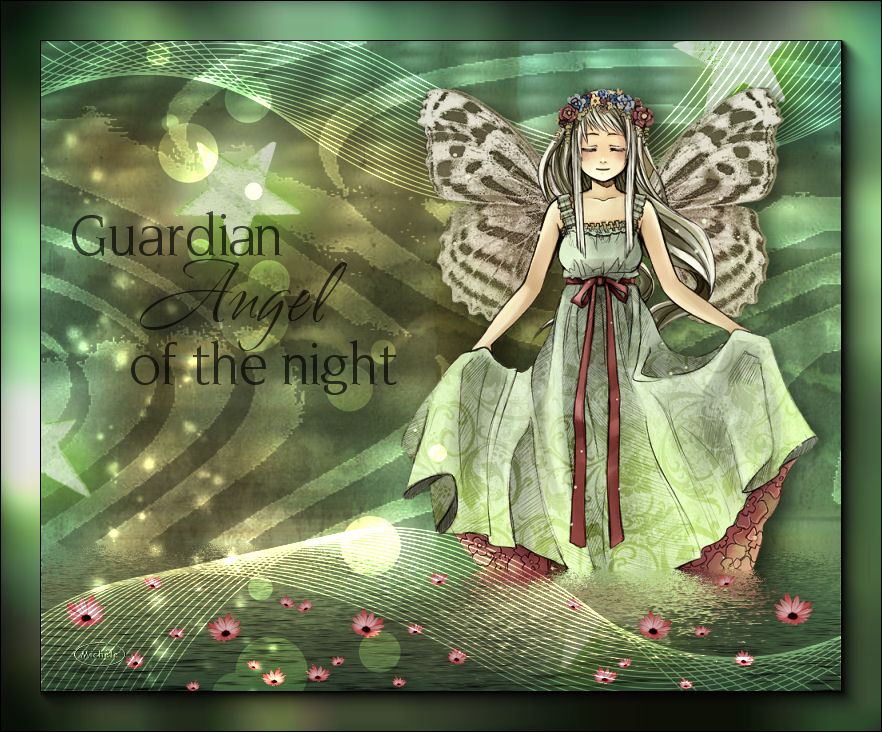
You'll find some versions of that tag in my gallery HERE
************************
To realize that tag, you'll need the plugins :
- Flaming Pear / Flood
- Graphic plus / Cross shadow
- AAA Frame / Foto frame
and the material zip down below :

**************
*It is forbidden to suppress watermarks on the material provided , to alter, mist or rename the tubes in order to respect the work of the tubers
- The tube of the girl is by Kikirou
You'll be able to get her tubes by joining in her sharing group here
- The brush "Flowing Line Brushes" used as a tube is by Peiro
The other elements have been found on the net
******************
Préparation
Duplicate your tubes, masks and image. Close the originals and minimize the copies for now.
*****************
Click here to print the tutorial
*******************
You can use my arrow to follow your work

***************
1- Open a transparent image of 800 by 650 pixels and select all
2- Open the image "gh_texture_13.jpg", copy it and paste it into the selection
Select none
3- Add a new raster layer
The mask "m-spotlightsmask.jpg" being activated in your Psp, we're going to use it as a texture
Set your colour palette as below and activate that texture "m-spotlightsmask.jpg"
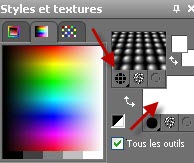
4- Flood fill your transparent layer with that texture
Set the mode of that layer to Overlay and lower its opacity at about 25
5- Add a new raster layer and flood fill it with white
6- Layers / New mask layer / from image / choose "m-modernartmask2.jpg" / check Source Luminance only
Adjust / Sharpness / Sharpen more
Layers / merge group
I have set the mode of that layer to Dodge ( opacity at 100 for me )
7- Layers / Merge all
If you are using different tubes from mine , you'll probably need to change the colours of your background :
You may change the colour of it by using the Colorizing effect but you will only get one colour !
It is better to use the effect below :
Adjust / Hue and Saturation / Hue, Saturation, Lightness
Play around with the three cursors to obtain colours that match your tubes
Here are two examples of different colours I managed to get !
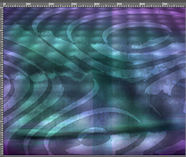
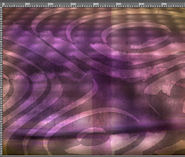
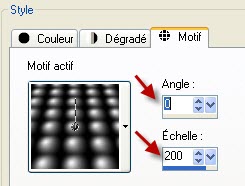
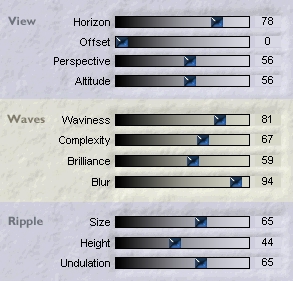
8- Effects / plugins / Flaming pear / flood as below :
9- Activate the tube " Etoiles1_Roo .pspimage" or a tube of your choice, copy it and paste it as a new layer
That tube is at the right place for me
You may colorize that tube so it matches your colours
( Adjust / Hue and saturation / colorize ..... )
I have lowered the opacity at 75
It is up to you to decide which colour, which mode and which opacity suit you !
10- Activate the tube " Etoiles2_Roo .pspimage"or a tube of your choice, copy it and paste it as a new layer
Place the tube as on my tag or to your liking
I have set the mode of that layer to Dodge and lowered its opacity to about 50
11- Activate the tube "Bulles_Roo.pspimage"or a tube of your choice, copy it and paste it as a new layer
That tube is at the right place for me
I have set the mode of that layer to Dodge and lowered its opacity at 42
12- Activate the tube "Flowing Line Brushes by Peiro_10.pspimage", copy it and paste it as a new layer
Place as on my tag ( on the top side of your tag)
I have set the mode of that layer to Dodge and lowered its opacity at 52
13- Activate the tube " kikirou1534_fairy_by_Ugly_baka.pspimage"or a tube of your choice, copy it and paste it as a new layer
Place as on my tag or to your liking
14- Effects / plugins / Flaming pear / flood as on step 8 but you can move the cursor on the Horizon line to adapt the effect on your tube
15- Activate the tube "Fleurs_Roo.pspimage"or a tube of your choice, copy it and paste it as a new layer
Place it on the bottom of your tag
Colorize that tube so that the flowers are in harmony with your other colours
Instead of a tube, you may use a brush of your own on a new layer !
16- Activate now, the layer where you have the tube "Flowing Line Brushes by Peiro_10_Roo.pspimage"
Layers / duplicate
Image / Flip
Image / mirror
Layers / arrange / Bring to top
17- Activate the text tube"text_roo_fairymist.pspimage"or a tube of your choice, copy it and paste it as a new layer
Place to your liking
18- Add a new raster layer and apply your signature
19- Make sure everything is at the right place
Layers / Merge all
Edit / copy
Image / add some symmetrical borders of 1 pixel with a colour of your choice , I chose black
20- Image / add some symmetrical borders of 40 pixels with a contrasting colour
With your magic wand, set as below , select the inside of that border

Edit / Paste into the selection ( your copy from step 19 is still in the memory of your computer )
Keep selection !
21- Adjust / Blur / gaussian blur / 15
22- Effects / plugins / Graphic plus / Cross shadow default
Select none
23- Effects / plugins / AAA Frame / Foto frame / Width 40, 0,0,0,0,0,0, opacity 100
24- Image / add some symmetrical borders of 1 pixel with a colour of your choice , I chose black
25- Save your work as a jpeg file and resize it if necessary
***************
That's it !! You've done it !!
If you 've enjoyed doing my tutorial, it would be nice to write a few words in my guest book !
If you 've had the slightest problem, please, send me a mail so I can see to the problem !
Tutorial translated on the 27 th of august 2010
*************
Other versions of that tag
