Thank you for putting a link to this tutorial, whenever you display your realization of that tag on a website, on a group or in a mail !
****************************
You'll find some versions of that tag in my gallery HERE
***********************
To realize that tag, you'll need the plugins :
- Toadies / What are you
- Mura's Meister / Copies
- VM distortion / Gear
- Graphic plus / Vertical mirror
and the material zip down below :

**************
*It is forbidden to suppress watermarks on the material provided , to alter, mist or rename the tubes in order to respect the work of the tubers
- The image " JHanna_276 background.jpg" is by Jhanna
You can join in her sharing group here
The tube of the woman is by Guismo
You'll find her tubes on Dakara's site here or on her sharing group here
- The tube of the building is by Bibiche
- The tube of the bird is by 1Patries
- The elements of scrap that I have used are by Yaya
- The brush "bubble_brushes" is by Hawksmont
The other elements that I haven't created, have been found on the net.
******************
Preparation
- To be on the safe side, duplicate your tube and image in your Psp :
-
Window / Duplicate
- Close the originals and work with the copies !
- Place the brush files in the brush folder of your Psp files.
- Place the file "fairymist_regina.PspSelection" in the selection folder of your Psp files.
*****************
Click here to print the tutorial
**********************
You can use my arrow to follow your work
Click on it and drag it all along the tutorial !

***************
Tutorial realized with PSP XIII

Step 1 : The background of the tag
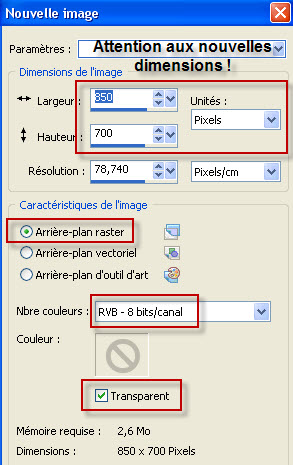
1 - Open a new transparent image of 850 by 700 pixels.
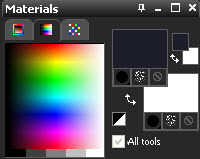
2 - Set the foreground of your material palette with a very dark colour out of your main tube :
My choice : Foreground colour : dark purple 1d1e2c
Background : White
3 - Flood fill your transparent image with your dark foreground colour.
4- Add a new raster layer and select all.
5- Activate the background "JHanna_184_background.jpg" or a background of your choice matching your main tube and copy it.
6- Paste it into the selection of your tag.
Deselect all .
I have set the mode of that layer on to Overlay ( You may change that mode later on if you wish ! )
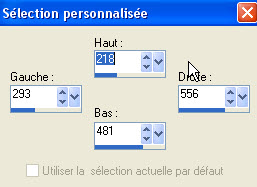
6- Add a new raster layer.
7- Selections / Custom selection as below :

8- Flood fill that selection in white ( Right click of your mouse ).
- Selections / Select None .
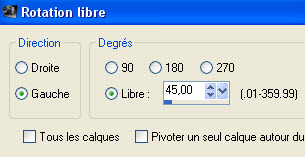
9- Image / free rotation as below :
10- Effects / Plugins / Toadies / What are you / 20, 20.
11- Effects / 3d effects / drop shadow / 1, 1, 100, 5, black.
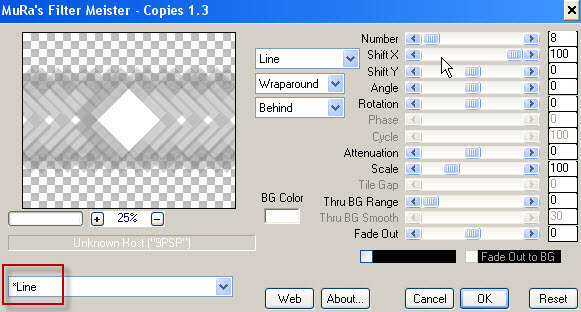
12- Effects / Plugins / Mura's meister / copies as below :
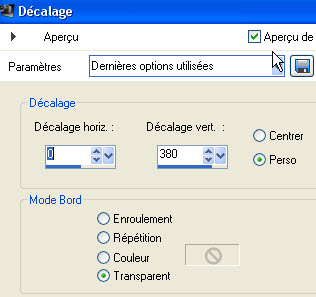
13- Effects / image effects / Offset as below :
14- I have set the mode of that layer on to Dodge and I have lowered the opacity to 65.
It is up to you to see which opacity looks better with your colours !
15- Layers / Duplicate.
Image / Flip.
16- Effects / Plugins / VM distortion / gear / 75, 167.
17- Activate your raster Deform tool ( letter D)
- Set the tool as below :

Click on your Move tool ( letter M) to get rid of your previous tool.
18- Lower the opacity of that layer to your liking ( 45 for me ).
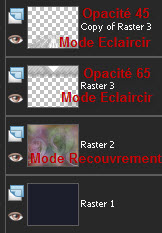
Here is my layers palette :
Step 2 : The scenery
1- Open the tube "AAAbibicheskadi0204.pspimage" or a misted tube of your choice matching your background, in your Psp and copy it.
2- Paste that tube as a new layer on to your tag.
3- I have resized my tube at 75% ( Resize all the layers NOT checked !)
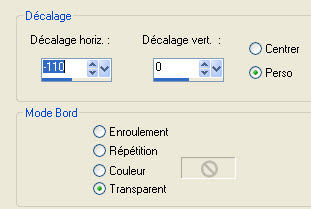
4- I have moved my tube like this : Effects / image effects / Offset as below :
If you use another tube, try to place it like mine with your move tool ( The figures above may not work out for your tube ! )
Step 3 : Stars and Bubbles
1- Open the tube "elements kit tendre reverie by yaya (9)_resized.pspimage" in your Psp and copy it.
2- Paste that tube as a new layer on to your tag.
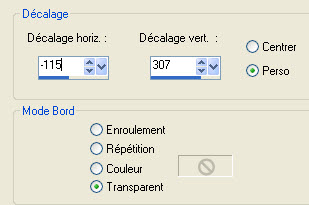
3- Effects / image effects / Offset as below :
- The mode of that layer is on Dodge and the opacity is at 65
4- Open the tube "elements kit tendre reverie by yaya (13)_resized.pspimage", in your Psp and copy it.
2- Paste that tube as a new layer on to your tag.
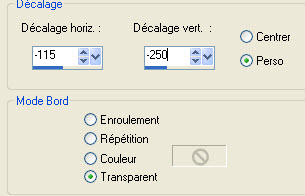
3- Effects / image effects / Offset as below :
- The mode of that layer is on Dodge and the opacity is at 85
4 - Set the Background of your Material palette with a bright colour out of one of your tubes or a colour matching your tag.
I have left my dark colour in my Foreground
We'll use that bright colour to apply a brush ( if you prefer to apply your brush with a left click, just put that bright colour in your Foreground !)

2- Activate your tool brush, choose the brush "bubble2_brushes_by_hawksmont.PspBrush" and set as below :

* If your Psp doesn't accept that size of brush, you may set the size of the brush to 499 / 500 and we'll enlarge that bubble afterwards. *
3- We'll need to apply the brush right in the center of the tag so here is below, the way I chose to follow to find the center ( There are other ways to do it but I thought I would show you how to use these blue guides in your Psp !)
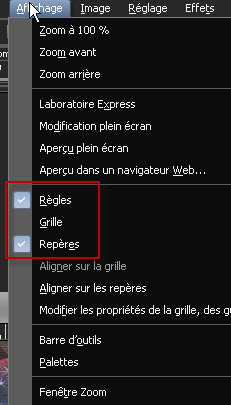
- Go to View , check Rulers and Guides as below :
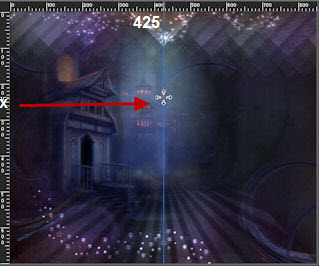
4- First of all , place the tip of your brush ( but you could use another tool to do it ) anywhere in this vertical part of your ruler, until you get a small cross ( black for me ).

- Keep the left click of your mouse pressed and drag it towards the right hand side until your blue vertical line has reached the number 425 of the above horizontal ruler of your tag.
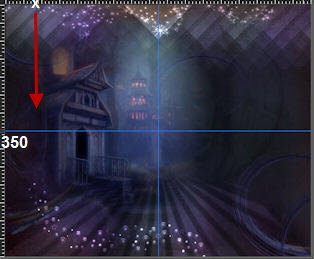
To get an horizontal guide, place the tip of your tool on the top horizontal ruler and drag the blue horizontal guide until it has reached 350 in your vertical ruler.
The center is exactly where the two guides meet.
5- ADD A NEW RASTER LAYER
You are now ready to apply your brush in the center of your tag ( left click if your bright colour is in your foreground, right click if it is in your background like me.
6- To get rid of the blue guides, go back to View and uncheck Guides ! ( You can uncheck Rulers too if you wish but I must admit I keep my rulers on, all the time !!)
** If you had to put the size of your brush to 500, you will have to resize your bubble now :
-
Image / resize at 135% ( Resize all the layers NOT checked !) **
7- On the layer where your big bubble is :
Selections / load a selection / from disk / choose "fairymist_regina.PspSelection" and set as below :
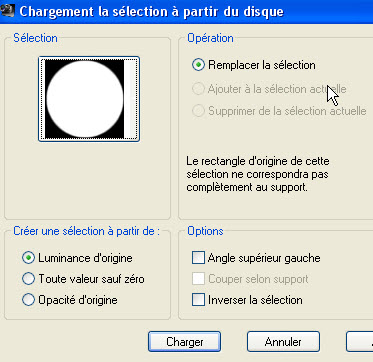
Hit the delete key of your keyboard .
Selections / Select None.
- I have set the mode of that layer on to Dodge, opacity at 100 ( See what opacity suits you ).
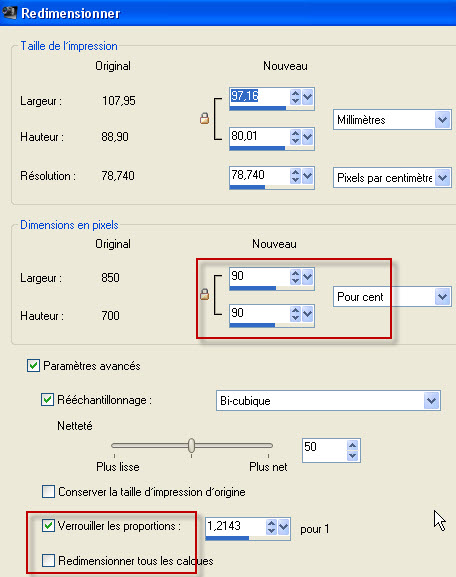
8- Layers / Duplicate
Image / resize at 25 % ( Resize all the layers NOT checked !)
Place that second bubble in the top left hand side corner of your tag.
9- Layers / Duplicate
Image / resize at 50 % ( Resize all the layers NOT checked !)
Place that third bubble like me or to your liking.
10- Image / Dupliquer
Place that fourth bubble like me or to your liking.
Step 4 : The street lamp
1- Open the tube "elements kit tendre reverie by yaya_resized (24).pspimage" or a tube of your choice, in your Psp and copy it.
2- Paste that tube as a new layer on to your tag.
Place it like me or to your liking.
I have set the mode of that layer on to Hard light .
3- Layers / Duplicate ( just to emphasize the brilliance of the light !)
Step 5 : The gate
1- Open the tube "gate.pspimage"or a tube of your choice, in your Psp and copy it.
2- Paste that tube as a new layer on to your tag.
I have set the mode of that layer on to Multiply.
Step 6 : The birds
1- Open the tube "birds(1Patries).pspimage"or a tube of your choice, in your Psp and copy it.
2- Paste that tube as a new layer on to your tag.
Place on the gate like me or to your liking.
I have lowered the opacity of that layer on to 68.
In my layers palette, I have, then, dragged the layer of the birds underneath the layer of the gate.
You can add a slight drop shadow on the birds if you wish.
Etape 7 : The main tube
Go back on your top layer !
1- Open the tube "2-1-TheVintageAngel_Forgiveness.pspimage"or a tube of your choice, in your Psp and copy it.
2- Paste that tube as a new layer on to your tag.
Place it like me or to your liking.
3- With my Psp 13, I have been able to apply that treatment on my tube to give it more brightness but your tube may not need it :
- Adjust / One step Photo fix
4- Effects / 3d effects / drop shadow of your choice ( 4, 4, 60, 20, black for me )
Step 8 : The text
1- Open the tube "fairymist_regina_texte.pspimage" or a text tube of your choice, in your Psp and copy it.
2- Paste that tube as a new layer on to your tag.
Place like me or to your liking.
I have set the mode of that layer on to Dodge, opacity at 90.
3- Apply your signature
Step 9 : The borders
1 - Make sure everything is at the right place !
- Image / add some symmetrical borders of 2 pixels with a colour of your choice (black for me ).
2- Calques / Duplicate.
3- On your top layer : Image / Resize as below :
4- Effects / 3d effects / drop shadow / 0, 0, 80, 40, black
5- On your bottom layer :
- Adjust / Gaussian blur at 20
- Effects / Plugins / Graphic plus / Vertical mirror / 128, 0.
6- Add a new raster layer.
- Flood fill that new layer in white.
- Image / resize that layer at 95 % ( same settings as previously )
- Set the mode of that white layer on to Dodge and lower its opacity until you get a bright colour not too dazzling ( 50 for me )

7- Add some symmetrical borders of 1 or 2 pixels with a colour of your choice (black for me ).
8 - Save your work as a jpeg file and resize it if necessary
***************
That's it !! You've done it !!
If you 've enjoyed doing my tutorial, it would be nice to write a few words in my guest book ! If you 've had the slightest problem, please, send me a mail so I can see to the problem
Tutorial translated on the 24th of September 2011
*************
Other versions of that tag