
Thank you for putting a link to this tutorial, whenever you display your realization of that tag on a website, on a group or in a mail !
**************************
You'll find some versions of that tag in my gallery here
***********************
To make that tag, you'll need the filters :
- Mock / mosaic
- Alien Skin Eye Candy 5 / Impact.
- L en k's / Frederiek HERE.
and the material zip down below :

**************
*It is forbidden to suppress watermarks on the material provided , to alter, mist or rename the tubes in order to respect the work of the tubers
- The tubes of the girl and the cat are by Kikirou
- The tube of the frame is by Cordelia.
- The tube of the scenery is by Gini.
- The other elements that I haven't created, have been found on the net.
******************
Preparation
To be on the safe side, duplicate your tubes and image in your Psp :
-
Window / Duplicate
- Close the originals and work with the copies !
- Place the selection in the selection folder of your Psp files.
- Double click on the Alien skin preset, it will install itself in the right folder.
*****************
Click here to print the tutorial
**********************
You can use my arrow to follow your work
Click on it and drag it all along the tutorial !
**********************

***************
Tutorial made with PSP XIII
********************
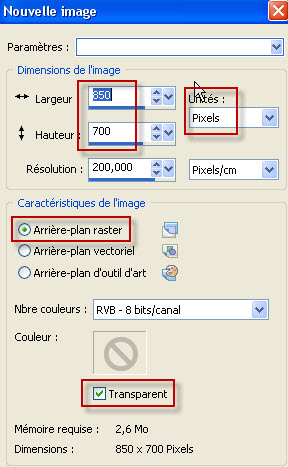
1 - Open a new transparent image of 850 by 700 pixels
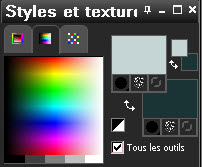
2 - Set your Material palette with two colours out of your main tube.
- My choice : Foreground : Light colour c5d5d5.
- Background : Contrasting colour ab7278 .
3 - Flood fill your transparent image with your light foreground colour.
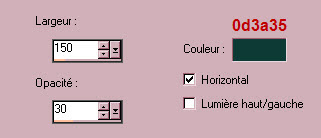
4- Effects / Texture effects / Blinds as below :
5- Effects / Plugins / Mock / mosaic / 30.
6- Effects / Edge effects / Enhance.
7- Effects / Distortion effects / Wave as below :

8- Effects / Edge effects / Erode.
9- ADD A NEW RASTER LAYER.
10 - Layers / arrange / move down.
11- Activate your flood fill tool and flood fill that new layer with your background colour (right click).
12- Layers / Merge visible.
13- Open the tube "Frame4 by Cordelia" or a similar tube of your choice, in your Psp and copy it.
14- Paste it as a new layer on to your tag.
15- I have placed that tube as follows :
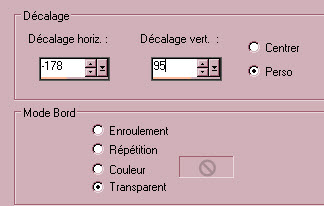
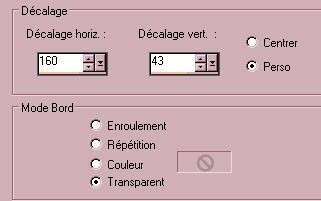
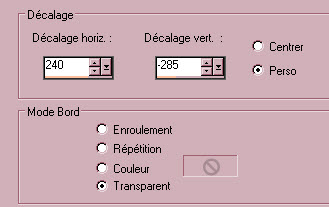
- Effects / Image effects / Offset :
16- I have changed the colours of my tube that way :
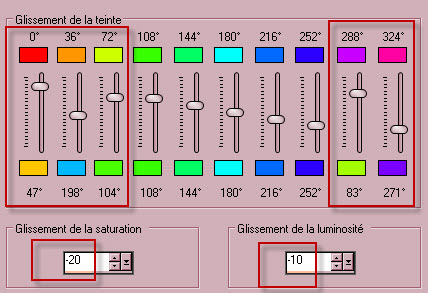
- Adjust / Hue and saturation / Hue map :
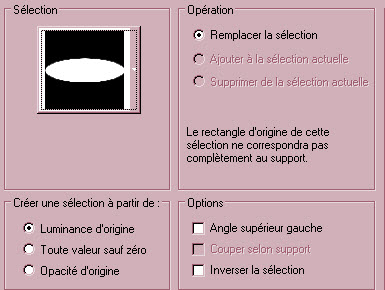
17- Activate your magic wand and set it as below :

- Click inside your frame. Keep selection !
18- Open the tube "OldWestburyGardens_MistedByGin" or a tube of your choice, in your Psp and copy it.
19- Paste it AS A NEW LAYER on to your tag.
- Place your tube in the center of your selection, with your move tool (letter M).
20- Selections / Invert.
- Hit the delete key of your keyboard.
- Deselect all.
21- Open the tube "notes" or a similar tube of your choice, in your Psp and copy it.
22- Paste it as a new layer on to your tag.
23- I have placed that tube as follows :
- Effects / Image effects / Offset :
24- Open the "text" tube or a tube of your choice, in your Psp.
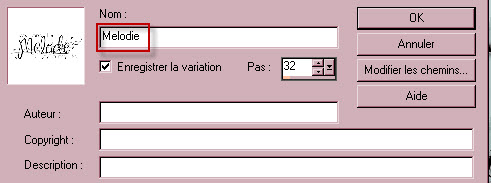
- We are going to promote that tube into a brush, as explained below :
25- File / Export / Custom brush.
- Name that brush like me or to your liking and click on OK :
- Close your "text" tube, we don't need it any more !
26- Set your Material palette as below :
- I have set the foreground with the dark green colour 1c3436.
- ADD A NEW RASTER LAYER.
27- Activate your brush tool, set as below (choose the "melodie" brush or the brush you have just created
and apply it on your new layer with your foreground colour, in the bottom left handside corner of your tag.

- Activate your move tool (letter M).
28- Place the brush in the right place, unless it is already done !
- Effects / 3d effects / drop shadow / 1, 1, 100, 2, background colour (pink for me ).
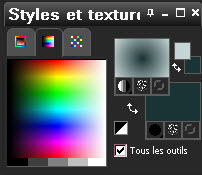
29- Set your Material palette as below :
Foreground : c5d5d5
Background : 1c3436
30- ADD A NEW RASTER LAYER.
31- Selections / load a selection / from disk / choose "Fairymist_Paula" and set as below :
32- Flood fill the selection with your foreground colour
33- Selections / modify / contract by 10 pixels. Keep selection.
34- Set your Material palette as below :

35- ADD A NEW RASTER LAYER.
- Flood fill the selection, on that new layer, with your foreground sunburst gradient.
- I have set the mode of that layer on to Overlay.
- Deselect all.
36- Layers / Merge down.
37- Image / resize at 60% (resize all the layers NOT checked).
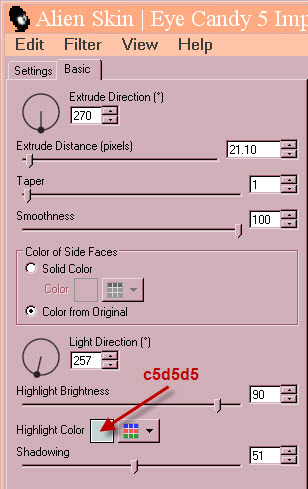
38- Effects / Alien skin eye candy 5 / Impact / extrude / tab Settings / click on the preset "Fairymist_Paula".
- Tab Basic : Here are the settings of my preset (in case my preset wouldn't work for you !)
39- I have placed my tube, like this :
- Effects / Image effects / Offset :
40- Effects / 3d effets / drop shadow / - 3, 0, 30, 20, Background dark colour (1c3436).
41- Open the tube "KikiRou172" or a tube of your choicie, in your Psp and copy it.
42- Paste it as a new layer on to your tag.
43- I have resized the tube at 90% (resize all the layers NOT checked).
- Place the tube as on my tag.
44- Effects / 3d effects 3d / drop shadow of your choice / - 3, 0, 60, 20, black for me.
45- Open the tube "KikiRou225" or a tube of your choicie, in your Psp and copy it.
46- Paste it as a new layer on to your tag.
47- I have resized the tube at 30% (resize all the layers NOT checked).
- I did Image / mirror on that tube.
- Place the tube as on my tag.
48- Effects / 3d effects / drop shadow of your choice / - 3, 0, 40, 15, black for me.
49- Activate the layer at the bottom of the pile of layers (Merged) and copy it (Edit / copy).
50- Layers / Merge visible.
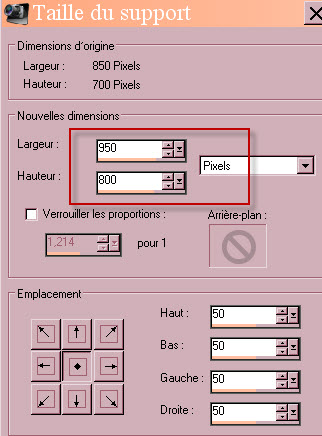
51- Image / canvas size as below :
52- ADD A NEW RASTER LAYER.
- Layers / Arrange / Move down.
53- Selections / select all.
54- PASTE INTO THE SELECTION the copy made on step 49.
- Selections / Modify / contract by 10 pixels.
55- Adjust / Blur / Gaussian blur at 30.
56- Effects / Plugins / L&K / Frederiek / 73, 6.
57- Effects / Edge effects / erode.
- Deselect all.
58- Open the tube "couture-stitches" in your psp and copy it.
59- Paste it as a new layer on to your tag.
60- Activate the layer on top of the pile (your tag).
- Effects / 3d effects / drop shadow / 0, 0, 80, 20, black.
61- Apply your signature
62- Layers / Merge all.
63 - Save your work as a jpg file.
***************
That's it !! You've done it !!
If you've enjoyed doing my tutorial, it would be nice to write a few words in my guest book !
If you've had the slightest problem, please, send me a mail so I can see to the problem
Tutorial translated on the 9th of April 2014
*************
You'll find some versions of that tag in my gallery here