
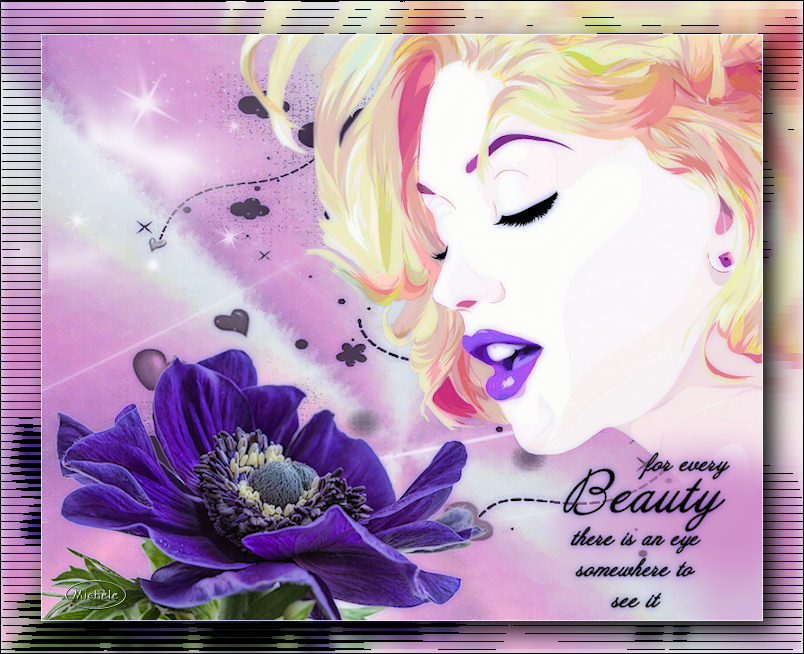
Thank you for putting a link to this tutorial, whenever you display your realization of that tag on a website, on a group or in a mail !
**************************
You'll find some versions of that tag in my gallery HERE
***************
To realize that tag, you'll need the plugins :
- Virtual painter,
- Alien skin Eye Candy 5 / Impact,
- Xero,
- VM experimental
and the material zip down below :

**************
*It is forbidden to suppress watermarks on the material provided , to alter, mist or rename the tubes in order to respect the work of the tubers
- The tube of the woman is by Guismo
You'll find some of her tubes on Dakara's site here
You'll be able to get her tubes by joining in her sharing group here
- The tube of the flower is by Sabine
You'll be able to get her tubes by joining in her sharing group CreaTubes here
- The mask Vix-mask292 is by Vixmask
- One of the brushes I have used is by LadyVictoire
- The other elements have been found on the net
******************
Preparation
Duplicate your tubes ; close the originals and minimize the copies for now. Put the masks in your masks file. Export your brushes in your psp as custom brushes
*****************
Click here to print the tutorial
*******************
You can use my arrow to follow your work

***************
1- Open a new transparent image of 800 by 650 pixels
2- Set your material palette with two colours out of your flower ( I have used the colours which are in the center of the flower !)
My choice: Foreground : colour 6982a4 
Background : colour e6e3bb 
3- Make a rectangular gradient in your foreground with the settings below :

4-Flood fill your layer with that gradient
5- Add a new raster layer
Set your material palette with two colours out of your woman's face
My choice : Foreground : white
Background : colour d95e8d 
6- Make a radial gradient as below :
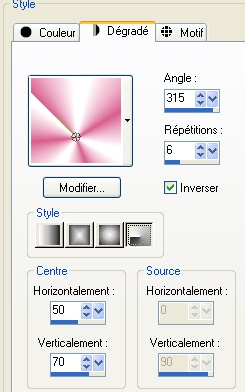
Flood fill your layer with that gradient
7- Effects / plugins / Virtual painter / pastel as below
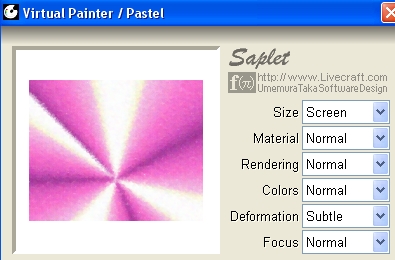
Lower the opacity of that layer to about 69
At this stage, you should have this :
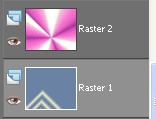
8- Add a new raster layer and paint it in white
Layers / new mask layer / choose @rosa_mascara_be03 with the settings below :

Merge group
9- Add a new raster layer and flood fill it with black ( or with the colour you wish to use to draw the clouds )
Layers / new mask layer / choose Vix_mask292, same settings as on point 8
Merge group
You may lower the opacity of that layer if you wish or even change the mode !
10- Open the tube Graphsabine_Design30 or a tube of your choice, copy it and paste it as a new layer
Image / resize that tube at 90 %
Place the tube as shown on my tag
11- Open the tube cal_guis_16_9_2008_vector_2 or a tube of your choice, copy it and paste it as a new layer
Place the tube as shown on my tag
12- We're now going to colorize a part of the face to give it the same colour as the flower ( purple flower = purple lips ...for me ! )
Adjust /Hue and saturation / Hue map as below :
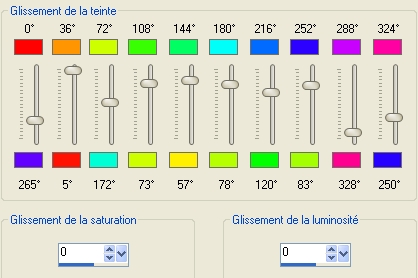
It's up to you now to play with the different cursors to get the colour you want
I got the lips purple by setting the first cursor on 265 ° !
13- Effects / 3d effects / drop shadow / -1, 1, 20, 0, black
14- With your dropper tool, pick the color of your background ( d594ce for me )
Activate your airbrush tool set as below :

Apply it several times in the bottom hand right corner, in order to hide the bottom part of the woman's neck ( it may not be necessary with another tube !)
15- Add a new raster layer
Activate your brush tool and choose the text brush jc-beauty or a brush of your choice; Here are below the settings I have used for the brush jc-beauty

Apply that brush in the bottom hand right corner with a colour of your choice ; size between 200 and 221
16- Add a new raster layer
Take the brush LadyVictoire_stars_4_1 set as below or a brush of your choice

Appy that brush in the top left hand corner with the colour you want ( I've used white)
17- Make sure everything is in its place (merge all, flaten)
Copy your tag (for later )
18- Add a new raster layer and apply your signature
19- Image / add some new symmetrical borders of 1 pixel in white or any other colour of your choice
20- Effects / plugines / Xero / Porcelaine default
21- Layers / Promote Background layer
Image / resize at 90% ( Resize all the layers NOT checked )
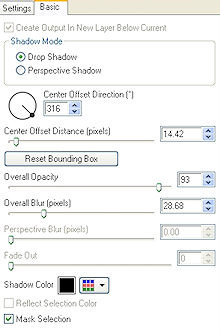
22- Effects / Alien skin Eye candy 5/ Impact / Perspective shadow / drop shadow blurry
23 - Add a new raster layer
Select all and paste into the selection ( your copy from point 17 !)
Select none
24- Layers / arrange / move down
25- Adjust / Blur / gaussien blur at 5
26- Effects / plugins / VM Experimental / TeeWee / 0, 0
27- Image / add some new symmetrical borders of 1 pixel in white or any other colour of your choice
28- Save your work as a jpeg file and resize if necessary
******************
That's it !! You've done it !!
If you 've enjoyed doing my tutorial, it would be nice to write a few words in my guest book !
If you 've had the slightest problem, please, send me a mail so I can see to the problem.
Tutorial translated on the 20 th of june 2009
*************
You'll find some versions of that tag in my gallery HERE
