
Thank you for putting a link to this tutorial, whenever you display your realization of that tag on a website, on a group or in a mail !
**************************
You'll find some versions of that tag in my gallery here
***********************
To make that tag, you'll need the material zip down below :

***********************
*It is forbidden to suppress watermarks on the material provided , to alter, mist or rename the tubes in order to respect the work of the tubers
- The tube of the baby is by Aclis
You may join her sharing group ici
- The elements of scrap I have used are by BCS
- The mask Navidad 0004 is by Brujita
**************
Preparation
To be on the safe side, duplicate your tubes and image in your Psp :
-
Window / Duplicate
- Close the originals and work with the copies !
- Place your mask in the mask folder of your Psp files.
- Open the font outside your Psp if you have Windows Xp or place it in the Font folder of Windows if you have Win7.
**********************
Click here to print the tutorial
**********************
You can use my arrow to follow your work
Click on it and drag it all along the tutorial !

**************************
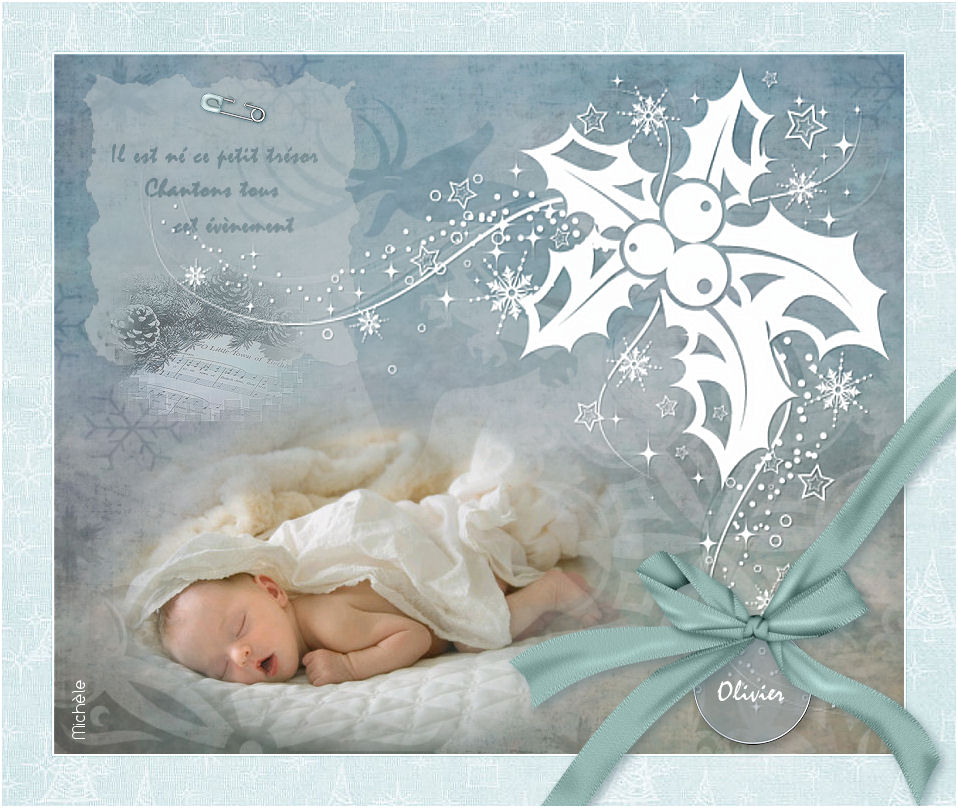
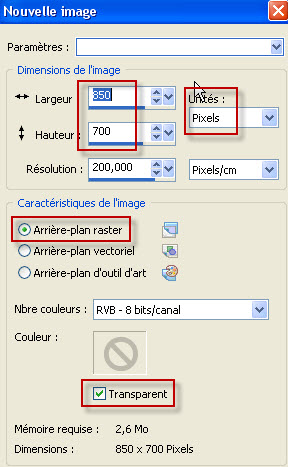
1- Open a new transparent image of 850 by 700 pixels and select all.
2- Open the "bcs deer paper" or a fancy paper of your choice.
- Copy it and paste it INTO THE SELECTION
- Deselect all.
3- Optionnal : To give more contrast to my background, I did this :
- Adjust / Contrast and brightness / Contrast and brightness / Brightness : - 40, Contrast : 30.
4- ADD A NEW RASTER LAYER and flood fill it in white (or another colour of your choice).
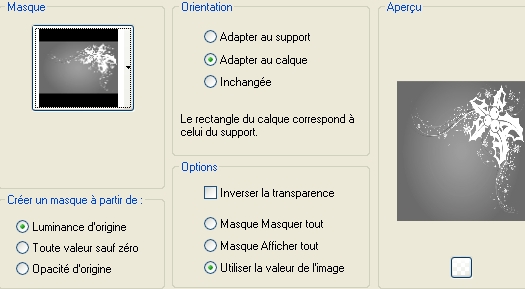
5- Layers / Load a mask / from disk / choose the mask Brujita navidad 004
- Adjust / Sharpness / Sharpen more.
- Merge group.
6- Effects / 3d effects / drop shadow / 1, 1, 75, 1, black.
- Close temporarely that layer so that it doesn't get in your way for the further steps !
7- Activate your bottom layer.
- Open the tube "message", copy it and paste it as a new layer on to your tag.
- I have lowered the opacity of that layer at 53 (you may prefer to create your own label)
- Place that label ("message") on the top left hand side of your tag
8- Open the tube "partition", copy it and paste it as a new layer on to your tag.
- Place the tube as on my tag.
- I have set the mode of that tube on to Luminance.
9- Set the background of your Material palette with a colour contrasting with your background.
- I have chosen the colour  578b99). Close your foreground.
- Activate your text tool and with a font of your choice, write down your message (I have chosen Mistral, size 26 ).
- Use as many layers as the sentences you want to write.
- I have set the mode of my text on Multiply.
- You can find my text enclosed in the material, in case you want to use it.
(copy that layer and paste it as a new layer on to your tag. )
- Reopen the mask layer that you have closed on step 5 and activate that layer.
10- Open the tube of the baby, copy it and paste it as a new layer on to your tag.
- Place the tube as on my tag.
11- Open the tube of the safety pin, copy it and paste it as a new layer on to your tag.
- Place the tube as on my tag.
12- Image / add some symmetrical borders of 2 pixels in white.
13- Image / add some symmetrical borders of 50 pixels with a contrasting colour.
14- With your magic wand, set as below, select that border.

15- Open the image "BC christmas tree paper", copy it and paste it INTO THE SELECTION.
- Effects / Edge effects / Enhance.
- Deselect all.
16- Open the tube "BCs ribbon wrap", copy it and paste it as a new layer on to your tag.
17- Image / resize at 60 % (Resize all the layers NOT checked).
18- Image / free rotation of 45 ° / left (Don't check the bottom squares)
- Adjust / Sharpness / Sharpen.
- Place the tube as on my tag.
19- Effects / 3d effects / drop shadow / 4, 4, 50, 15, colo ur 47676f
20- Open the tube "rond", copy it and paste it as a new layer on to your tag.
21- Layers / arrange / Move down.
- Place the tube "rond" under the bow as shown on my tag
22- Set your background in white and close your foreground.
- With your text tool, write down the name of the baby with the same font, size 30.
23- Apply your signature.
24- Image / add some symmetrical borders of 2 pixels in white.
25- Save your work as a jpeg file.
***************
That's it !! You've done it !!
If you 've enjoyed doing my tutorial, it would be nice to write a few words in my guest book !
If you 've had the slightest problem, please, send me a mail so I can see to the problem
Tutorial translated on the 26th of november 2008
*************
You'll find some versions of that tag in my gallery HERE
