Thank you for putting a link to this tutorial, whenever you display your realization of that tag on a website, on a group or in a mail !
**************************
You'll find some versions of that tag in my gallery HERE
***********************
To realize that tag, you'll need the plugins :
- Two Moon / Wish it would Rain
- Flaming Pear / Flexify 2
and the material zip down below :

**************
*It is forbidden to suppress watermarks on the material provided , to alter, mist or rename the tubes in order to respect the work of the tubers
- The tube of the woman is by Jenny.
You can join in her sharing group here
- The background "papier kit tendre reverie (14).jpg is by Yaya.
- The brush Flower spray brush has been found here.
The other elements that I haven't created, have been found on the net.
******************
Preparation
- To be on the safe side, duplicate your tube and image in your Psp :
-
Window / Duplicate
- Close the originals and work with the copies !
- Place the mask "Lotty_Mask15.PspMask" in the mask folder of your Psp files.
- Place the two brush files in the brush folder of your Psp files.
- Place the files "fairymist_olga1.PspSelection" and "fairymist_olga2.PspSelection"in the selection folder of your Psp files.
*****************
Click here to print the tutorial
**********************
You can use my arrow to follow your work
Click on it and drag it all along the tutorial !

***************
Tutorial realized with PSP XIII

Step 1 : The background of the tag
- If you have decided to use my colours, here is what you can do :
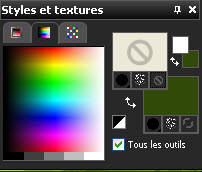
- Open the colour palette "Fairymist_Palette_Olga", in your Psp and using your dropper tool, pick out my colours to set your Material palette ( left click for your foreground / right click for your background )

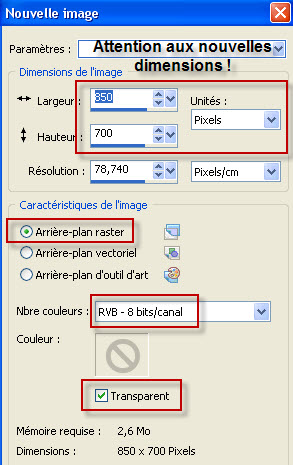
1- Open a new transparent image of 850 by 700 pixels. ( NEW SIZE)
2- Set your Material palette with two colours out of your main tube, as below :
My choice : Foreground : Light colour d4de2c.
Background : Dark colour 62912e.
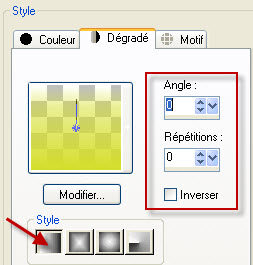
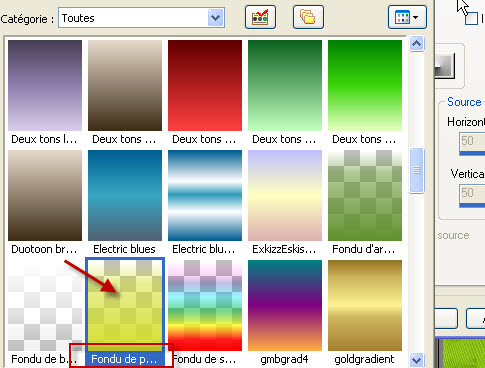
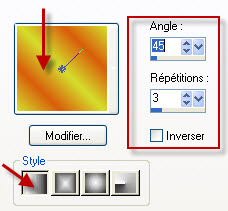
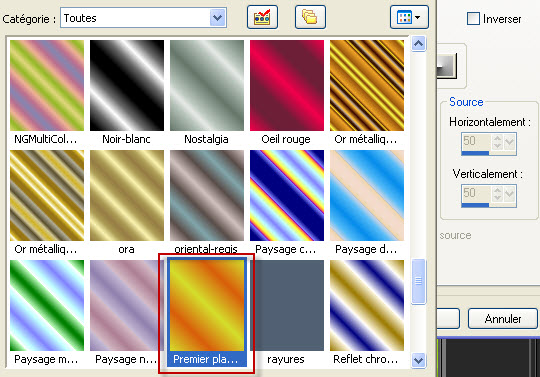
- Set your foreground with a linear gradient as below :
- Click on the square which shows your gradient and choose Fading foreground among all the gradients.

3 - Flood fill your transparent image with your dark background colour.
4 - Open the image "Papier kit tendre reverie by yaya (14).jpg" or a background of your choice, in your Psp and copy it.
5- Add a new raster layer and select all.
6- Paste your image into the seection.
- Deselect all.
I have set the mode of that layer on to Overlay ( It is up to you to see which mode suits your colours better).
7- Add a new raster layer and flood fill it with your fading foreground gradient.
8- Effects / Plugins / Two Moons / Wish it would Rain as below :

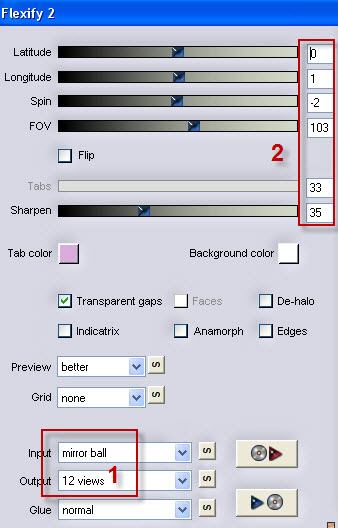
9- Effects / Plugins / Flaming pear / Flexify 2 as below :
10- Selections / load a selection from disk / Choose "fairymist_olga1.PspSelection" / as below :
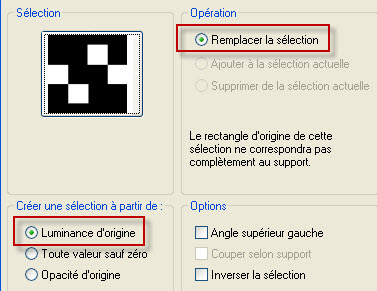
11- Selections / Promote selection to layer.
12- Go back on the layer just underneath and hit the delete key of your keyboard.
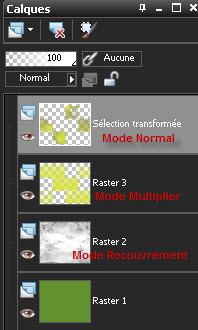
Selections / Select none .
I have set the mode of that layer on to Multiply ( It is up to you to see which mode is best for you!).
13- Effects / 3d effects / Drop shadow / 1, 1, 60, 0, black.
14- Effects / Edge effects / Enhance.
15- Activate the layer which is on top of the pile.
Effects / 3d effects / Drop shadow / 1, 1, 80, 0, black.
16- Image / Mirror
I have left the mode of that layer on to Normal ( See what is best for you !).
Here is what I get at that stage of the tutorial :

Step 2 : The flower brush
1- Set your Material palette with two colours which will be used to apply the flower brush on your tag.
My choice :
Foreground : Green d4de2c ( as on point 2 of step 1).
Background : orange d85d0c.
Set your foreground with a foreground linear gradient as below :

2- Activate your brush tool set as below :

3- Add a new raster layer
Apply the brush " Flower Spray 1.PspBrush" or a brush of your choice with your foreground gradient ( left click ) in the middle of each of the 4 squares of your Promoted selection layer ( The brushes will be applied on your new layer which will allow you to play on the mode of that layer ! ).
I have set the mode of that layer on to Hard Light ( It is up to you to see which mode gives a nicer result with your colours ).
4- Effects / 3d effects / Drop shadow as below :

It is up to you to find the drop shadow colour which makes your flowers show up nicely .
Step 3 : The waves
1- In your layers palette, activate layer Raster 3 and add a new layer as below :
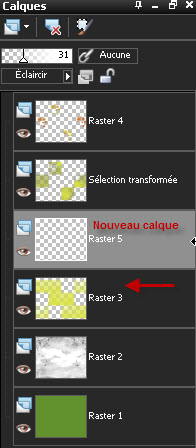
2- Selections / Load a selection from Disk / Choose "fairymist_olga2.PspSelection" / same settings as on point 10 of step 1.
3- Flood fill that selection in white.
Select none.
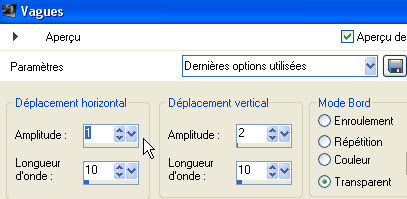
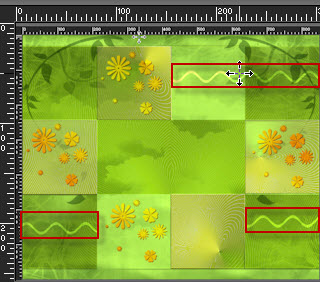
4- Effects / distortion effects / Wave as below :
5- I have set the mode of that layer on to Dodge and lowered its opacity to 30 ( It is up to you to see which mode and opacity are best for you ).
6- Layers / Duplicate / twice !
7- Close temporarly the Promoted selection layer ( which will be on your way ! ) and place the 3 layers as below :
Open the eye of your Promoted selection layer.
Step 4 : The stars
1- In your layers palette, activate the layer which is just underneath your Promoted selection layer.
- Add a new raster layer
- Flood fill that layer in white.
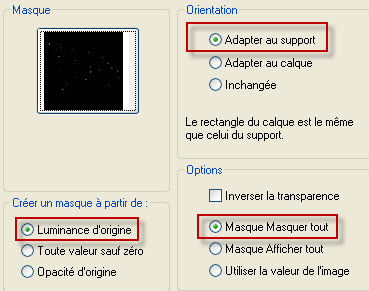
3- Layers / Load a mask from Disk / Choose "Lotty_Mask15.PspMask" and set as below :
Layers / Merge group.
I have set the mode of that layer on to Dodge.
Step 5 : The main tube
In your layers palette, activate the layer which is on top of the pile !
1- Open the tube "Jen_Vrouw 433_24-03-2011.pspimage" or a tube of your choice, in your Psp and copy it.
2- Paste it as a new layer on to your tag.
I have resized my tube at 85% ( Resize all the layers NOT checked !).
- Place as on my tag or to your liking.
3- Effects / 3d effects / Drop shadow of your choice / 4, 4, 60, 20 , black for me.
Step 6 : The title
1- Set your Material palette as below :
Close your foreground and set your background with a colour of your choice to write that title.
My choice : Dark green 334a0a.
2- Activate your text tool, set as below :

If you use another font , you will probably have to change the size of it.
- Apply your text tool on your tag and write down the chosen word ( Olga for me ).
- Confirm and convert to raster layer.
Place your title as on my tag or to your liking.
3- Effects / 3d effects / Drop shadow of your choice / 1, 1, 80, 1, yellow colour ffff7b for me .
Step 7 : The borders
1- Apply your signature.
2- Make sure everything is at the right place !
3- Image / add some symmetric borders of 2 pixels with a colour of your choice :
d4de2c for me.
4- Layers / Promote background layer.
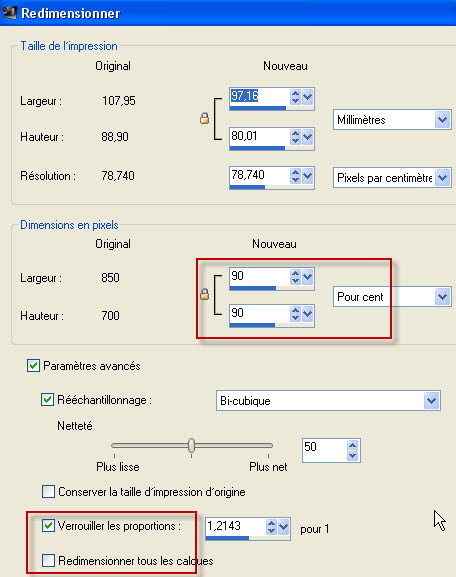
5- Image / Resize as below :
6- Effects / 3d effects / Drop shadow / 0, 0, 80, 20, black.
7 - Add a new raster layer
Layers / Arrange / Move down.
8- Flood fill that new layer with your background colour.
9- Effects / Plugins / Two Moons / Wish it would Rain as below :

10- Add a new raster layer and flood fill it in white.
11- Layers / Load a mask from Disk / Choose "Lotty_Mask15.PspMask" and set as previously :
- Merge groupe and set the mode of that layer on to Dodge.
12- Image / add some symmetric borders of 1 pixel with a colour of your choice :
d4de2c for me.
13 - Save your work as a jpeg file and resize it if necessary
***************
That's it !! You've done it !!
If you 've enjoyed doing my tutorial, it would be nice to write a few words in my guest book !
If you 've had the slightest problem, please, send me a mail so I can see to the problem.
Tutorial translated on the 13th of August 2011
*************
You'll find some versions of that tag in my gallery HERE