

Thank you for putting a link to this tutorial, whenever you display your realization of that tag on a website, on a group or in a mail !
**************************
You'll find some versions of that tag in my gallery HERE
*****************
To realize that tag, you'll need the plugins VDL Adrenaline, Mura's seamless, Alien skin Eye Candy 5 / Impact,
and the material zip

**************
*It is forbidden to suppress watermarks on the material provided , to alter, mist or rename the tubes in order to respect the work of the tubers
-The tube of the scenery is by Guismo
You'll find some of her tubes on Dakara's site here
You'll be able to get her tubes by joining in her sharing group here
- The mask hjr_mask-texture29 is by HJR
The other elements have been found on the net
******************
Preparation
Duplicate your tubes and background. Close the originals and minimize the copies for now.
Put the MD mask 116 in your mask folder
*****************
Click here to print the tutorial
*******************
You can use my arrow to follow your work

***************
1- Open a new transparent image of 800 by 650 pixels
2- Set your colour palette with two colours of your choice
My choice : Foreground : light colour adcff3 
Background : dark colour 0a2a58 
Set your foreground with a linear gradient as follows :
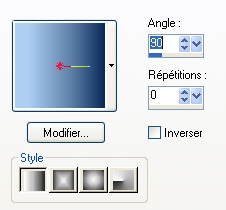
3- Flood fill your transparent layer with that gradient
4- Adjust / Brightness and contrast / Brightness and contrast / Brightness : -20 and contrast : 0
5- Effects / plugins / VDL adrenaline / Snowflakes as below :

Adjust / sharpness /sharpen
6- Add a new raster layer and flood fill it with your dark colour
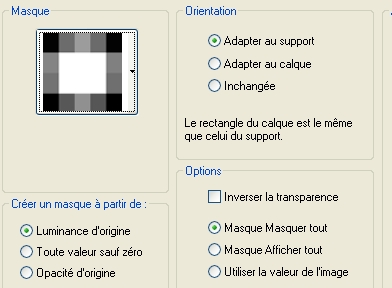
7- Layers / load a mask from disk / choose MD Mask 116 with the settings below :
Layers / Merge group
Effects / edge effects / enhance
8- Add a new raster layer and flood fill it with your light colour
9- Layers / new mask layer / from image / choose hjr_mask-texture29 / Only check Source Luminance
Adjust / sharpness / sharpen more
Merge group
10- Open the tube calguismistcilhiver4119 or a scenery tube of your choice, copy it and paste it as a new layer
My tube is at the right place ! Make sure yours give a nice effect and move it if necessary
I have set the mode of that layer to Luminance Legacy and lowered its opacity to 37
Put your work on the side for the moment, we're going to make the snow star frames
11- Open the tube decokreis-muckis-winterscrap
Window / duplicate ( or hit the shift key and the d key )
You have now two "decokreis" !
12- With your magic wand set as below, select the inside of one of your "decokreis"

13- Selections / modify /expand 2 pixels
Add a new raster layer
14- Open your scenery image or another big size scenery image
With your cercle selection tool set as below , select a nice part of your image (you'll have to select another nice part later on for your second decokreis !)

Copy that round selection
15- Go back to your selected decokreiz
Make sure your transparent layer (created on step 13) is activated
Paste into the selection
Select none
16- Layers / arrange / move down
Layers / merge visible
17- Repeats steps 12, 13, 14, 15 and 16 for your second decokreiz using another nice part of your image
18- Copy your two decokreiz on your tag ( that you have put on the side on step 10 )
Resize each of them by 40% ( Resize all the layers NOT checked !)
Place them as on my tag
19- Open the tube Autumnmist or a tube of your choice, copy it and paste it as a new layer
Place it at the right place !
To make my tube brighter, I did this :
Adjust / Brightness and contrast / Brightness and contrast / Brightness : 0 and contrast : 20
I did it twice !
Your tube may not need that treatment if it is bright enough !!
20- Effects /3d effects / drop shadow as below , with the colour white !!

21- Activate now the layer which is underneath your tube ( the layer with the white shadow )
Effects /distortion effects / wind / check from right , wind strength : 100
Set the mode of that layer to Dodge and lower its opacity to 50
22- Activate now your top layer ( the one on which your tube itself is )
Open the tube "ruban_rouge" , copy it and paste it as a new layer
You may colorize that tube or use another ribbon of your choice !
Place the ribbon as shown on my tag
23- Open the tube "noeud", copy it and paste it as a new layer
You may colorize that tube or use another bow of your choice !
24- Add a new raster layer
Set your colour palette with two light colours
My choice : Foreground : white
Background : blue 4c8dd2 
Set your Background with a linear gradient, angle 45, repeat 1, Invert CHECKED
25- Activate your text tool, set as below, choose the font Bahamas or a font of your choice
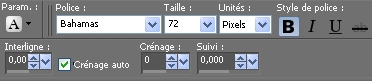

Write in capital letters NUIT DE NOËL or a text of your choice
26- Image /free rotation as below :
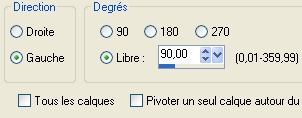
Place your text as on my stag
27- Effects / plugins / Mura's seamless / Emboss at alpha as below :
28- Add a new raster layer and apply your signature
29- Make sure everything is in its place
Image / add some symmetrical borders of 1 pixel, with a light colour ( white for me )
30- Layers / Promote background layer ( your background layer will be converted to a raster layer )
31- Image / resize at 90% ( Resize all the layers NOT checked !)
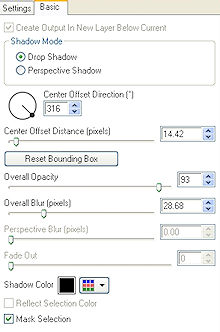
32- Effects / modules externes / Alien skin Eye candy 5 / impact / Perspective shadow / Drop shadow blurry default, as below :
33- Add a new raster layer
Layers / arrange / move down
34- Flood fill that layer following steps 2 to 5
Image / mirror
Image / flip
35-Image / add some symmetrical borders of 1 pixel, with a light colour ( white for me )
Put your tag on the side for the moment
We're now going to do the animation ( make snow with the airbrush ! )
If you don't feel like doing the animation, you can, then, save your work as a jpeg file and resize it if necessary
*********
Animation
*If you have any problem making the three snow layers, you can use mine by clicking ici
1- Open a new transparent image of 802 by 652 pixels and flood fill it in black ( or open a new black image !!)
Without that black layer, you wouldn't be able to see the snow we're going to create !
2- Add a new raster layer
Set your background and foreground with the colour white
Activate your airbrush tool, set as below : ( Density 4 !!)

Apply your airbrush all over your layer or only in some parts of it ( in that case, use the round shape ) depending how much snow you want to create
3- Add a new raster layer and repeat the previous step but change the density of your air brush ( I set it on 1)
4- Add a new raster layer and repeat the previous step but change the density of your air brush ( I set it on 3)
The bigger your figure is, the thicker the snow will be
5- Rename each of these 3 snow layers : snow1, snow2, snow3
6- Activate now the layer snow1, copy it
7- Go back to your tag ( that you have left on the side on step 35 ) and paste it as a new layer
Layers / Merge all
Edit / copy
8- Open your Animation shop
In Animation shop : Edit / paste as a new animation
9- Go back to your Psp
Click twice on the return arrow , as below, to cancel what has been done on step 7 :

Activate your layer snow2, copy it
Go back to your tag and paste it as a new layer
Layers / Merge all
Edit / copyr
10- Go back to Animation shop
In Animation shop : Edit / paste after current frame
11- Go back to your Psp and repeat steps 9 and 10 for snow3
12- In Animation shop : Edit / Select all
13- Still in Animation shop : Animation / Frame property ( set to 20 )
The smaller the figure is , the quicker the animation will be !
14- Have a look at your animation : in Animation shop, click as below

Stop the animation by clicking on the same place
15- If the result suits you , all you have to do is save your animation as a gif file, in your Animation shop !
You may resize your animation in Animation shop :
Animation / resize animation / choose the right size in pixels
***************
That's it !! You've done it !!
If you 've enjoyed doing my tutorial, it would be nice to write a few words in my guest book ! If you 've had the slightest problem, please, send me a mail so I can see to the problem !
Tutorial translated on the 19th of December 2009
*****************
You'll find some versions of that tag in my gallery HERE