

Thank you for putting a link to this tutorial, whenever you display your version of that tag on a website, on a group or in a mail !
************************
Other versions of that tag here
*******************
To make that tag, you'll need the filters :
- Alien Skin Eye Candy 5 Impact and Textures
- VDL Adrenaline
and the material zip down below :

**************
" It is forbiden to suppress watermarks on the material provided, to alter, mist or rename the tubes in order to respect the work of the tubers.
- The tube of the girl is by Odette.
- The tube of the scenery is by Mentali.
- The other elements that I haven't created, have been found on the net.
******************
Click here to print the tutorial.
**********************
You can use my arrow to follow your work
Click on it and drag it all along the tutorial !

***************
Preparation
- Place the selection file "Fairymist-selection-Noël-2022" in the selection folder of your PSP.
****************
Tutoriel made with PSP 2020
****************
1 - Open a new transparent image of 850 by 700 pixels as below :

2- Selections / Select all.
3- Open the image "Bkg Noel 2022" or a blurred image of your choice,
copy it and paste it into the selection.
- If you wish to use my image but want to change its colors, proceed as below :
- Adjust / Hue and saturation / Hue map / move the different cursors
to get the colours you want.
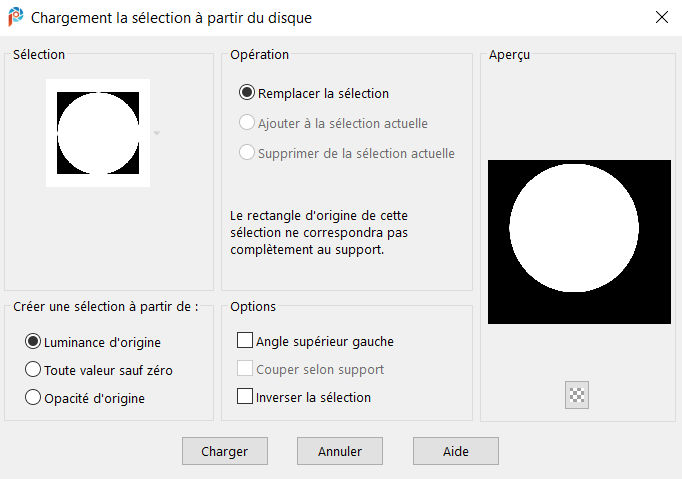
4- Selections / Load a selection from the disk as shown down below :
- Choose the selection "Fairymist-selection-Noel-2022"
5- In your layers palette, right click on this first layer, choose :
Promote background layer ( your background layer will be converted to a raster layer )
- Keep the selection !
6- On that new layer :
- Selections / Modify /Inside, outside Feather / inside as below :

7- Open the scenery tube "mentali-misted846" or a tube of your choice,
copy and paste it as a new layer.
(if you paste it into the selection, you may distort your tube !).
8- I have placed the tube as follows :
- Effects / Image Effects / Offset as below :

9- Selections / Invert.
- Hit the delete key of your keyboard to delete the parts of that tube that are outside the circle !
- Selections / Select none.
10- In your layers palette, activate the layer with the circle.
- Set the mode of that layer on to Screen, opacity at 72.
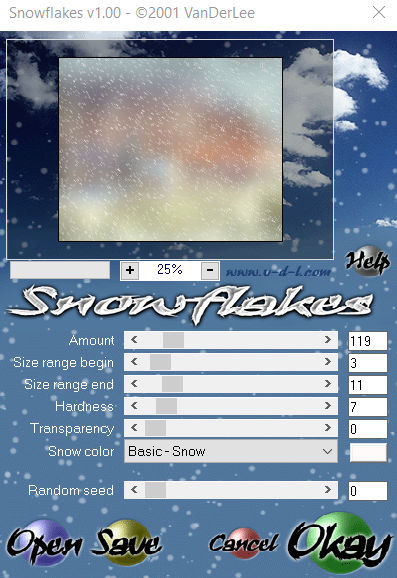
11- Activate layer Raster 1, at the bottom of the pile of layers.
- Effects / Plugins / VDL Adrenaline / Snowflakes as below :
12- In your layers palette / activate the layer on top of the pile (the scenery).
- Add a new raster layer.
13- Flood fill it in white.
14- Open the mask "Masque-Noël-2022" in your PSP.
- On your tag : Layers / New mask layer / from image as below :

- Adjust / Sharpness / Sharpen more.
- Layers / Merge group.
15- Effects / 3D effects / Drop shadow as below :

1, 2, 65, 2, color 341a02
16- Add a new raster layer.
- Flood fill it in white.
17- Open the mask "65-kris" in your PSP.
- On your tag : Layers / New mask layer / from image as below :

- Adjust / Sharpness / Sharpen more.
- Layers / Merge group.
18- Layers / Duplicate.
- Layers / Merge down.
19- Add a new raster layer.
- Selections / select all.
- Flood fill that layer in red( #730501) like me or with a colour of your choice.
20- Selections / Modify / Contract by10 pixels.
- Hit the delete key of your keyboard.
21- Selections / Invert.
22- Effects / 3D effects / Inner bevel as below :

- Selections / Select none.
23- Effects / distortion effects / curlicues as below :

24- Open Odette's tube "fillette chat cadeaux Noël" and erase her name on it.
- Copy it and paste it as a new layer on to the tag.
25- Image / Resize the tube at 75%.
26- Layers / Duplicate.
- Set the mode of that copy on to Multiply.
- Layers / Merge down.
- Place the tube like me or to your liking.
27- Effects / Plugins / Filtre Alien skin eye candy 5 / Impact / Perpective shadow as below :

28- Effects / 3d effects / Drop shadow :
-2, 2, 65, 1, same colour as on point 14.
29- Open the tube "Yoka-TEXT-HappyHolidays-181216" or a tube of your choice,
copy it and paste it as a new layer on to your tag.
- Place the tube like me or to your liking.
30- ADD A NEW RASTER LAYER.
- Layers / Arrange / Send to bottom.
31- Image / Canvas size as below :

32- Selections / Select all.
33- Open, once more, the image "Bkg Noël 2022" or the image of your choice,
- copy it and paste it into the selection.
- Selections / Select none.
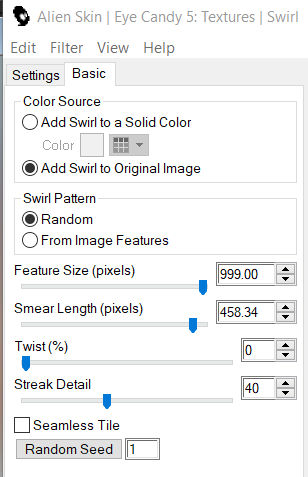
34- Effects / Plugins / Alien Skin Eye Candy 5 / Textures /
Swirl / Random, large, no twist, long streaks as below :
35- Effects / edge effects / enhance more.
36- Add a new raster layer and flood fill it in white.
37- Open the mask "Fairymist-calque- neige" in your PSP.
- Activate the layer that you have just flood filled in white :
- Layers / New mask layer/ from an image as below :

- Adjust / Sharpness / Sharpen more.
- Layers / Merge group.
38- In your layers palette, activate the layer with the red frame.
- Effects / Plugins / VDL Adrenaline / Snowscape as below :

39- In your layers palette, activate the layer on top of the pile.
- Open the tube "kikirou1263_Bow-Ribbon redim et colorisé" or a tube of your choice.
- Copy it and paste it as a new layer on to your tag.
- Place it like me or to your liking.
40- Apply your signature.
- Make sure everything is at the right place !
- Image / Add some symmetrical borders as below :

41- Image / Add some borders as above but with red instead of white.
42 - Save your work as a jpg file.
***************
That's it !! You've done it !!
If you 've enjoyed doing my tutorial, it would be nice to write a few words in my guest book !
If you 've had the slightest problem, please, send me a mail so I can see to the problem.
Tutorial translated on the 14th of december 2022
*************
Thank you to my sister Annie-Claude and to my friend Annie that have tested this tutorial.
*************
