
Thank you for putting a link to this tutorial, whenever you display your realization of that tag on a website, on a group or in a mail !
**************************
You'll find some versions of that tag in my gallery HERE
******************
To realize that tag, you'll need the filter VM Natural
and the material zip down below :

**************
*It is forbidden to suppress watermarks on the material provided , to alter, mist or rename the tubes in order to respect the work of the tubers
- The tube of the champagne is by Patrymists
- The tube of the scenery is by Guismo
You'll find some of her tubes on Dakara's site here
You'll be able to get her tubes by joining in her sharing group here
- The other elements have been found on the net
******************
Preparation
Duplicate your tubes and background. Close the originals and minimize the copies for now.
Export your brushes in your psp as custom brushes
*****************
Click here to print the tutorial
*******************
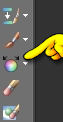
You can use my arrow to follow your work

***************
1- Open a new transparent image of 800 by 650 pixels
2- Select all
Open the image bg or a tile background of your choice, copy it and paste it into the selection
Select none
Minimize that tile in your Psp because we'll need it later on to flood fill your figures !
3- Adjust / blur / gaussian blur / 20
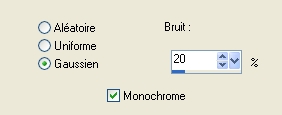
4- Adjust / add some noise / as below :
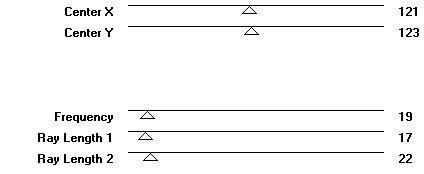
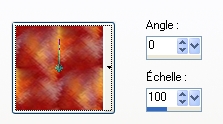
5- Effects / plugins / VM Natural / Splash default as below :
6- Open the tube clock Divers0189 or a tube of your choice, copy it and paste it as a new layer
Place the tube in the top part of your tag
I have set the mode of that layer to Soft light ( opacity 100)
It will be up to you to choose the mode and the opacity that is better for your tube
7- Open the tube PatryMists_NewYear06 or a tube of your choice, copy it and paste it as a new layer
Place the tube in the bottom right hand side corner of your tag
I have lowered the opacity of that layer to 63
8- Open the tube Calguisredsigns3099 or a tube of your choice, copy it and paste it as a new layer
I did : Image / Mirror and have resized my tube at 75%
Place your tube in the bottom left hand side corner of your tag
I have lowered the opacity of that layer to 75
9- Add a new raster layer
Activate your brush tool set as below and apply it in the centre of your tag with a light colour out of your bg tile
I have chosen the colour f3ae47

If your psp, doesn't accept my brush, you can copy the layer Ss sparkles, enclosed in my zip and paste it onto your tag as a new layer
Set the mode of that layer to Dodge and lower its opacity to 65
10- Add a new raster layer
Set your foreground with white or a colour of your choice and close your background
11- Activate your text tool , set as below and write 2010 with the font Franklin Gothic Demi, size 150 or a font of your choice

Select none
Place your figure at the right place , you won't be able to move it afterwards!!
12- With your magic wand, set as below, select the inside or each figure of the number 2010 while keeping the shift key pressed

13- Selections / modify / expand by 1 pixel
14- Add a new raster layer
Set your foreground with the texture bg we have used on step 2 and that is still in your psp

15- Flood fill the inside of your selected figures with that texture
Select none
16- Layers / duplicate / twice
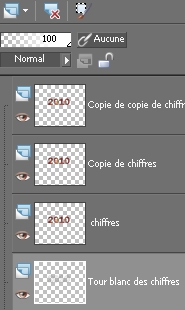
17- Activate the layer with the white figures, as shown above
Layers / arrange / bring to top
18- Activate now the layer "chiffres" ( see above ) and close the two copies of that layer
19- Activate the hue brush ( up / down), set as below and and apply that brush on your figures ( left click and right click to get different effects )

You can either shortly press the brush several times or wipe the figures from one side to another
Just play with your tool to get colours you like
20- Open, one after the other, the two copies of the number and apply the hue brush on them in order to get different shades
*** If your Psp doesn't have that tool, you can use the layers I have enclosed in my zip and paste them on your tag
These three layers with your numbers will be used in the animation
If you don't feel like doing the animation, just keep your favourite number layer !
21- Add a new raster layer
Set your foreground in white
Activate your brush tool set as below and apply the brush Bt-Daintydeco, size 500, rotation 90

Place it on the left hand side as shown on my tag
I have set the mode of that layer to Overlay
22- Layers / duplicate
Image / mirror
Image / flip
Image / free rotation / left / 45° ( don't tick any other box )
Place it on the top of your tag
** If your Psp doesn't accept that brush , you can use the layers I have put in the zip
23- With my eraser tool, I have rubbed off the part of the brush which was on the lady's face
24- Add a new raster layer and with your text tool , write your title ( set your background in white or a colour of your choice / close your foreground )
I have chosen the font Dominique, size 72 for the word Happy
I have added another raster layer and used the font Eurostar Black Ext, size 50 for the words New Year
Place to your liking
(If you prefer, you can use my title which is in my zip )
25- Effects /3d effects / drop shadow / 1, 1, 70, 2, black or a drop shadow of your choice
26- Add a new raster layer and apply your signature
27- Add a new raster layer / Select all
Flood fill that selection in white
Selections / modify / contract by 1 pixel and hit the delete key
Select none
28- Activate your bottom layer ( the one with your background)
Image / canvas size as below :

29- With your magic wand, set as on step 12, select the transparent part of your tag
Activate, one after the other, the layers where your tubes are and suppress the parts of the tubes that overlay on the selected border by hitting the delete key
Select none
30- Add a new raster layer
Layers / arrange / move to bottom
Flood fill that layer in white
Your tag is now finished
31- We're now going to do the animated part of it
If you don't wish to do the animation, all you have to do is merge all your layers and save your work as a jpeg file . Resize your tag if necessary
********
Animation
1- In your Psp
Close your two layers copies of the number 2010
Edit / copy special / copy merged
2- In Animation shop
Edit / paste as a new animation
3-In your Psp
Close the layer previously activated
Activate the layer which is above (the first copy of your figures )
Edit / copy special / copy merged
4- In Animation shop
Edit / paste after current frame
5-In your Psp
Close the layer previously activated
Activate the layer which is above (the second copy of your figures )
Edit / copy special / copy merged
6- In Animation shop
Edit / paste after current frame
7- In Animation shop
Edit / Select all
Check your animation, in your animation shop, by clicking here

Stop the animation by clicking at the same place
If you like it , all you have to do is save your work in a gif file , in your animation shop !
You may resize your file in your Animation shop :
Animation / Resize animation / choose the right size in pixels
***************
That's it !! You've done it !!
If you 've enjoyed doing my tutorial, it would be nice to write a few words in my guest book ! If you 've had the slightest problem, please, send me a mail so I can see to the problem !
Tutorial translated on the 26th of december 2009
***************
Other versions of that tag