
Thank you for putting a link to this tutorial, whenever you display your realization of that tag on a website, on a group or in a mail !
**************************
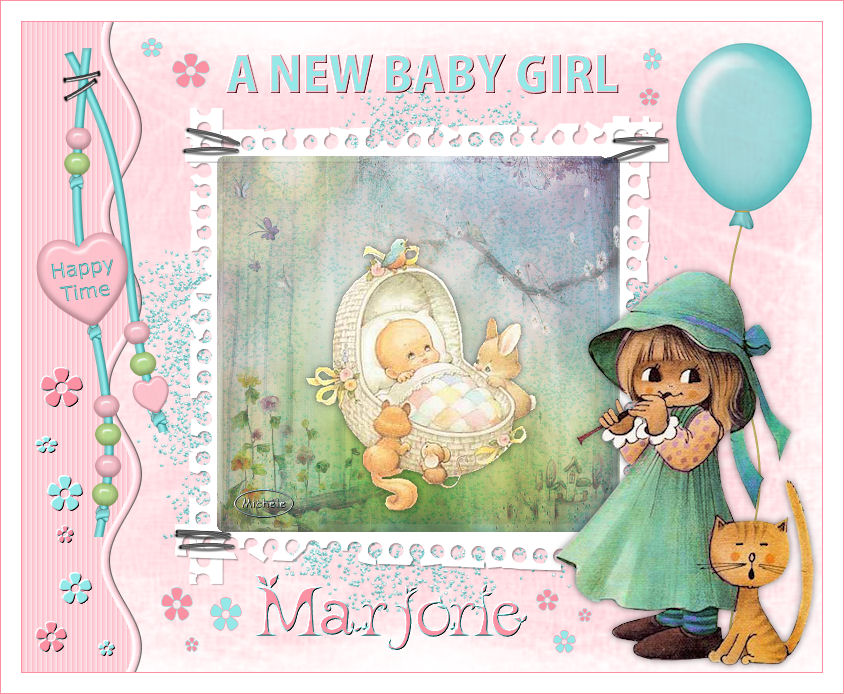
You'll find some versions of that tag in my gallery HERE
**********************
To realize that tag, you'll need the plugin
- Mura's seamless here
and the material zip down below

**************
*It is forbidden to suppress watermarks on the material provided , to alter, mist or rename the tubes in order to respect the work of the tubers
- The tube of the girl is by Dinie
- The backgrounds come from the scrap kit 6 by Gun Lindgren
- The tubes "Beadstring" and "Ballon" are elements of the scrap kit Happy Time by Bea of Bea
The other elements have been found on the net
******************
Preparation
Duplicate your tubes and image. Close the originals and minimize the copies for now..
Place your mask scratchdup2 in your mask folder
Place the selection in your selection folder
*****************
Click here to print the tutorial
*******************
You can use my arrow to follow your work

***************
1- Open a new transparent image of 800 by 650 pixels
2- Flood fill that transparent layer in white
3- Add a new raster layer and select all
4- Open the background "gl_taggersizekit06_paper20", copy it and paste it into the selection ( You may use another background !)
I have colorized that background in pale pink : Adjust / Hue and saturation / colorize / 249, 240
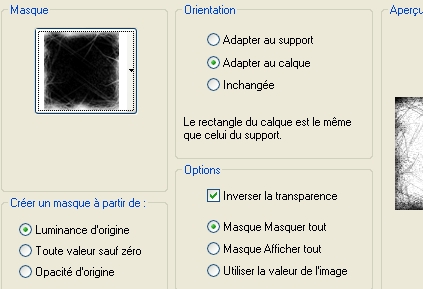
5- Layers / Load a mask / from disk / choose the mask " Scratchdup2" and set as below :
Merge group
6- Open the tube "ditab glitter1c", copy it and paste it as a new layer
I have colorized it in turquoise ( 127 / 165 )
7- Open the tube frame "parels" or "frame8_bc_happytime" or a scrap frame of your choice , copy it and paste it as a new layer
8- Add a new raster layer
Selections / load from disk / choose "selection_newbaby_fairymist" / check Source Luminance and Replace the selection
9- Flood fill that selection with your background colour but slightly darker ; I have chosen the colour fdc2cc 
10- Keep selection !
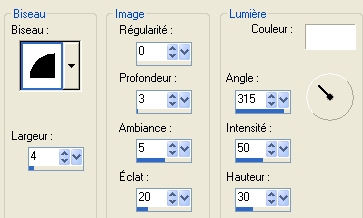
Effects / 3d effects/ Inner bevel as below :
Select none
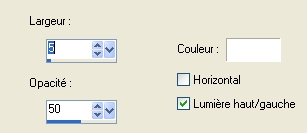
11- Effects / distortion effects / waves as below :

12- With your deform tool ( letter D), stretch your band vertically , towards the top and the bottom in order to suppress any sign of bevel on both ends
Click on the tool Move to get rid of the deform tool ( or hit the M key )
13- Lower the opacity of that layer to about 60
14- With your magic wand, set as below , select the part of your tag which is on the left of your waved band

15- Add a new raster layer
Flood fill that selection with the same colour as the one used on step 9
Select none
16- Effects /textures effects / Blinds as below :
17- Merge down
18- Activate the layer where your frame is
With your magic wand set as above , select the inside of your frame
Selections / Modify / expand by 8 pixels
19- Open your image or a picture of the baby , copy it and paste it as a new layer
I have used Jhanna's background and I have pasted a tube as a new layer on it !
Activate the layer where your image is
Selections / invert
Hit delete
Deselect
20- Activate now the layer on top of your pile of layers
Open the tube "CS_cute&sweet_balloon4" or a tube of your choice, copy it and paste it as a new layer
Place that tube at the right place
I have lowered the opacity of that layer to 82
21- Open the tube " beadstring2_bc_happytime"or a tube of your choice, copy it and paste it as a new layer
Place the tube at the right place
22- Effects /3d effects / drop shadow / 4, 4, 30, 20, black
23- Open the tube " Doll 21-02-3-9colorisee"or a tube of your choice, copy it and paste it as a new layer
I have resized that tube at 80%
Place the tube at the right place
24- Effects /3d effects / drop shadow / 0, 0, 50, 10, black
25- Add a new raster layer
Activate your text tool, set as below and write the text that you want to put on the top of your tag ; I have written A NEW BABY GIRL but that could be A NEW BABY BOY or UNE PETITE FILLE or UN PETIT GARCON ....it's up to you !

I have set my foreground in pink and my background in turquoise !
26- Effects / plugins / Mura's seamless / Emboss at alpha default
27- Add a new raster layer
With your text tool set as below , write the baby's first name
I have inverted my colours !

28- Effects / plugins / Mura's seamless / Emboss at alpha default
29- Add a new raster layer and activate your preset shape tool set as below

Draw small flowers on your tag, to your liking
You may create as many layers as flowers so you can move them as it suits you, later on !
30- You may add the same effect as on step 28, if you like
31- Add a new raster layer and apply your signature
32- Make sure everything is in the right place
Image / add some symmetrical borders of 1 pixel with a colour of your choice ( turquoise 62cccc for me )
Image / add some symmetrical borders of 30 pixels with a colour of your choice ( pale pink : fedde2 for me )
Image / add some symmetrical borders of 1 pixel with a colour of your choice ( turquoise 62cccc for me )
33- Save your work as a jpeg file and resize the tag if necessary
***************
That's it !! You've done it !!
If you 've enjoyed doing my tutorial, it would be nice to write a few words in my guest book ! If you 've had the slightest problem, please, send me a mail so I can see to the problem !
Tutorial translated on the 23rd of January 2010
*************
You'll find some versions of that tag in my gallery HERE