Thank you for putting a link to this tutorial, whenever you display your realization of that tag on a website, on a group or in a mail !
**************************
You'll find some versions of that tag in my gallery HERE
******************
To realize that tag, you'll need the plugins :
- VM Distortion,
- Alien skin Xenofex 2
and the material zip down below :

**************
*It is forbidden to suppress watermarks on the material provided , to alter, mist or rename the tubes in order to respect the work of the tubers
- The tube of the woman is by Aclis
You'll be able to get her tubes by joining in her sharing group here
- The tube of the horse is by Kat
You'll be able to get her tubes by joining in her sharing group here
The mask San Valentin is by Brujita
The brushes have been found on the net
******************
Préparation
Duplicate your tubes and the mask Fairymist; close the originals and minimize the copies for now.
Put the other masks in your mask file.
Export your brushes in your psp as a custom brushes.
*****************
Click here to print the tutorial
*******************
You can use my arrow to follow your work

***************
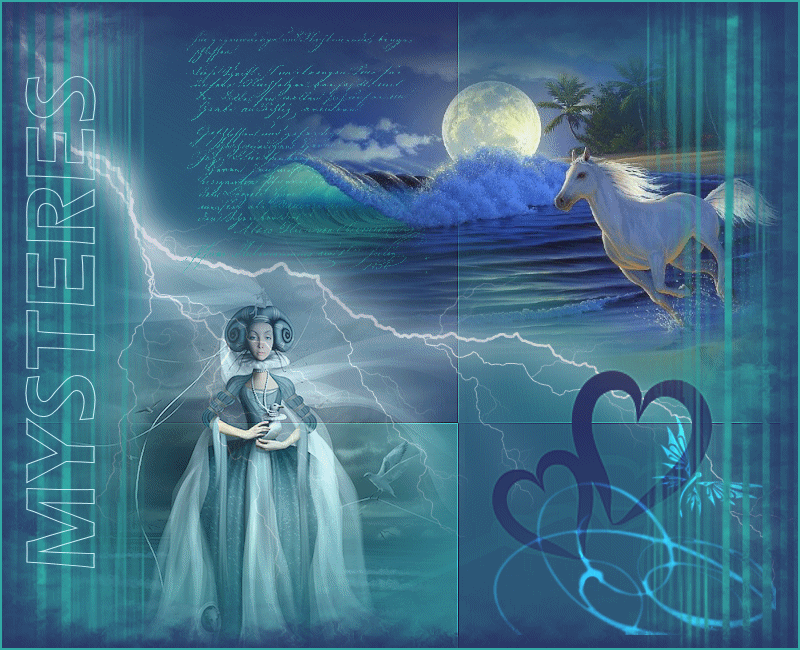
1- Open a transparent image of 800 by 650 pixels
2- Set your material palette with two colours out of your main tube
My choice: Foreground : dark colour 293263 
Background : bright colour 33aba6 
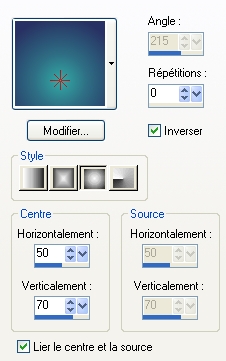
3- Set your foreground with a sunburst gradient with these settings :
4- Flood fill your transparent image with that gradient
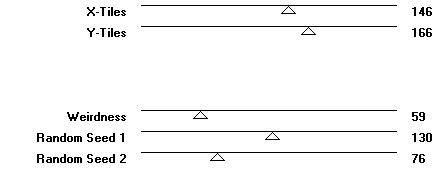
5- Effects / plugins / VM Distortion / Tilomat 2000 as below :
6- Effects / edge effects / enhance more
7- Add a new raster layer
Effects / plugins / Alienskin Xenofex 2 / Lightning as below

I haven't touched the Glow tab
8- Add a new raster layer and flood fill it with your dark colour
9- Layers / load a mask / from disk / choose Brujita_San_Valentin_3 / with these settings :
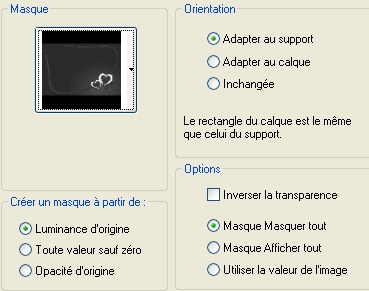
Adjust / sharpness / sharpen more
Layers / Merge group
10- Add a new raster layer
Set your foreground with your light colour
11- Activate your brush tool, choose the brush Random B4, set as below,or a brush of your choice and apply it in the bottom right hand corner of your tag.

Set the mode of that layer to Dodge and lower the opacity to 80
12- Add a new raster layer
With your brush tool, set as below, apply the brush letter in the top left hand corner of your tag

It's up to you to decide whether you want to change the mode of that layer or lower its opacity ... or leave it as it is !
13- Open the tube Kat_0205 or a tube of your choice, copy it and paste it as a new layer
Place that tube in the top right hand corner of your tag
14- I have duplicated that layer and merged down to emphasize the tube
15- Open the tube Aclis fantasy_18_08_2008 or a tube of your choice, copy it and paste it as a new layer
I have resized the tube at 75%
Place that tube in the bottom left hand corner of your tag
16- I have lowered the opacity of that layer to 62
I have duplicated it ; I have set that second layer on the Dodge mode and lowered the opacity to 18
That is my way to emphasize the tube !
17- Add a new raster layer and flood fill it with your light colour
18-Layers / load a mask / from disk / choose Mask Pillars / with the same settings as on step 9 :
Adjust / sharpness / sharpen more
Layers / Merge group
19- Add a new raster layer and flood fill it with your dark colour
20- Layers / new mask layer / from image / choose mask_fairymist / check Source Luminance and INVERT
Layers / Merge group
21- Layers / duplicate
22- Add a new layer and apply your signature
23- Add a new raster layer and flood fill it with your light colour
24- Selections / Select all
Selections / Modiy / contract by 2 pixels
Hit delete
Selections / select none
25- Add a new raster layer
Set your foreground with a very light colour
I have chosen the colour c8edf8 
26- Activate your text tool set as below and write the word MYSTERES or a word of your choice with the fonts Eras Demi TTC ( settings below ) or a font of your choice

27 - You can add a very light drop shadow if you wish
28- Image / free rotation as below :
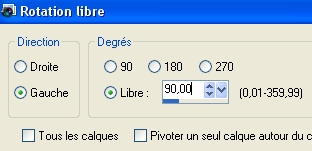
Place your text as on my tag
29 - For those who are interested, we're now going to make a little animation !
If that doesn't appeal to you , you can merge all, save your work as a jpeg file and resize it if necessary
****************
ANIMATION
1- In your Psp : Activate one of your layers
Edit / Copy special / copy merged
2- Open your Animation Shop
In your Animation shop : Right clic / paste as a new animation
3- Go back to your Psp : Activate the layer where the lightning is ( layer raster 2)
Lower the opacity of it between 50 and 60
Edit / Copy special / copy merged
4- In your Animation shop : Edit / paste after the active image
5- Go back to your Psp : Activate the layer where the lightning is ( layer raster 2)
Lower the opacity of it to 0
Edit / Copy special / copy merged
6- In your Animation shop : Edit / paste after the active image
7- In your Animation shop : Edit / Select all
If you want to change the speed of the animation :
Animation / Frame properties / The bigger your number is the slower the animation is !!!
8- Check your animation, in Animation shop, click where shown below

Stop the animation by clicking on it again
9- If the result suits you, all you have to do, now, is save your animation, in your Animation shop, as a gif file
*******************
That's it !! You've done it !!
If you 've enjoyed doing my tutorial, it would be nice to write a few words in my guest book ! If you have the slightest problem, please, send me a mail so I can see to the problem !
Tutorial translated on the 29th of august 2009
*************
You'll find some versions of that tag in my gallery HERE