
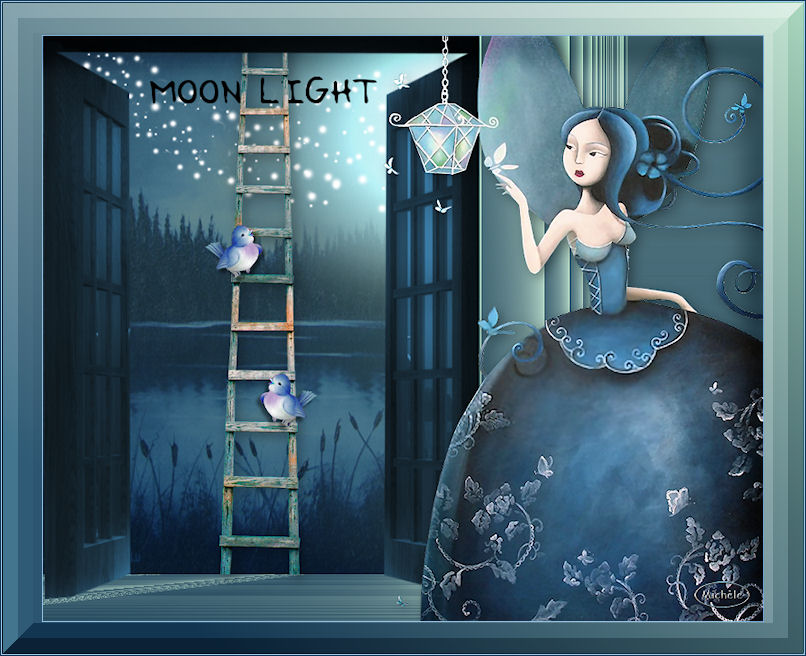
Thank you for putting a link to this tutorial, whenever you display your realization of that tag on a website, on a group or in a mail !
**************************
You'll find some versions of that tag in my gallery HERE
***********************
To realize that tag, you'll need the plugins :
- Filter Factory Gallery C / Versa-Tile
- Filter Factory Gallery A / Spotlight
- Bordure Mania (nvr) / Cadre relief n°1
and the material zip down below :

**************
*It is forbidden to suppress watermarks on the material provided , to alter, mist or rename the tubes in order to respect the work of the tubers
- The tubes of the woman is by Mtfp
The other elements have been found on the net
******************
Preparation
Duplicate your tubes and image. Close the originals and minimize the copies for now.
- Place your selections in your selections folder
*****************
Click here to print the tutorial
*******************
You can use my arrow to follow your work

***************
1- Open a transparent image of 800 by 650 pixels
2- Set your colour palette with two colours matching your main tube
My choice : Foreground : dark colour 123651
Background : light colour c2e4d1
Set your foreground with a linear gradient as below :
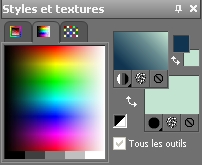
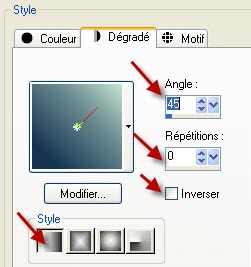
3- Flood fill your transparent layer with that gradient
4- Effects / plugins / Filter Factory Gallery C / Versa-Tile / 43, 2
5- Adjust / Sharpness / Sharpen
6- Selections / load a selection from disk / choose " fairymist_ moonlight_1.PspSelection"/ check Source Luminance and Replace the selection
7- Selections / Promote selection to layer
Keep the selection !
8- Add a new raster layer
Activate the picture "lac de nuit.jpg" or a picture of your choice, copy it and paste it into the selection
Select none
I have set the mode of that layer to Soft light but you can choose another mode if you prefer
You can colorize my picture if you wish
9- Layers / arrange / move down
Activate the top layer " Promoted Selection "
10- Effects / plugins / Filter Factory Gallery A / Spotlight as below :
The aim is to get a moon light effect ! Play round with Center X and Center Y to place the moon as you wish; move the Size button to get the size you wish
I have left that layer on the normal mode but lowered its opacity to 80 but it will be up to you to choose the mode and the opacity that suit you better

11- Activate your bottom layer ( Raster 1)
Selections / load a selection from disk / choose " fairymist_ moonlight_2.PspSelection"/ check Source Luminance and Replace the selection
12- Selections / Promote selection to layer
Keep the selection !
13- Effects / texture effects / blinds as below :
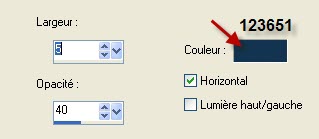
14- Keep the selection !
Effects / Plugins / Murameister / perspective tiling default ( 80, 0, 0, 100, 0, 0, 100, 255 )
Select none
15- Go back to the top layer
Selections / load a selection from disk / choose " fairymist_ moonlight_1.PspSelection"/ check Source Luminance and Replace the selection
16-Add a new raster layer
Activate the tube "Mtm_abstract_16_doors.pspimage" or a tube of a door or a window of your choice, copy it and paste it into the selection
Select none
17- I have colorized my door like this
Adjust / Hue and saturation / 144, 119
It is up to you to find the colour that matches your tag
18- Activate the deform tool ( Letter D) and stretch the sides of the door as shown with the red arrows so that the left and top sides of the door are right against the sides of the tag Pull the bottom side of the door down as shown with my white arrows
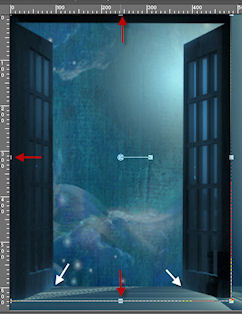
Click on your move tool ( Letter M) to desactivate your deform tool !
19- Activate the tube " titre_moonlight.pspimage", copy it and paste it as a new layer
Place it as shown on my tag or to your liking
You may prefer to write a title of your own or leave your tag without title !
( I have written my title with the font Macedo enclosed in my zip )
20- Activate the tube "stars.pspimage", copy it and paste it as a new layer
Place it as shown on my tag or to your liking
You may prefer to apply a brush of stars of your choice on a new layer !
* Place that layer underneath the layer with the door :
Layers / arrange / move down / twice !
21- Go back to your top layer
Activate the tube "echelle.pspimage" or a tube of your choice, copy it and paste it as a new layer
Place it as shown on my tag or to your liking
The ladder can be colorized or you can use the effect Hue map of Hue and Saturation
I have added a light drop shadow on the ladder : 4, 4, 40, 10, black
22- Activate the tube " Oisillon"or a tube of your choice, copy it and paste it as a new layer
Place it as shown on my tag or to your liking
You may change the colours of the bird by using the effect Hue map of Hue and Saturation
23- I have duplicated that layer with the bird and I did Image / mirror
Place it as shown on my tag or to your liking
24- Activate the tube "mtfp_267_the_blue_fairy_by_Sybile.pspimage" or a tube of your choice
Copy the layer where the tube is ( and not the layer with the watermark !)
and paste it as a new image !!!
On that new image :
Layers / resize at 650 pixels high as below :
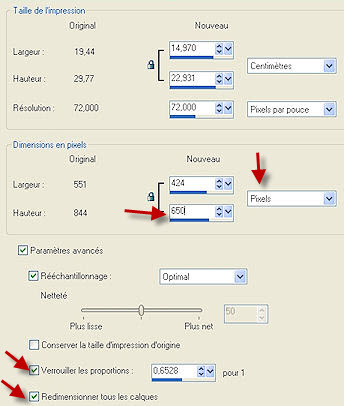
Adjust / sharpness / sharpen
25- Copy and paste as a new layer onto your tag
26- Effects /image effects / Offset / Horiz 190, Vertic 0, check custom and transparent
27- Effects / 3d effects / drop shadow of your choice / as on step 21 for me
28- Add a new raster layer and apply your signature
29- Make sure everything is at the right place
Image / add some symmetrical borders of 1 pixel with a colour of your choice
( 8dcadb  for me )
30- Layers / Promote background layer
31- Image / resize at 90 °% ( Resize all the layers NOT checked )
32- With your magic wand, set as below , select the transparent border of your tag

33- Flood fill that selection with the same gradient as on step 2
34- Selections / Promote selection to layer
Keep the selection !
35- Effects / Plugins / Bordure Mania (nvr) / Cadre relief n°1/ 49, 18 / angle chanfreinés checked
I have set the mode of that layer to Soft light
36- Effects / edge effects / enhance more
37- Effects / 3d effects / drop shadow / 30, - 20, 60, 30, black
Select none
38- Image / add some symmetrical borders of 1 pixel with a colour of your choice, as on step 29
39- Save your work as a jpeg file and resize it if necessary
***************
That's it !! You've done it !!
If you 've enjoyed doing my tutorial, it would be nice to write a few words in my guest book ! If you 've had the slightest problem, please, send me a mail so I can see to the problem !
Tutorial translated on the 17th of july 2010
*************
Other versions of that tag
