Thank you for putting a link to this tutorial, whenever you display your realization of that tag on a website, on a group or in a mail !
**************************
You'll find some versions of that tag in my gallery Here
***********************
To make that tag, you'll need the filters :
- Graphic plus / cross shadow
- Tramages / Panel stripes.
- Filters Unlimited 2.0
- Photo Aging kit
and the material zip down below :

**************
*It is forbidden to suppress watermarks on the material provided , to alter, mist or rename the tubes in order to respect the work of the tubers
- The tube of the music notes is by Kikirou. Thank you so much my friend for making that tube for me !
- The ribbon I have used is by Jaelop Designs
- The other elements that I haven't created, have been found on the net.
******************
Preparation
To be on the safe side, duplicate your tubes and image in your Psp :
-
Window / Duplicate
- Close the originals and work with the copies !
- The title of that tutorial has been written with the font Pristina (size 72).
*****************
Click here to print the tutorial
**********************
You can use my arrow to follow your work
Click on it and drag it all along the tutorial !

***************
Tutorial made with PSP XIII
********************
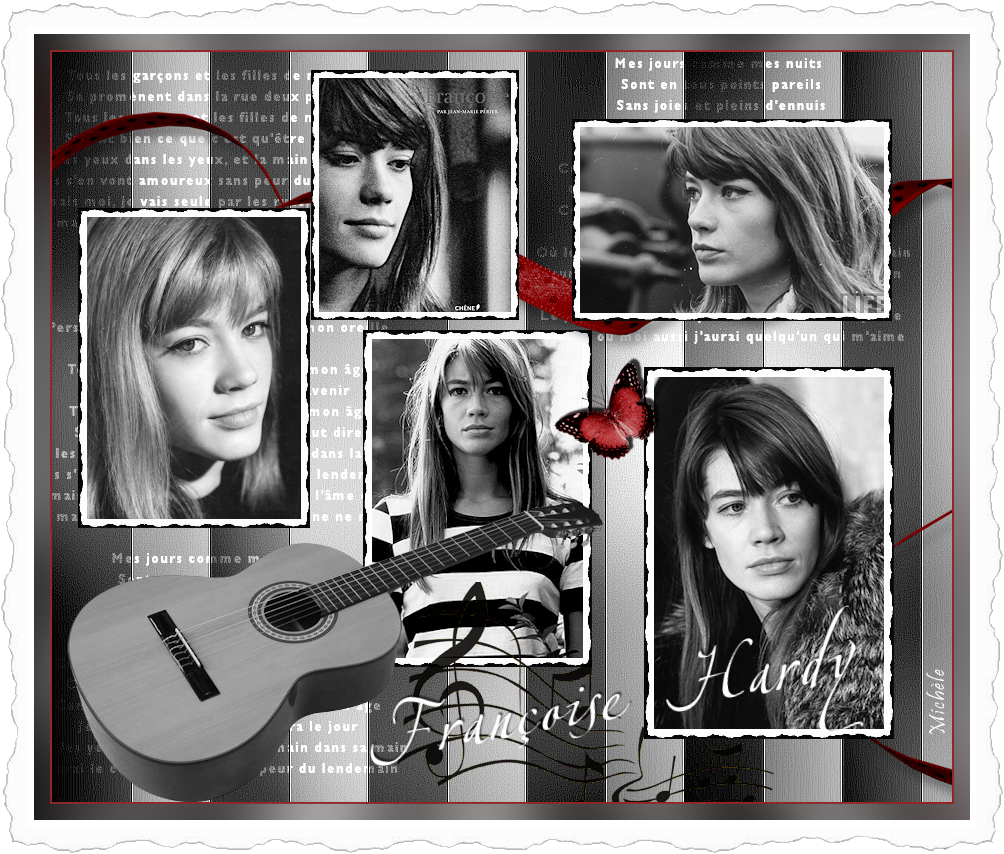
- A little note before we start :
- I have made that collage in black and white with a touch of red but it is up to you to decide whether you prefer to use colour pictures or not !!!
1 - Open a new transparent image of 900 par 750 pixels (! NEW SIZE !)
2 - Selections / select all.
3- Open the image "Fairymist_bkg_tagmonidole.jpg", in your Psp.
4- Copy that image and paste it into the selection of your transparent image
- Selections / select none.
- If you prefer to use a picture or a background of your choice, here is how I have made my background :
- I have opened my image "photo1" in my psp and have copied it.
- I have pasted it into the selection of my new transparent image and deselected all.
- Adjust / Blur / gaussian blur / 50 for me.
- Effects / Plugins / Simple / 4 way Average default.
- Effects / Plugins / Graphic plus / Cross shadow to your liking.
- Here are my settings : 50 ,50, 50, 50, 50, 50, 50, 80.
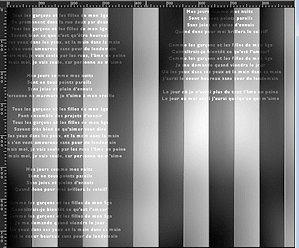
5 - We are now going to apply a filter effect on the background.
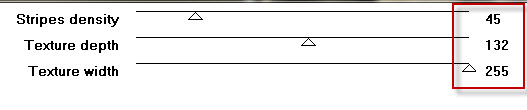
- I have chosen the filter Tramage but it is up to you to choose another filter if you prefer.
- Effects / Plugins / Tramage / Panel stripes as below :
6- Effects / edge effects / Enhance more.
7- Open the tube "Fairymist_texte_chanson.png" or another text tube of your choice, in your Psp.
8- Copy it and paste it as a new layer.
- Move the text against the top and left sides of your tag .
- I have set the mode ot that layer on to overlay.
9- Layers / Duplicate
10- With your move tool, place that layer on the top and right part of your tag like shown below :.
11- Open the tube "Jaelop Designs Kit Made with love element 22.pspimage" or a tube of your choice, in your Psp.
12- Copy it and paste it as a new layer onto your tag.
13- I have resized my tube at 50% ( Resize all the layers NOT checked).
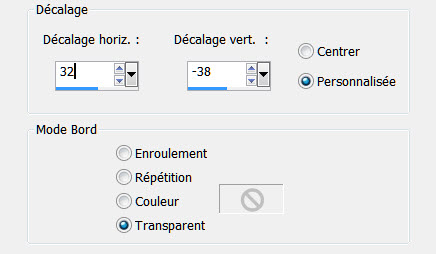
14- I have placed my ribbon as follows :
- Effects / Image effects / Offset as below :
15- I have changed the colours of my ribbon this way :
- Adjust / Hue and saturation / colorize : 255 and 200.
- Adjust / Contrast and Brightness : - 75 and 10.
16- We are now going to work on our little pictures .
- Open the image "Photo1" in your Psp.
17 - On that picture : Effects / Plugins / IC net software / Filters unlimited 2.0 / Photo aging kit / Photo frame 5 default.
18 - If you wish to delete the dented black border outside the picture, proceed as follows :
- Select that border with your magic wand set as below :

- Change your background layer into a raster layer (Layers / promote Background layer).
- Hit the delete key of your keyboard.
- Deselect all.
- I have left that black border on all my small pictures because my collage was in black and white.
19- Copy that modified picture and paste it as a new layer on to your tag.
- Place it like me or to your liking.
20- Repeat steps 16 to 19 for the other pictures (step 18 is optionnal).
21- Place all the pictures as you wish.
- You may use the free rotation tool (Image / Free rotate ) to tilt some of them.
- You may as well add a light drop shadow on each of them.
22- Open the tube "Papillon"or another decorative tube of your choice, in your Psp and copy it.
23- Paste it as a new layer on to your tag.
- I have resized that tube at 40% ( Resize all the layers NOT checked).
- Place it like me or to your liking.
- I have added a drop shadow on that tube : - 4, 4, 80, 2, black.
24- Open the tube "Kikirou 275.pspimage"or another decorative tube of your choice, in your Psp and copy it.
25- Paste it as a new layer on to your tag.
- I have resized that tube at 32% ( Resize all the layers NOT checked).
- Place it like me or to your liking.
26- Open the tube "Guitare"or a tube of your choice, in your Psp and copy it.
27- Paste it as a new layer on to your tag.
- I have resized that tube at 68% ( Resize all the layers NOT checked).
- Place it like me or to your liking.
- I have added a drop shadow on that tube : - 4, 4, 80, 20, black.
28- Set your Material palette with colour(s) you want to use to write the name of your idole.
- I have set my background in white and closed my foreground.
- I have used the font Zapfino linotype 3 / size 100 to write "Françoise Hardy".
29- I have added a drop shadow on those words : - 2, 2, 60, 2, black.
30- I have tilted my text that way :
- Image / free rotate / 10° on the left.
- Place that texte like me or to your liking.
31 - Apply your signature
- Make sure everything is in the right place before we merge the layers !
32- Layers / Merge visible.
- Edit / copy (your merged tag).
33- Image / add some symmetrical borders of 2 pixels with a colour of your choice :
- I have chosen red 8d0000
34- Image / add some symmetrical borders of 50 pixels with a colour of your choice : (white for me).
35- With your magic wand set as previously, select that large border.
- Paste into the selection (the copy of your tag).
36- Adjust / Blur / Gaussian blur at 40.
- Deselect all.
37 - Layers / promote Background layer.
38- On your tag : Effects / Plugins / IC net software / Filters unlimited 2.0 / Photo aging kit / Photo frame 5 default.
39- With your magic wand, select the outside black border of your tag.
- Hit the delete key of your keyboard and deselect all.
40 - Save your work as a PNG file.
***************
That's it, you have done it !
If you have the slightest problem, don't hesitate to get in touch with me !
Tuto translated on the 21st of january 2016
*******************
Another one of my youth idoles !
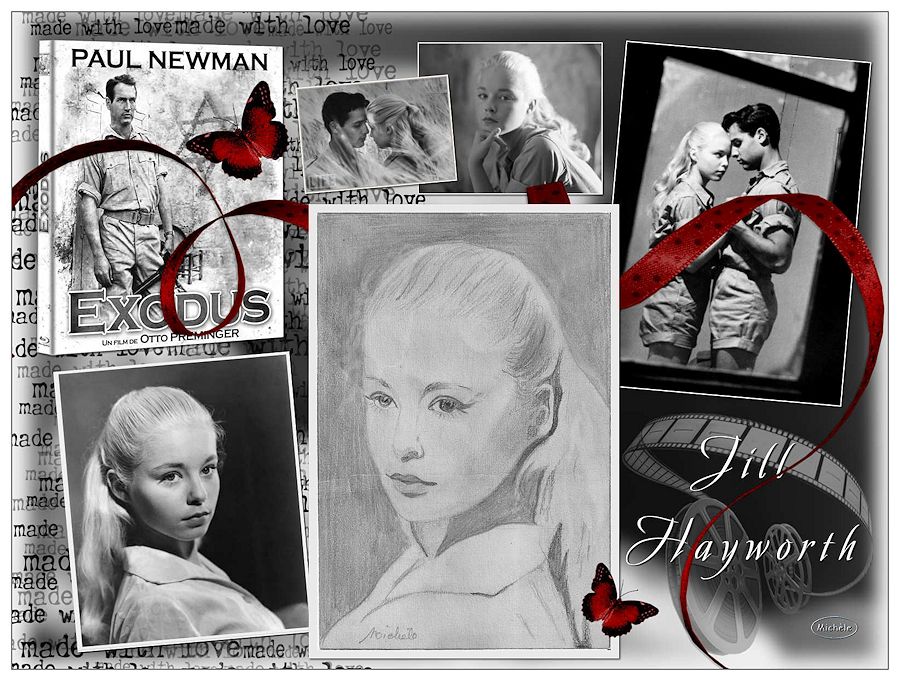
You'll find some versions of that tag in my gallery Here