
Thank you for putting a link to this tutorial, whenever you display your realization of that tag on a website, on a group or in a mail !
**************************
You'll find some versions of that tag in my gallery HERE
***************
To realize that tag, you'll need the plugins
- FM tools,
- Graphic plus,
- Alien skin Eye candy 5/ Impact
and the material zip downbelow :

*************************
*It is forbidden to suppress watermarks on the material provided , to alter, mist or rename the tubes in order to respect the work of the tubers
- The tubes of the couple and of the Xmas balls are by Amg
You may join in her sharing group here
- The tube of the bow is by Lenypeny and the ribbon is by Marian
- The mask Brujita navidad 0008 is by Brujita
- The other two masks have been found on the net
**************
Preparation
Duplicate your tubes and masks. Close the originals and minimize the copies for now.
Place the mask Brujita-navidad 0008 in your mask file
************
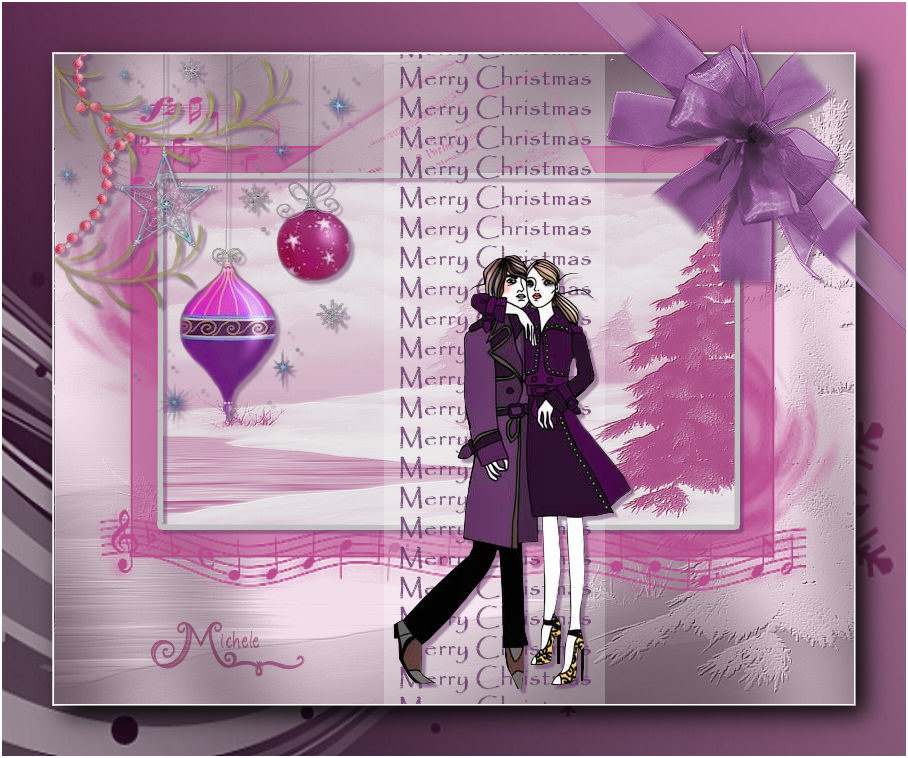
1- Open a new transparent image of 800 by 650 pixels and flood fill it with a colour of your choice
I have chosen the colour b94a8e 
2- Add a new raster layer and flood fill it in white or a colour of your choice
3- Layers / new mask layer / choose the mask paysage chat 14 or another scenery mask of your choice / only check Source luminance
Adjust / sharpness / sharpen more
4-Merge all
Image / mirror
5- Effects / plugins / FM tools / blend emboss default / twice !
Leave that picture on the side ( we'll use it on step 17)
6- Repeat steps 1 and 2
7- Add a new raster layer and flood fill it in light grey c2c2c2 or a light colour of your choice
8- Repeat step 3
Merge group
9- Image / mirror
10- Layers / merge down
11- Effects / plugins / FM tools / blend emboss default / twice !
12- Effects / plugins /Graphic plus / cross shadow default except intensity at 80 ( 50, 50, 50, 50, 50, 50, 80, 128 )
13- Lower the opacity of that layer to 82
14- Add a new raster layer and flood fill it with the same colour as on step 1
15- Layers / new mask layer / choose the mask gabeemask20 / check Source luminance and invert mask data
Adjust / sharpness / sharpen more
Merge group
16- With your magic wand, set as below, select the inside of your mask

17- Open the image you have left on the side on step 5 , copy it and paste it into the selection
Keep the selection !
Adjust / sharpness / sharpen more
18- Selections / Modify / select / selection borders / check Outside and anti-alias / border width : 5
19- Flood fill that border with your light grey c2c2c2 or the colour of your choice
20- Effects /3d effects / drop shadow / 4, 4, 50, 2, dark purple 653768
21- Select none and merge all !
22- Open the tube Texte ( if you want to do your own text : draw a vertical selection , flood fill it in white, lower its opacity ; add a new layer , write your text and apply the filter murameister/ copies to duplicate the text vertically )
If you don't want to make your own text, just copy my tube and paste it as a new layer on your tag
Effects /image effects / offset / vert 0, horiz 60, check custom and transparent
23 - Open the tube Christime 1 amg or a tube of your choice, copy it and paste it as a new layer on your tag
Place le tube in the top left hand side of your tag
24- Effects / 3d effects / drop shadow / 4, 4, 50, 2, dark purple for me 653768
25- Open the tube Couplehugamg, copy it and paste it as a new layer on your tag
Place it as on my tag
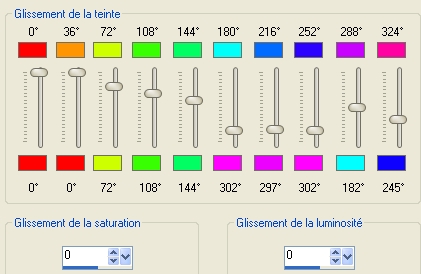
26- Adjust / Hue and saturation / hue map as follows ( that is if you wish to have the same colours as me !)
27- Same drop shadow as on step 24
28- Add a new raster layer and apply your signature
29- Image / add some symmetrical borders of 2 pixels in white
30-Image / add some symmetrical borders of 50 pixels colour e3dbe0 
31- With your magic wand set as on step 16, select that border
32- Selections / Promote selection to layer
33- Set your foreground with a linear gradient , angle 45, repeats 0, invert NOT checked
Foreground : very dark colour 230a20 
Background : same colour as on step 1
34- Flood fill your selection with that gradient
35- Keep selection !!
Layers / load from disk / choose the mask Brujita navidad 0008 as below :

Adjust / sharpness / sharpen more
Merge group
36- Selections / Invert
37 - Effects / plugins / Alien skin eye candy5 / impact / perspective shadow / drop shadow blurry defaut
38- Open the tube BE Ribbon or a tube of your choice , copy it and paste it as a new layer
39- Image / free rotation / 45° right / don't check anything else
40- Adjust / Hue and saturation / colorize / 211, 64
41- Place the ribbon on the top right hand corner of your tag
42- Open the tube Lenystrikje 85 or a tube of your choice, copy it and paste it as a new layer
43- Image /free rotation / 90 ° on the right / don't check anything else
Place the bow in the middle of your ribbon
Adjust / sharpness / sharpen / twice
44- Layers / merge down
45- Effects /3d effects / drop shadow / 4, 4, 50, 2, dark purple for me 653768
46- Image / add some symmetrical borders of 2 pixels in white
47- Save your work as a jpeg file and resize your tag if necessary
********************
That's it !! You've done it !!
If you 've enjoyed doing my tutorial, it would be nice to write a few words in my guest book ! If you 've had the slightest problem, please, send me a mail so I can see to the problem !
Tutorial translated on the 29 th of november 2009
*************************
You'll find some versions of that tag in my gallery HERE