
Thank you for putting a link to this tutorial, whenever you display your realization of that tag on a website, on a group or in a mail !
**************************
You'll find some versions of that tag in my gallery HERE
************************
To realize that tag, you'll need the plugin Graphic plus
and the material zip here
**************
*It is forbidden to suppress watermarks on the material provided , to alter, mist or rename the tubes in order to respect the work of the tubers
- The tube of the woman is by kkat47
- The tube of the scenery is by Essentials
*****************
Preparation
-Duplicate your tubes. Close the originals and minimize the copies for now.
-Place the "Corel_15_013.png" texture file in your Texture folder of your Psp files
- Open the jpeg " Coralieplumety" in your Psp and export it as a custom brush OR put the two file brushes in the brush folder of your Psp files
*****************
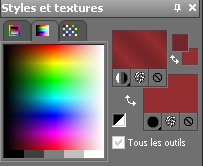
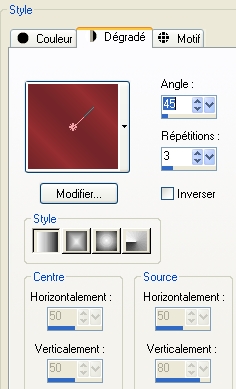
1- Open a new transparent image of 600 by 600 pixels and flood fill it with a linear gradient (45°, repeats 3, Invert checked ) with these colours
Foreground 75262a
Background 952e31
2- Adjust / Blur / Gaussian blur at 50
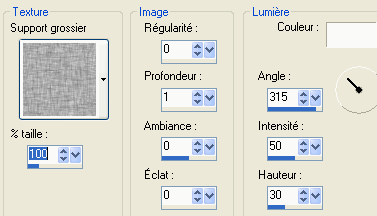
3-Effects / texture effects / texture as below :
3- Effects / edge effects / enhance
4- Add a new raster layer
- Set your foreground with a contrasting colour, 130706 for me :
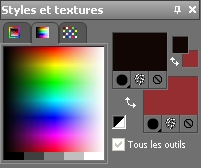
- Activate your brush tool, set as below and apply the brush "Coralieplumeti" in the middle of your tag with your foreground colour

- Edit / Copy
Add a new raster layer and select all
- Paste into the selection and deselect
- Delete the previous layer on which you have applied the brush Coralie-plumety !
Lower the opacity of that layer between 40 and 50
It is up to you to decide which opacity looks better but the dots mustn't show through the tubes you will add later on !
Effects / edge effects / enhance more (twice )
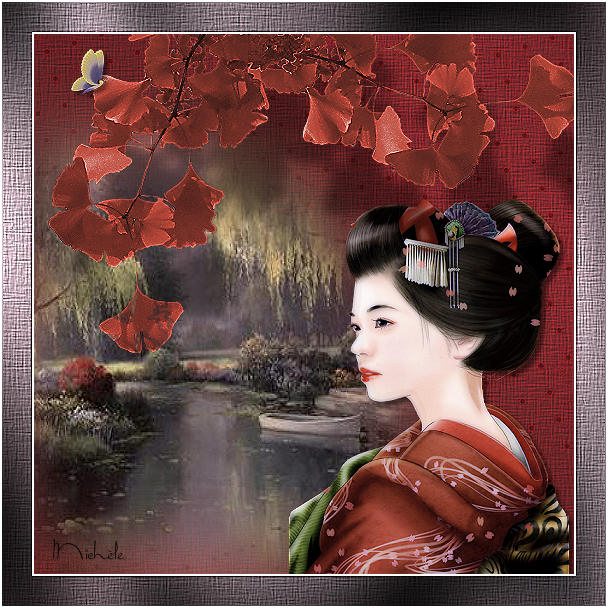
5-Activate the tube of the woman, copy it and paste it as a new layer onto your tag
I have resized that tube by 80 %
Adjust / sharpness / sharpen
Place the tube, as shown on my tag, on the right hand side of it
6- Activate the tube autumn leaves, copy it and paste it as a new layer onto your tag
I did : Image mirror.
Duplicate that layer
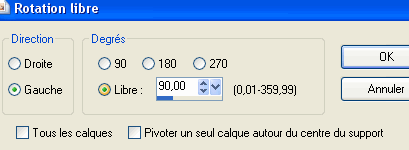
Image / free rotation as below
Adjust / sharpness / sharpen
7- Layers / arrange / move down
Place those two layers with leaves as shown on my tag
Activate your top layer
Layers / Merge down
8- Adjust / Hue and saturation / colorize : 3, 135
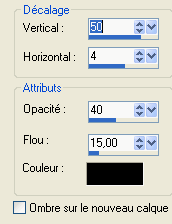
9-Effects / 3d effects / drop shadow as below :
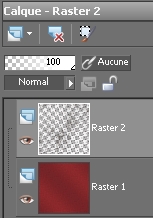
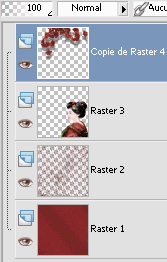
You should get those layers :
10- Activate your layer raster 2
Activate the scenery tube , copy it and paste it as a new layer onto your tag
11-Activate your deform tool and enlarge that tube so that it covers the tag , reaches the lady's face and gets underneath your leaves
Adjust / sharpness / sharpen ( two or three times )
12-You may add a butterfly tube or any other decoration to your liking
13- Image / add some symmetrical borders of 2 pixels in white
14- Image / add some symmetrical borders of 30 pixels in a contrasting colour
Select that border with your magic wand set as below

Flood fill your selection with a linear gradient ( angle 45, repeats 1, don't check Invert ! ) with these colours
Foreground 56474c
Background a2929b
15- Keep the selection
Effects / texture effects / texture, as on step 3.
Effects / edge effects / enhance
Effects / plugins / Graphic plus / cross shadow default
Select none
16- Image / add some symmetrical borders of 2 pixels in white
17- Add a new raster layer , apply your signature
Merge all and save as a jpeg file.
************
That's it !! You've done it !!
If you 've enjoyed doing my tutorial, it would be nice to write a few words in my guest book ! If you 've had the slightest problem, please, send me a mail here so I can see to the problem !
Translation done on the 17th of october 2010
*****************

|