Thank you for putting a link to this tutorial, whenever you display your version of that tag on a website, on a group or in a mail !
**************************
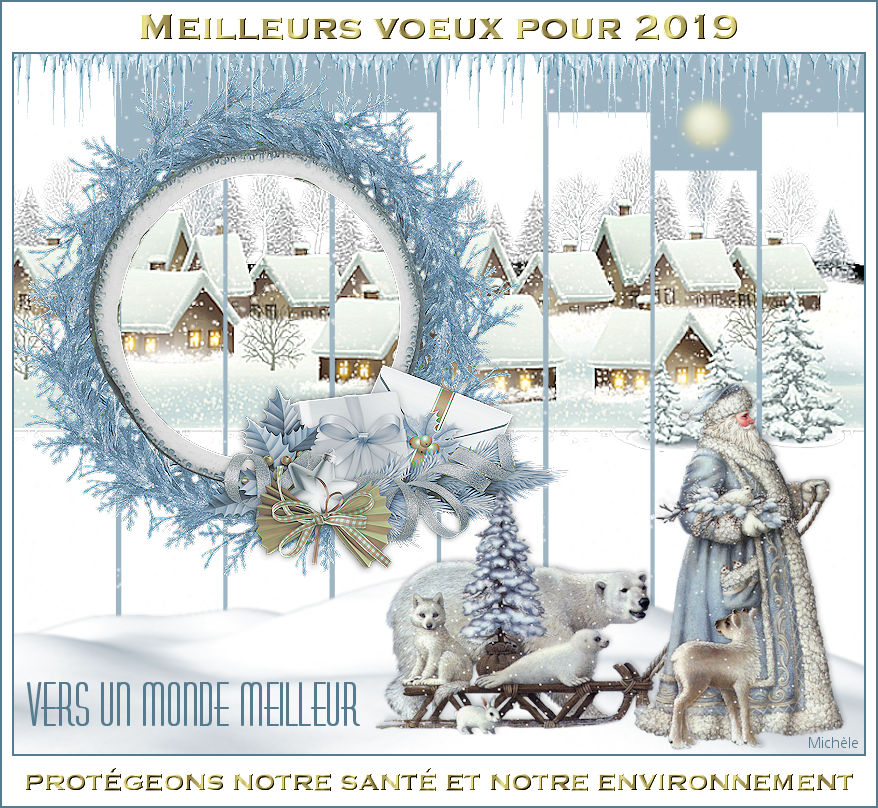
You'll find some versions of that tag in my gallery here :

***********************
To make that tag, you'll need the filter :
- VDL Adrenaline / Snowflakes.
and the material zip down below :

**************
"It is forbidden to suppress watermarks on the material provided, to alter, mist or rename the tubes in order to respect the work of the tubers
- The tube of the snowy scenery is by Graph_Sabine_Design.
- The tube of Father Xmas is by Tatie.
- The tube of the crown is out of a scrap kit by Mirella.
- The other elements are from the net.
******************
Preparation
To be on the safe side, duplicate your tubes and images in your Psp :
-
Window / Duplicate
- Close the originals and work with the copies !
*****************
Click here to print the tutorial.l
**********************
You can use my arrow to follow your work
Click on it and drag it all along the tutorial !

***************
Tutorial made with PSP 2018.
********************
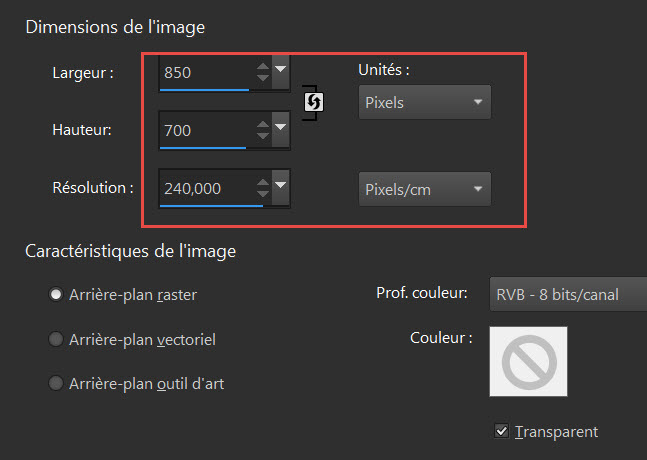
1 - Open a new transparent image of 850 by 700 pixels.
2- Flood fill that image with white like me or with a colour of your choice.
3- ADD A NEW RASTER LAYER.
4- Flood fill that new layer with a colour that matches the tubes you are going to use.
- I have chosen a pale blue : #AEC6D0
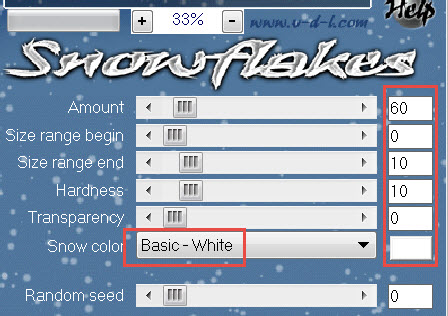
5- Effects / Plugins / VDL Adrenaline / Snowflakes as below :
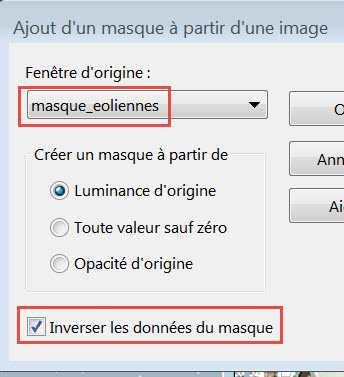
6- Open, in your PSP, the mask "masque_eoliennes" and minimize it.
7- On layer raster 2 of your tag :
- Layers / New mask layer / from image / Choose "masque_eoliennes"
and set as below :
- Layers / Merge group.
8- In your Layers palette / Activate layer Raster 1.
9- Open, in your PSP, the tube "Graph-Sabine Design-Tubes 468" or a tube of your choice and copy it.
10- Paste it as a new layer on to your tag.
11- I have moved my tube that way :
- Effects / Image effects / Offset :
- Horizontal Offset : 0 / Vertical Offset :10 / Transparent and custom ticked.
12- In the layers palette/ Activate the layer on top of the pile.
13- Open, in your PSP, the tube "Moon"or a tube of your choice and copy it.
14- Paste it as a new layer on to your tag.
- Place it like me.
15- Open, in your PSP, the tube "Frost"or a tube of your choice and copy it.
16- Paste it as a new layer on to your tag.
- Place it like me.
17- Open, in your PSP, the tube "ASB_HolidayWishes_ClusterFrame_2" or a tube of your choice and copy it.
18- Paste it as a new layer on to your tag.
19- I have moved my tube that way :
- Effects / Image effects / Offset :
- Horizontal Offset : - 140/ Vertical Offset : 85 / Transparent and custom ticked.
20- Open, in your PSP, the tube "Neige" and copy it.
21- Paste it as a new layer on to your tag.
22- I have moved my tube that way :
- Effects / Image effects / Offset :
- Décalage horizontal : - 35 / décalage vertical : - 334 / Case Transparent cochée.
23- In the layers palette/ Activate the layer on top of the pile.
- Open, in your PSP, the tube "tubtatie_a9c2fc960d2d" or a tube of your choice and copy it
- With your erase tool, erase the watermark of that tube.
24- Paste it as a new layer on to your tag.
25- I have resized that tube by 75%, twice.
- ¨Place the tube like me or to your liking.
26- Add a drop shadow of your choice.
- Effects / 3d effects / drop shadow / for me : -2, 2, 20, 6, black.
27- Open, in your PSP, the tube "texte 1" or a text of your choice and copy it.
28- Paste it as a new layer on to your tag.
- Place it like me or to your liking.
29- Add your signature.
30- Image / add some symmetrical borders of 2 pixels with a colour of your choice.
- I have chosen the blue 567a8e.
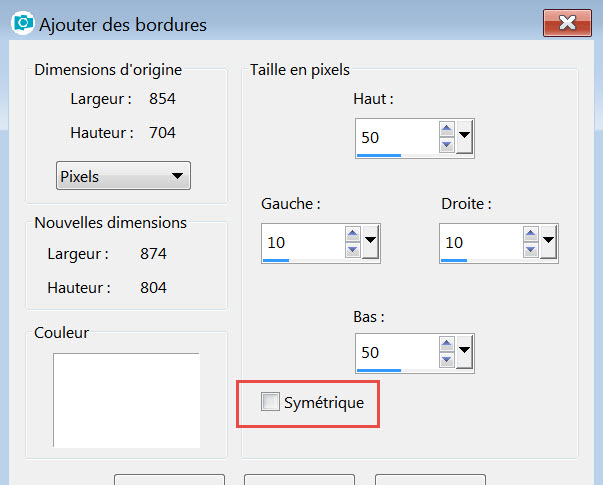
31- Image / add some borders NOT symmetrical as shown below with a colour of your choice..
- I have chosen White..
32- Open, in your PSP, the tube "texte 2" or a text of your choice and copy it.
- Paste it as a new layer on to your tag.
- Place it like me.
33- Open, in your PSP, the tube "texte 3" or a text of your choice and copy it.
34- Paste it as a new layer on to your tag.
- Place it like me.
35- Image / add some symmetrical borders of 2 pixels with a colour of your choice.
- I have chosen the blue 567a8e.
36- Save your work as a jpeg file..
*****************
That's it !! You've done it !!
If you 've enjoyed doing my tutorial, it would be nice to write a few words in my guest book !
If you 've had the slightest problem, please, send me a mail so I can see to the problem.
Tuto translated on the 3rd of January 2019