

Thank you for putting a link to this tutorial, whenever you display your realization of that tag on a website, on a group or in a mail !
-----------------------
You'll find some versions of that tag in my gallery HERE
******************
To realize that tag, you'll need the plugins :
- Mura's Meister / Clouds & Copies
- IC Net software / Filters Unlimited 2.0
- Cybia / Screenworks
and the material zip down below :

**************
*It is forbidden to suppress watermarks on the material provided , to alter, mist or rename the tubes in order to respect the work of the tubers
- The tube of the trunk with the flowers is by Kikirou
( Kikirou doesn't share tubes any more )
- The tube of the woman is by Guismo
You'll be able to find her tubes on Dakara' s site here
and you can join in her sharing group here
The tube of the curtains is by MMDesign
you can join in her sharing group Here
- The masks that I have used to create some light are by Narah
- The mask of the floor is by Vero
You'll find her nice site here
The other elements that I haven't created, have been found on the net.
******************
Preparation
- To be on the safe side, duplicate your tube and image in your Psp :
-
Window / Duplicate
- Close the originals and work with the copies !
- Place the two masks "2020.msk" and "Exkizz_Mask_Daphne1.pspimage" in the mask folder of your Psp files. The other two masks by Narah will be opened in your Psp.
Click here to print the tutorial
**********************
You can use my arrow to follow your work
Click on it and drag it all along the tutorial !

***************
Tutorial realized with PSP XIII

Step 1 : The background of the tag
1 - Open a new transparent image of 850 by 700 pixels.

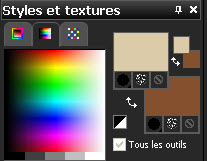
2 - Set your Material palette with two colours out of your main tube, as below :
My choice : Foreground : Light colour dbcba9
- Background : Dark colour 85502e
3 - Effects / Plugins / Mura's Meister / Clouds as below :
You may click several times on the Reset colors button to obtain a cloudy sky to your liking !

4- Layers / Duplicate
5- Effects / Plugins / IC Net software / Filters Unlimited 2.0 / Color Filters / Blue sky / 130, 128
6- On that layer ( Copy of Raster 1) :
- Layers / Load a mask from Disk / Choose the mask "Exkizz_Mask_Daphne1.pspimage" and set as below :
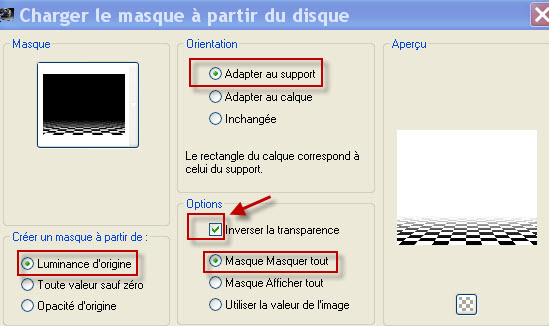
- Layers / Merge group.
7- Effects / 3d effects / Drop shadow as below :

8- Here is what I did to get the colours that suited me ( It will be up to you to find the modes and opacities that give the nicest effects with your colours and tubes )
- I have duplicated my layer 2 ( Group - copy of Raster 1)


Step 2 : The lights
1- ADD A NEW RASTER LAYER
- Flood fill that new raster layer with your light foreground colour ( left click)
2- Layers / New mask layer / From image / Choose the mask "Narah_mask_Abstract61.jpg" and set as below :

- Adjust / sharpness / Sharpen more.
- Layers / Merge group.
3- Layers / Load a mask from Disk / Choose the mask "2020dmk"and set as below:
- Uncheck Invert the transparence !!!!

- Layers / Merge group.
4- Effects / Image effects / Offset as below :
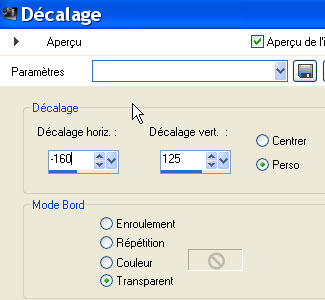
5- Set the mode of that layer on to Dodge , opacity at 70 ( you may have to choose another opacity ! )
- It is really up to you to decide which mode and opacity suit you !
**********************
6- ADD A NEW RASTER LAYER
- Flood fill that new raster layer with your light foreground colour ( left click)
7- Layers / New mask layer / From image / Choose the mask "Narah_mask_Abstract59.jpg" and set as below :
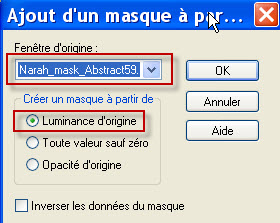
- Layers / Merge group.
8- Effects / Image effects / Offset as below :

9- Set the mode of that layer on to Dodge , opacity at 80 ( you may have to choose another opacity ! )
- It is really up to you to decide which mode and opacity suit you !

Step 3 : The tubes mask and flowers
1- Open the tube "Mask_pieces.pspimage" or a tube of your choice, in your Psp and copy it.
2- Paste it as a new layer on to your tag.
3- Place it at the top of your tag like me.
4- I have set the mode of that layer on to Dodge , opacity 40.
- It is up to you to decide which mode and opacity suit you !
*********************
5- Open the tube "kikirou1719 - still life.pspimage" or a tube of your choice, in your Psp and copy it.
6- Paste it as a new layer on to your tag.
I have resized the tube at 50% ( Resize all the layers NOT checked !)
Place the tube as on my tag or to your liking.
7- Effects / 3d effects / drop shadow of your choice / 4, 4, 40, 40, black for me.

Step 4 : The curtain
1- Open the tube "MMDesignz_Si168179.pspimage ( raster 1)"or a tube of your choice, in your Psp and copy it.
2- Paste it as a new layer on to your tag.
I did : Image / mirror
3- For the tube I have used : Effects / Image effects / Offset as below :

4- The tube I have chosen being very light, here is what I did to obtain a dark colour in the right shade :
- Adjust / Hue and saturation / Colorize : 237, 255
- Adjust / Traitement optimal des photos comme suit :
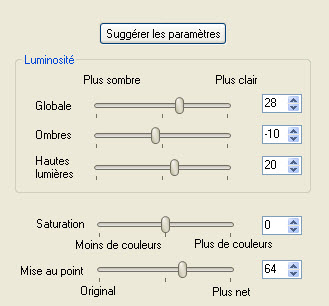
( If your Psp doesn't have that possibility, you can do this instead : Adjust / Brightness and contrast / Brightness and contrast / - 20 / 0 ) Your final result will be approaching.
For everybody : - Adjust / Brightness and contrast / Brightness and contrast / - 173 / - 17 (negative numbers !)
- Adjust / Hue and saturation / Colorize : 255, 195.
It will be up to you to play with the figures of the colorization and Brightness and Contrast to get the colour your wish !
5- Effects / 3d effects / drop shadow of your choice / 4, 4, 40, 40, black for me.

Step 5 : The main tube
1- Open the tube "calguis1veninse23110.pspimage"or a tube of your choice, in your Psp and copy it.
2- Paste it as a new layer on to your tag.
- I have resized the tube at 90% ( Resize all the layers NOT checked !)
- Place the tube against the right and bottom sides of the tag.
3- Effects / 3d effects / drop shadow of your choice / 4, 4, 60, 20, black for me.

Final step
1- Apply your signature on your tag.
- Make sure everything is at its place.
2 - Image / add some symmetrical borders of 2 pixels with a dark colour.
My choice :
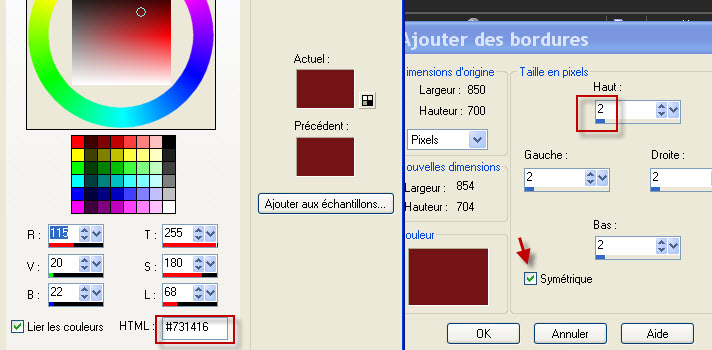
3- Layers / Duplicate
4- On the top layer :
- Image / resize at 90% ( Resize all the layers NOT checked !)
- Effects / 3d effects / drop shadow / 1, 1, 100, 5, black. and - 1, -1, 100, 5, black
5- On the bottom layer :
- Adjust / Blur / Gaussian blur / 30
- Effects / Plugins / Cybia / Screenworks / Dot Screen as below :

6- Activate your top layer :
- Open the tube ' deco.pspimage" or a similar tube, in your Psp and copy it.
7- Paste it as a new layer on to your tag.
Place it as below :

8- Effects / Mura's Meister / Copies as below :
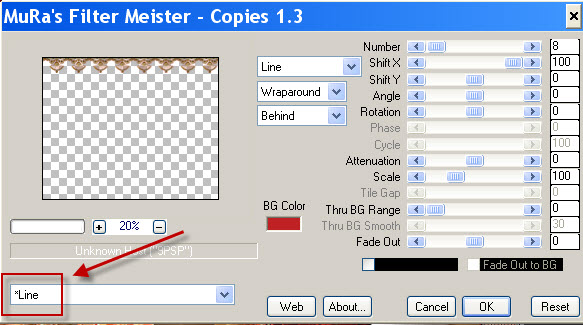
9- Effects / 3d effects / drop shadow of your choice / My choice, with the same colour as the border

10- Image / add some symmetrical borders of 2 pixels with the same colour as on step 2.
11 - Save your work as a jpeg file and resize it if necessary .
***************
That's it !! You've done it !!
If you 've enjoyed doing my tutorial, it would be nice to write a few words in my guest book ! If you 've had the slightest problem, please, send me a mail so I can see to the problem
Tutorial translated on the 4th of February 2012
*************
 MY OTHER CARNIVAL TUTORIALS here
******************
You'll find some versions of that tag in my gallery HERE
