
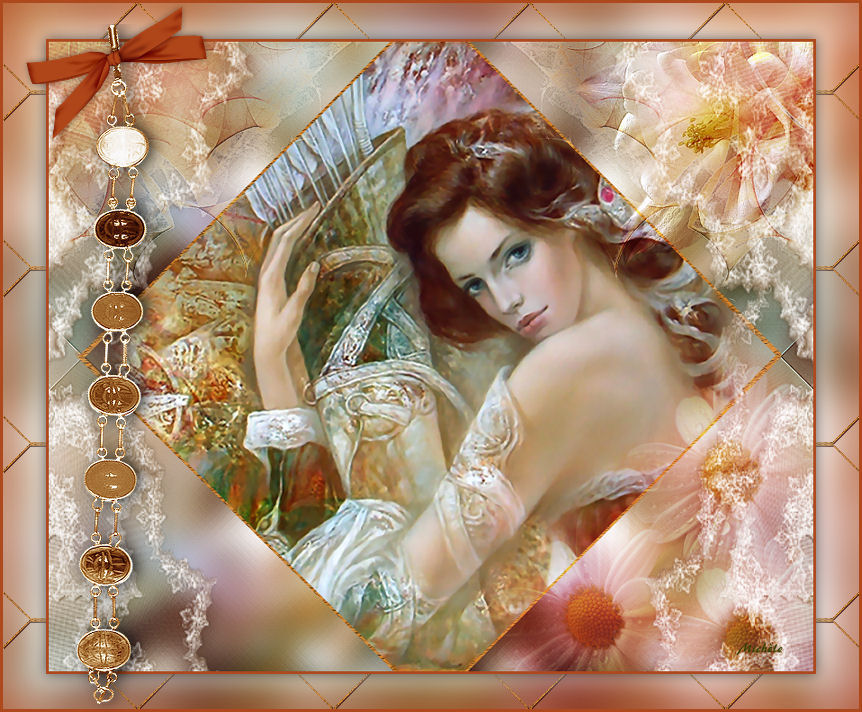
Thank you for putting a link to this tutorial, whenever you display your realization of that tag on a website, on a group or in a mail !
**************************
You'll find some versions of that tag in my gallery HERE
***********************
To realize that tag, you'll need the plugins :
- Simple
- DSB / Bright noise
- Mura's Meister / Copies
and the material zip down below :

**************
*It is forbidden to suppress watermarks on the material provided , to alter, mist or rename the tubes in order to respect the work of the tubers
- The tube of the woman "Sorensen_Designs Mist June 120-11.pspimage" is by Sorensen.
You can join in her sharing group here
- The tube "Abstract_2" is by Paci
- The tube of the flower is by Nimue la Fée.
You can join in her sharing group here
The other elements that I haven't created, have been found on the net.
******************
Preparation
- To be on the safe side, duplicate your tube and image in your Psp :
-
Window / Duplicate
- Close the originals and work with the copies !
- Place the mask "2020.msk"in the mask folder of your Psp files.
- Place the files "fairymist_marilyn_1.PspSelection" and "fairymist_marilyn_2.PspSelection"in the Selection folder of your Psp files.
- Place the pattern "Corel_08_005.jpg" in the Pattern folder of your Psp files. ( Unless you've already got it in your Corel !)
*****************
Click here to print the tutorial
**********************
You can use my arrow to follow your work
Click on it and drag it all along the tutorial !

***************
Tutorial realized with PSP XIII


Step 1 : The background of the tag
1- Open a new transparent image of 850 by 700 pixels and paste your tube, on that new transparent image, as a new layer.
2- Activate the tube "Sorensen_Designs Mist June 120-11.pspimage" or a large tube of your choice in your Psp and copy it.
3- Paste it as a new layer on to your tag.
Optionnal !!!!!!!!!!!!!!!!!!!!!!!!!!!!!! Optionnal
If you can't find a tube as large as mine, you can make your own, using an image of your choice, as explained below :
A - Open an image of your choice with a minimum size of 850 by 700 pixels.
B- Selections / Load a selection / from Disk / Choose "Fairymist_Marilyn_1" and set as below :

C- Selections / Edit selection as below :
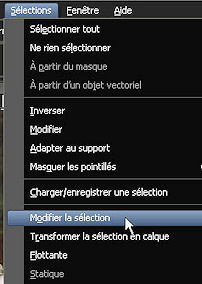
Your selection will become red !
D- With your move tool ( letter M ), place that selection on the most interesting part of your picture.
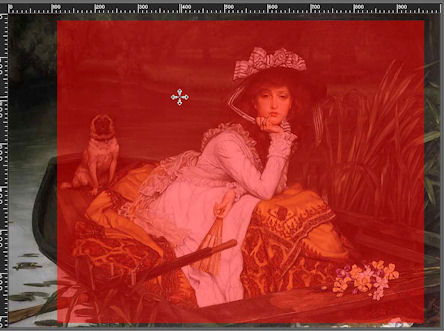
E- Selections / Edit selection.
You will, then, get your selection back to normal !
F- Edit / Copy.
G- Paste as a new image.
H- On that new image : Layers / Load a mask / from disk / choose the mask 2020 and set as below :
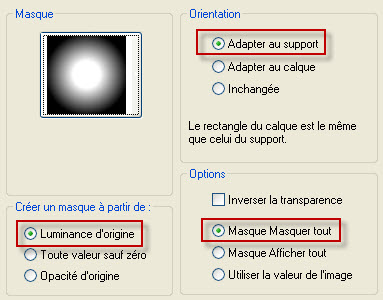
Layers / Merge group. That layer with your new tube is now ready for use on step 4 of the tutorial as it is as the right size .
Copy that tube and paste it as a new image, Rename it "My tube" and save it as a Psp image, to be on the safe side !
( We'll use that new tube later on !)
**********************
Let's all go ahead with the tutorial now !
4- Effects / Image effects / Seamless tiling default, as below :

5- Layers / Merge all.
Once merged, the gaps in the tag will show in white, if you don't like those white parts, you may cancel the merge step, add a new layer, move it down and flood fill it with a colour of your choice and merge all again !!
6- Adjust / Blur / Gaussian blur / 20
7- Effects / Plugins / Simple / Diamonds.
8- Effects / Edge effects / Enhance more.
9- Optionnal : You may add a slight texture effect or plugin effect on that background if you wish but it mustn't show too much !! I have left mine as it is !


Step 2 : The inside diamond shape frame
1- Activate your free hand selection tool, set as below and select the diamond shape line that you can see in the middle of your tag as shown below :


If it is difficult for you to select that shape, you may use my selection :
"fairymist_marilyn2.PspSelection".
Selections / Load a selection / from disk / Choose "Fairymist_Marilyn_2" , same settings as on step 1.
2- Paste ( the copy of your tube is still in memory ! ) AS A NEW LAYER.
3- Selections / Invert.
4- Hit the delete key of your keyboard ( The part of the tube that is outside that diamond will disappear !)
5- Selections / Invert.
6- Selections / Modify / Select selection borders as below :

7- ADD A NEW RASTER LAYER.
8- Set the Foreground of your Material palette as below :

9- Flood fill the selected border with the pattern "Corel_08_005.jpg / Animal tigre" ( see settings above ).
Select none.
10- If the colour of that pattern doesn't match your colours, colorize it with a colour of your choice :
Adjust / Hue and saturation / Colorize
11- Copy that frame and paste it as a NEW IMAGE. We'll use it later on. Rename that new image "Grid" and just to be on the safe side, save it as a Psp file !
12- Optionnal : On your tag, activate the layer with your diamond shape frame :
Effects / 3d effects / light drop shadow of your choice / 1, 1, 80, 5, black for example.


Step 3 : The decorations
1- Open the tube "Daisies" or a tube of your choice, in your Psp and copy it.
- Paste it as a new layer on to your tag.
- Place it in the bottom right hand side corner of your tag.
- I have set the mode of that layer on to Overlay ( It is up to you to see which mode suits you better !)
- I have lowered the opacity of that layer to 70 ( See what is best for you ).
2- Open the tube "abstract2_by_paci.pspimage"or a tube of your choice, in your Psp and copy the selected part of my tube or your tube.
- Paste it as a new layer on to your tag.
- Place in the top right hand side corner of your tag.
- I have set the mode of that layer on to Soft light ( It is up to you to see which mode suits you better !)
- Layers / Duplicate.
- Image / Mirror.
3- Open the tube "353NLF100308.psp"or a tube of your choice, in your Psp and copy it.
- Paste it as a new layer on to your tag.
- I have resized that tube at 85 % ( Resize all the layers NOT checked !).
- Place in the top right hand side corner of your tag.
- I have set the mode of that layer on to Overlay ( It is up to you to see which mode suits you better !)
4- I haven't put any decoration in the bottom left hand side corner of my tag but nothing stops you from doing it !
5- Open the tube "dentelle.pspimage" or another light curtain tube of your choice or any other decoration element that matches your tag, in your Psp and copy it.
- Paste that tube on to your tag as a new layer.
- My tube is at the right place.
Here is what I get, at this stage :

6- Apply your signature


Step 4 : The borders
1- Make sure everything is at the right place.
- Image / add some symmetrical borders of 3 pixels with the same colour used on the diamond shape frame of your tag :
ae481d for me.
2- Layers / Duplicate.
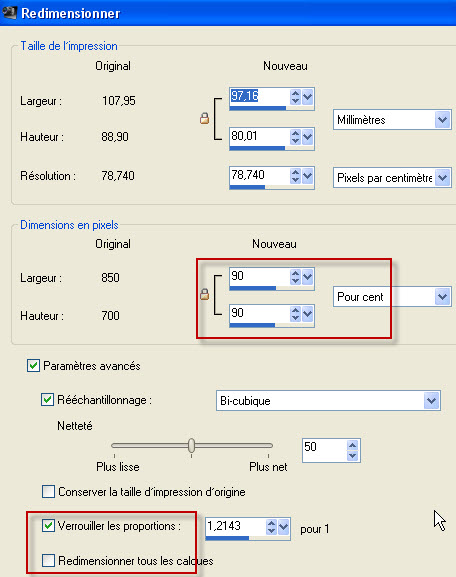
3- Image / Resize at 90% as below :
4- Effects / 3d effects / Drop shadow / 0, 0, 80, 20, black.
5- Effects / 3d effects / Drop shadow / 0, 0, 80, 40, WHITE or a very light colour.
6- Activate your bottom layer.
Adjust / Gaussian blur / 20.
7- Optionnal : Effects / Plugins / DSB Flux / Bright noise as below :

8- Reactivate your tube "Grid" and copy it .
9- Paste it on your tag as a new layer.

10- Image / Resize at 25% ( Resize all the layers NOT checked ).
11- Effects / Mura's Meister / Copies as below :

12- Effects / 3d effects / Drop shadow / 1,1, 80, 1, dark colour out of your tag ( 38120c for me ).
13 - Image / add some symmetrical borders of 3 pixels with the same colour used on the diamond shape frame of your tag :
ae481d for me..


Step 5 : Final decoration
1- Open the tube "bracelet.pspimage"or a tube of your choice, in your Psp and copy it.
2 - Paste it as a new layer on to your tag.
3- Place like me or to your liking.
My tube has already got a drop shadow !
4- Open the tube "noeud.pspimage"or a tube of your choice, in your Psp and copy it.
5 - Paste it as a new layer on to your tag.
6- Place like me or to your liking.
My tube has already got a drop shadow !
7- Layers / Merge all.
8 - Save your work as a jpeg file and resize it if necessary
***************
That's it !! You've done it !!
If you 've enjoyed doing my tutorial, it would be nice to write a few words in my guest book ! If you 've had the slightest problem, please, send me a mail so I can see to the problem
Tutorial translated on the 10th of September 2011
*****************
Other versions of that tag
