
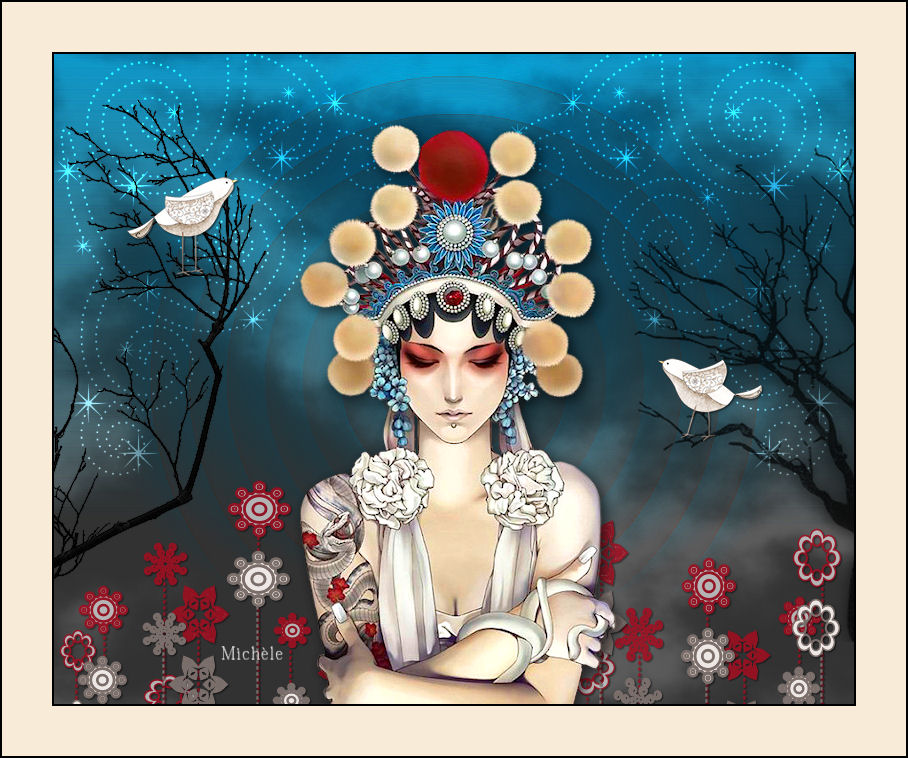
Thank you for putting a link to this tutorial, whenever you display your realization of that tag on a website, on a group or in a mail !
**************************
You'll find some versions of that tag in my gallery HERE
*****************
To realize that tag, you'll need the plugins :
- Kiwi's oelfilter ( Zig Zack ) here
- Alf's Power Toys ( split distortion ) here
- Graphic plus ( Emboss ) here
- XE Xtras ( Elemental ) here
- Transparency ( Eliminate black ) here
and the material zip down below :

**************
*It is forbidden to suppress watermarks on the material provided , to alter, mist or rename the tubes in order to respect the work of the tubers
- The tube of the woman is by Kikirou
You'll be able to get her tubes by joining in her sharing group here
- The tube of the birds is by Katussia
- The tube of the tree is by Brigitte Mtm
You'll be able to get her tubes by joining in her sharing group here
- One of the brushes I have used is by Coby17
The other elements have been found on the net
******************
Preparation
- Duplicate your tubes and image. Close the originals and minimize the copies for now.
- Export your brush in your psp as a custom brush
- Put the file Preset shapes "syl_5_cercles-deco.PspShape" in the Preset shapes folder of your Psp folders
*****************
Click here to print the tutorial
*******************
You can use my arrow to follow your work

***************
1- Open a transparent image of 800 by 650 pixels
2- Set your colour palette with two colours matching your main tube
My choice : Foreground : colour 404040
Background : colour 006b8b
Set your foreground with a linear gradient as below :

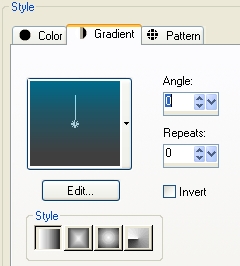
3- Flood fill your transparent layer with that gradient
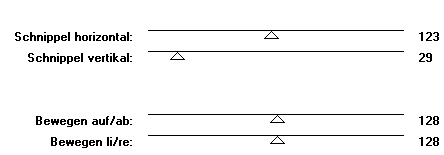
4- Effects / plugins / Kiwi's oelfilter / Zig Zack as below :
5- Effects / edge effects / enhance
6- Effects / plugins / Alf's Power Toys / split distortion / 76
7- Effects / plugins / Graphic plus / Emboss default
8- Layers / duplicate
9- On your top layer :
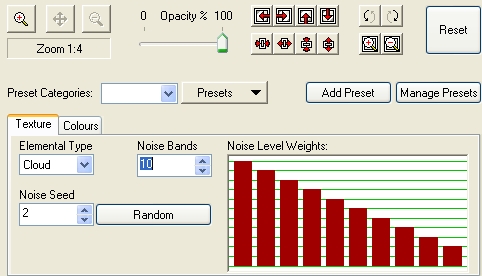
Effects / plugins / XE Xtras / Elemental
Click on Customize and set as below :
10- Effects / plugins / Transparency / Eliminate black
Set the mode of that layer on Overlay or a mode that suits your colours better !
11- Add a new raster layer
- Activate your brush tool and choose the brush "Celestial_Forms_Brushes_PS_by_Coby17.cs_1" set as below or a brush of your choice

Apply the brush , in the center of your tag, with white or a colour of your choice
* If you Psp doesn't accept that big brush, you can use my tube "pinceau celestial", included in the zip, copy that tube and paste it as a new layer
- Image / flip
Place in the top left hand side of your tag
Set the mode of that layer to Dodge or a mode that allows your brush to show better !
You may duplicate that layer in order to make the colour fetch out better and merge down with the previous layer
12- Layers / duplicate
Image / mirror
13- Open the tube " Mtm_bomen 20_ 2 Aug 2007.pspimage" or a tube of your choice, copy it and paste it as a new layer
Place at the right place
You may add a drop shadow to it ( I haven't put any )
14- Open the tube "tree2.pspimage"or a tube of your choice, copy it and paste it as a new layer
Place at the right place
15- Open the tube " kTs_oiseaux.psp"or a tube of your choice (bird or not !), copy it and paste it as a new layer
With your free hand selection tool , cut out one of the birds and resize it to your liking
Place that bird on one of the trees
Resize the other bird and place it on the other tree
* If you prefer, you may use my resized birds; all you'll have to do is copy them and paste them as new layers onto your tag
Effects / 3d effects / drop shadow of your choice ( My choice : 1, 1, 60, 3, black )
16- Open the tube "kikirou1545_Xiao-Bai.pspimage"or a tube of your choice, copy it and paste it as a new layer
I have resized my tube at 85% ( adjust / sharpen if necessary )
Place at the right place
17 - Effects / 3d effects / drop shadow / 4, 10, 40, 20, black
18- Add a new raster layer
We'll draw the flowers on that layer ( unless you prefer to use mine and colorize them ! )
19- Activate your preset shape tool , choose one preset shape flower "cercle_" and set it as below :

Set your colour palette with two colours out of your tag; my choice :
Foreground : red A30C1F
Background : beige / grey : b2b2a8
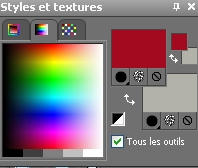
20- Draw the flowers to your liking and use several shapes out of the "syl_5_cercles-deco.PspShape" or other flower shapes of your choice
You may temporarily close the layer where the woman is, so you can see better
21- Add a new raster layer
With your pen tool , set as below , draw the stems of your flowers with your foreground colour ( I have chosen red )


My choice : line style : "dots " and width 3 but it is up to you to decide what style and width you prefer
If you want your stems to be straight, keep the shift key pressed while drawing !
22- Once your stems are drawn, convert your vectorial layer to raster layer l
Layers / arrange / move down
Activate your flower layer and merge down so that your flowers and stems are on the same layer
23- Layers / duplicate
Move that new layer towards the left or right
24- Adjust / hue and saturation / colorize / 11, 23 for me ( choose, for this second lot of flowers, a colour matching your tag )
25- Adjust / Brightness and contrast / 30, 0 for me
26- You may put a drop shadow on both flower layers
My choice : 1, 1, 60, 3, black
I have lowered the opacity of my red flowers layer on to 85
26- Activate your top layer
Add a new raster layer and apply your signature
27- Make sure everything is in its place !
Image / add some symmetrical borders of 1 or 2 pixels with a colour of your choice
I have chosen black
28- Image / add some symmetrical borders of 50 pixels with a colour of your choice
I have chosen : f8ecd8 
29- Image / add some symmetrical borders of 1 or 2 pixels with a colour of your choice
I have chosen black
30- Save your work as a jpeg file and resize it if necessary
***************
That's it !! You've done it !!
If you 've enjoyed doing my tutorial, it would be nice to write a few words in my guest book ! If you 've had the slightest problem, please, send me a mail so I can see to the problem !
Tutorial translated on the 15th of may 2010
*************************
You'll find some versions of that tag in my gallery HERE
