Thank you for putting a link to this tutorial, whenever you display your realization of that tag on a website, on a group or in a mail !
**************************
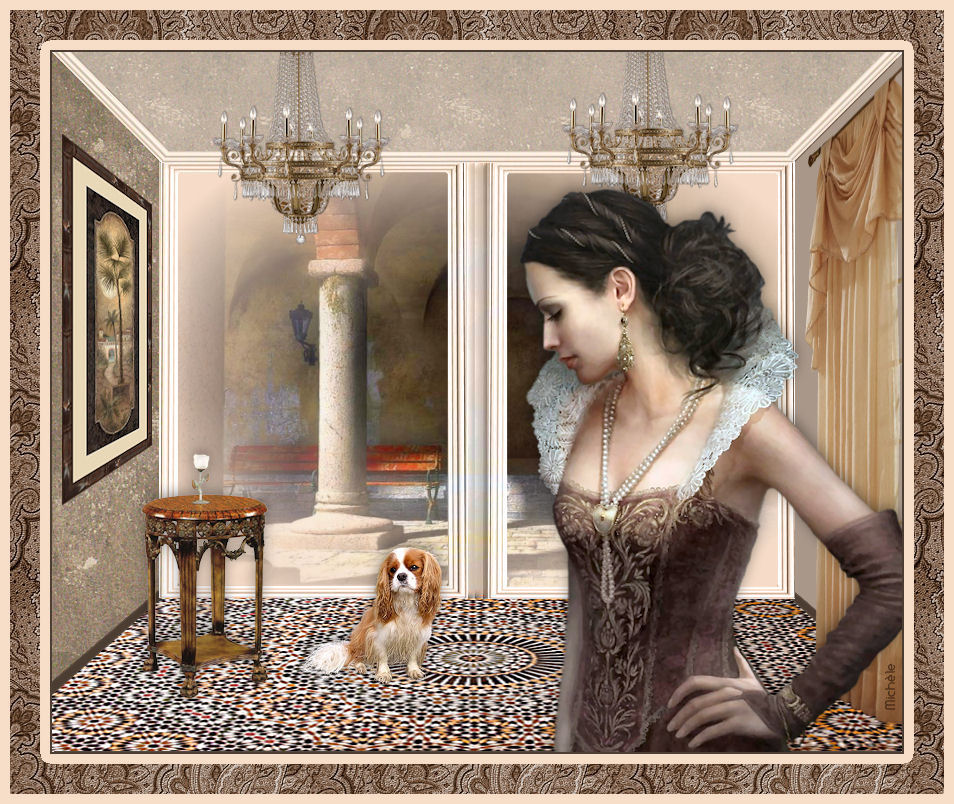
You'll find some versions of that tag in my gallery Here
***********************
To make that tag, you'll need the filters :
- Filters Unlimited 2.0
- Toadies / Sucking Toad II.2
and the material zip down below :

**************
*It is forbidden to suppress watermarks on the material provided , to alter, mist or rename the tubes in order to respect the work of the tubers.
- The tubes of the lady and of the scenery is by Kikirou.
- The tube of the dog is by Nikita.
- The other elements that I haven't created, have been found on the net.
******************
Preparation
To be on the safe side, duplicate your tubes and image in your Psp :
-
Window / Duplicate
- Close the originals and work with the copies !
- Place the patterns in the pattern folder of your Psp files.
*****************
Click here to print the tutorial
**********************
You can use my arrow to follow your work
Click on it and drag it all along the tutorial !

***************
Tutorial made with PSP XIII
1 - Open the file "Fairymist alpha malika" attached to the material.
- That transparent image seems empty
but it includes the selections you will need later on !
2- Window / Duplicate. Close your original file.
- We're going to work on the copy.
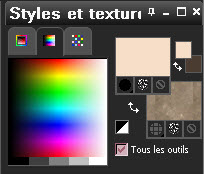
3 - Set your Material palette with two colours out of your main tube.
My choice : Foreground : Light colour f6dcc8
Background : Dark colour 4c3d32
4 - Flood fill your new transparent image with that foreground colour.
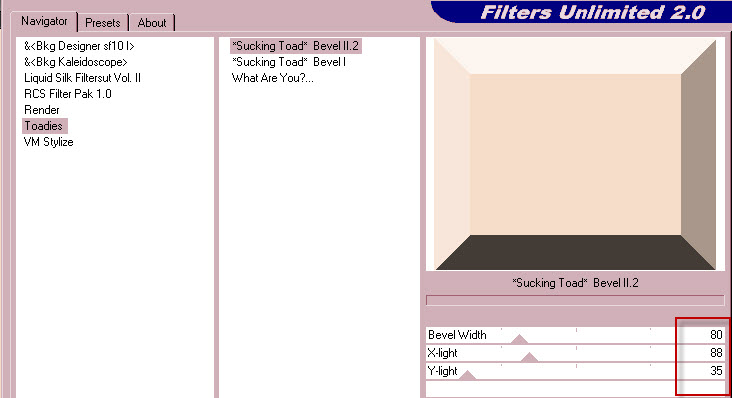
5- Effects / Plugins / IC.NET Software / Filtres Unlimited / Toadies / Sucking Toad Bevel II.2 as below :
- If that plugin doesn't work for you, you can use the layer "Fairymist_Bkg_toadies" that I have attached to the Material.
- You may colorize that layer to match your colours.
6- ADD A NEW RASTER LAYER.
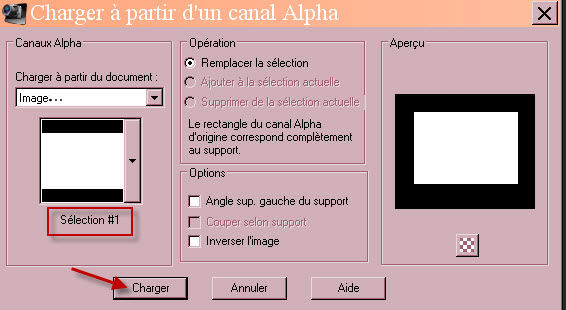
7- Selections / Load a selection / from alpha channel / choose Selection "#1"/ set as below :
8- Open the scenery tube "kikirou894_Corner" or a tube of your choice, in your Psp and copy it.
9- Paste it INTO THE SELECTION, on that new layer. Select none.
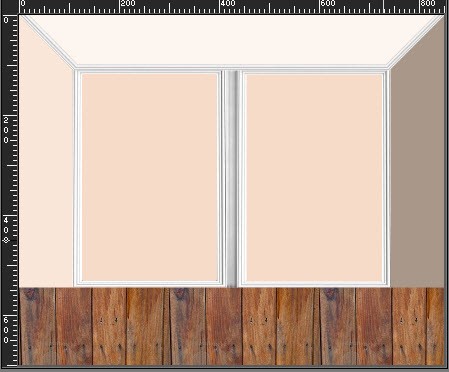
10- Open the tube "Fenêtre-Window" in your Psp and copy it..
11- Paste it as a new layer on to your tag.
12- Place it like me :
- Effects / Image effects / Offset : 0, 24, custom and transparent checked.
- I have set the mode of that layer on to Luminance legacy.
13- Open the tube "Fairymist_malika_moulures" n your Psp and copy it..
14- Paste it as a new layer on to your tag.
15- Place it like me :
- Effects / Image effects / Offset : 0, 337, custom and transparent checked.
- I have set the mode of that layer on to Luminance legacy.
16- Open the tube "Fairymist_Malika _Sol_Floor" in your Psp and copy it.
- To make your own floor, see my explanations down below !
17- Paste the tube of the floor as a new layer on to your tag and place it like me :
- Effects / Image effects / Offset :

************************
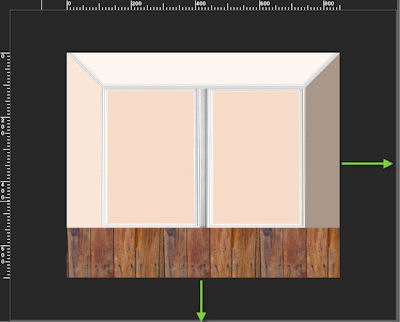
- If you want to make your own floor, this is what I did :
A- Open a new transparent image of 850 by 300 pixels.
B- Fill flood it with a pattern of your choice.
C - Copy that band and paste it as a new layer on to your tag.
D- Effects / Image effects / Offset / 0, - 345, custom and transparent checked.
E - Zoom out your tag by 50 or 60% (View / Zoom out)
F - Stretch the sides of that image as shown below :
G- Activate your deformation tool (letter D).
G- Press and keep pressed the shift key (vertical arrow) and click on the top left hand side corner of your floor..
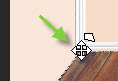
- Push that corner towards the right to make the top side of your floor narrower.
- Proceed in the same way with your other corners
in order to get a floor with like mine :
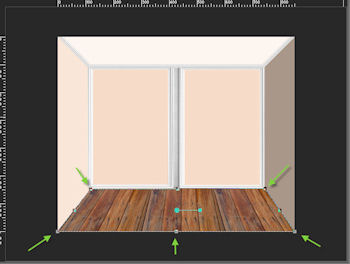
- Click on your move tool to get rid of your deform tool !
***********************
- Move the layer of the floor as below :
- Layers / arrange / Move down (twice) so that the floor layer is underneath the door layer.
18- Set your Materials palette as below :
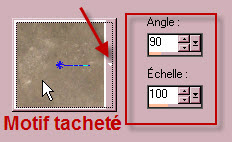
- Beware : angle 90 !
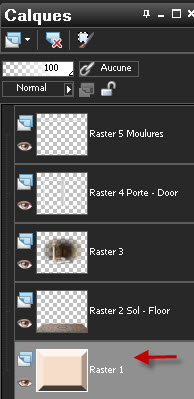
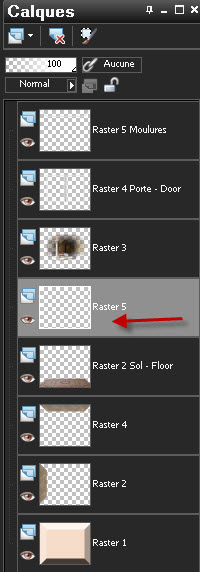
19- In your Layers palette, activate your bottom layer (raster 1).
20- ADD A NEW RASTER LAYER.
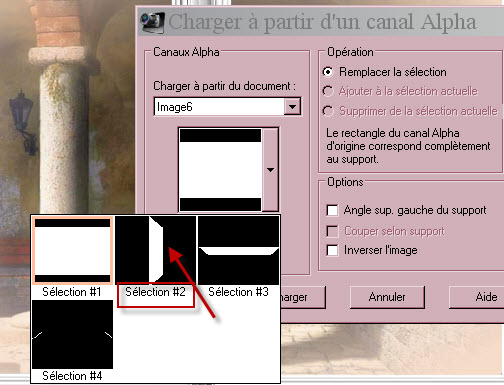
21- Selections / Load a selection / from alpha channel / choose selection "#2"/ Set as below :
22- Flood fill the selection, on your new layer with your background pattern.
23-ADD A NEW RASTER LAYER.
24- Selections / Load a selection / from alpha channel / choose selection "#3".
25- Flood fill the new selection, on your new layer with your background pattern.
- I have set the mode of that layer on to Multiply and have lowered the opacity at 55.
26- In your Layers palette, activate the floor layer and ADD A NEW RASTER LAYER:
27- Selections / Load a selection / from alpha channel / choose selection "#4".
28- Flood fill that new selection, on your new layer with your background dark colour.
(Take the background pattern off).
- Selections / Select none.
29- Activate the layer on top of the pile.
- Open the tube "Cadre-Painting" or a tube of your choice in your Psp and copy it.
30- Paste it as a new layer on to your tag and place it on the left hand side wall of your tag.
- I have used the deform tool to give that shape to my tube, just like for my floor.
31- Open the tube "Lustre-Lights"or a tube of your choice in your Psp and copy it.
32- Paste it as a new layer on to your tag.
- Place it like me or to your liking.
33- Effects / 3d effects / drop shadow of your choice / 1; 1, 20, 1, black for me.
- I have duplicated that tube and did Image / mirror.
34- Open the tube "Rideau-Curtains"or a tube of your choice in your Psp and copy it.
35- Paste it as a new layer on to your tag.
- Place it like me on the right hand side wall of your tag.
36- Open the tube "table"or a tube of your choice in your Psp and copy it.
37- Paste it as a new layer on to your tag.
- Place it like me or to your liking.
38- Effects / 3d effects / drop shadow of your choice / - 3, 0, 40, 20, black for me.
39- Open the tube "Cavalier King Charles"or a tube of your choice in your Psp and copy it.
40- Paste it as a new layer on to your tag.
- Place it like me or to your liking.
40- Effects / 3d effects / drop shadow of your choice / - 3, 0, 40, 20, black for me.
41- Open the tube "Kikirou 1607"or a tube of your choice in your Psp and copy it.
42- Paste it as a new layer on to your tag.
- I have resized my tube à 90%.
- Place it like me or to your liking.
43- Effects / 3d effects / drop shadow of your choice / - 3, 0, 40, 20, black for me.
44- Apply your signature
- Make sure everything is at the right place.
45- Image / add some symmetrical borders of 2 pixels with your dark colour.
46- Image / add some symmetrical borders of 50 pixels with your light colour.
47- With your magic wand, set as below , select this light border :

48- Selections / Modify / Contract by 10 pixels.
49- Set your Material palette as below :
- Choose my pattern Arabesques or a pattern of your choice for your foreground :
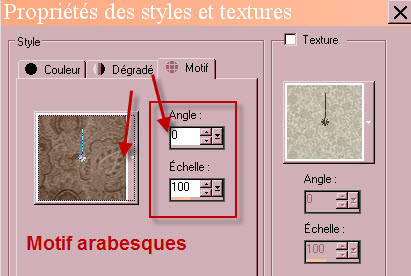
50- Flood fill your selection with that foreground pattern, on that layer or on a new one if you prefer.
51 - Save your work as jpg file.
***************
That's it !! You've done it !!
If you 've enjoyed doing my tutorial, it would be nice to write a few words in my guest book !
If you 've had the slightest problem, please, send me a mail so I can see to the problem
Tutorial translated on the
***********************
You'll find some versions of that tag in my gallery Here