Thank you for putting a link to this tutorial, whenever you display your realization of that tag on a website, on a group or in a mail !
**************************
You'll find some versions of that tag in my gallery HERE
***********************
To realize that tag, you'll need the plugins : here
- Richard Rosenman / Grid generator
- Transparency / Eliminate white
- Alien Skin Eye Candy 5 / Impact
- VDL Adrenaline / Snowscape et Snowflakes
and the material zip down below :

**************
It is forbidden to suppress watermarks on the material provided , to alter, mist or rename the tubes in order to respect the work of the tubers
- The tube of the christmas lady is by Jenny
You'll be able to get her tubes by joining in her sharing group here
- The tubes of the stairs and of the curtains are by Guismo
You'll be able to find her tubes on Dakara' s site here
and you can join in her sharing group here
- The tube of the girl and of the white tree are by Katussia
The other elements have been found on the net
******************
Preparation
- Duplicate your tubes and image. Close the originals and minimize the copies for now.
*****************
Click here to print the tutorial
*******************
You can use my arrow to follow your work

***************
1- 1- Open a transparent image of 800 by 650 pixels and select all
2- Activate the image "home8.jpg" or an image of your choice, copy it and paste it into the selection
Selections / select none
3- Activate the tube " calguismistesc1889.pspimage" or a tube of your choice, copy it and paste it as a new layer onto your tag
Place that tube as on my tag (on the right hand side of your tag)
4- Activate the tube " adriferrari_kitxmas_garland_3.pspimage"or a tube of your choice, copy it and paste it as a new layer onto your tag
I have resized that tube at 30%
Place the tube on the top right hand side of your tag
5- Layers / duplicate
Image / mirror
With your move tool, move your duplicated layer towards the left so that the two ends of your garland don't overlap
6- Activate the tube" calguisrideautheatre25109.pspimage ( raster 3)"or a tube of your choice, copy it and paste it as a new layer onto your tag
Place the curtains on the left hand side of your tag as on my creation
I have set the mode of that layer to Multiply ( It is up to you to see what mode suits you )
7- Activate the tube "kTs_©AnneCresci_2.pspimage"or a tube of your choice, copy it and paste it as a new layer onto your tag
I did Image / mirror
I have resized the tube at 40%
Adjust / sharpness / sharpen
8- Effects /3d effects / drop shadow / 0, 4, 45, 20, black
9- You may add as many decoration elements or people as you wish to make your home as nice as possible ! The picture used at the beginning may be covered with your tubes !
10- Add a new raster layer and flood fill it with any colour / I have used black
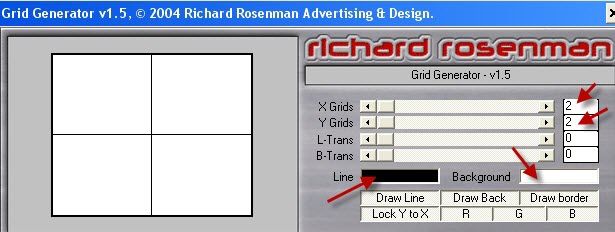
11- Effects / plugins / Richard Rosenman / Grid generator as below
12- Effects / plugins / Transparency / Eliminate White
13- Selections / select all
Selections / Float
Selections / Defloat
Selections / Modify / expand by 5 pixels
14- Flood fill the selection in black or with a colour of your choice
Selections / Select none
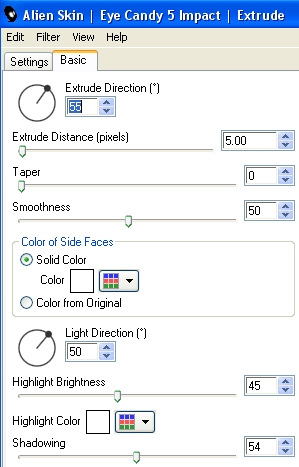
15- Effects / plugins / Alien Skin Eye Candy 5 / Impact / extrude as below
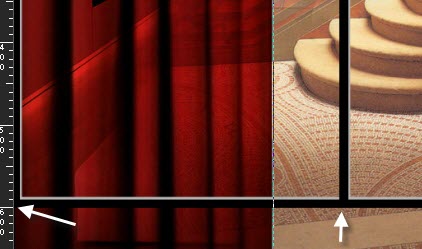
16- With your raster deform tool ( Letter d) pull up the bottom of your window until you reach 600 pixels on your ruler ( View / rulers checked) as shown below
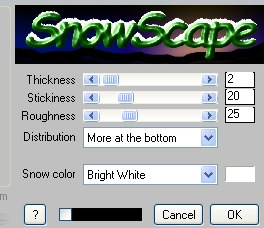
17- Effects / plugins / VDL Adrenaline / Snowscape as below
18- Activate the tube "kTs~lk5003.pspimage"or a tube of your choice, copy it and paste it as a new layer onto your tag
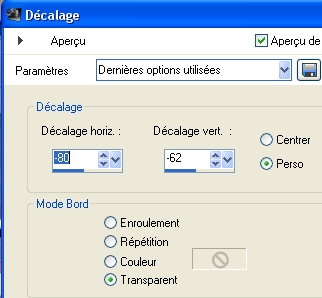
Then I did : Image / image effects / Offset as below
19- With your raster deform tool ( Letter d) stretch the tube towards the right until it touches the right side of your tag
Adjust / sharpness / sharpen
Click on another tool to get rid of your deform tool !
20- Activate the tube "Jen_vrouw 359_23-11-2010.pspimage"or a tube of your choice, copy it and paste it as a new layer onto your tag
Place as shown on my tag
21- Effects / 3d effects / drop shadow of your choice / 0, 4, 45, 20, black for me
22- Add a new raster layer and apply your signature
23- Make sure everything is at the right place
Image / add some symmetrical borders of 1 pixel with a colour of your choice ( black for me )
24- Layers / Promote Background layer
25- Layers / duplicate
Image / resize at 90 °% (Resize all the layers NOT checked )
26- Activate your bottom layer
Adjust / Blur / gaussian blur / 20
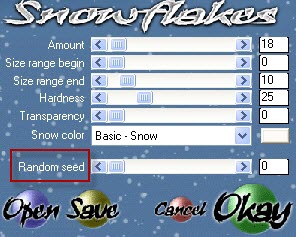
27- Effects / plugins / VDL Adrenaline / Snowflakes as below or with settings of your choice
28- Image / add some symmetrical borders of 1 pixel with a colour of your choice ( black for me )
If you don't wish to do the snow animation , you can stop here and save your work as a jpeg file
29- Layers / Promote Background layer
Layers / duplicate twice
30- Activate these three layers, one by one, and apply the effect Snowflakes on each of them as shown on step 27 but click on Random seed so the effect changes every time
We are now ready for the animation
....................
ANIMATION
1- In your Psp
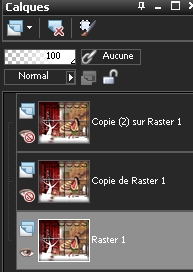
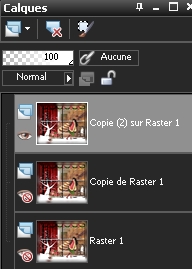
In your layer palette , close the two copies of your raster 1 and activate layer raster 1 as shown below
Edit / Copy
2- In your Animation shop
Edit / paste as a new animation
3- Go back to your psp
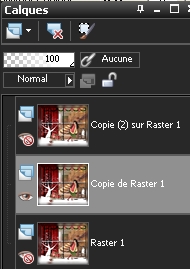
Close layer raster 1 and open the layer Copie de Raster 1 and activate it
Edit / Copy
4- In your Animation shop
Edit / paste after current frame
5- Go back to your Psp
Close your layer Copie de Raster 1 and open Copie (2) sur Raster 1 and activate it
Edit / Copy
6- In your Animation shop
Edit / paste after current frame
7- In your Animation shop
Edit / select all
8- Edit / Frame properties / 20
- Check your animation, by clicking here

Stop the animation by clicking at the same place
9- You may change the speed of your animation that way :
Animation / Frame properties / the bigger the figures are the slower the animation will be!!!
10- If you like the result, all you have to do is save your work as a gif file , in your animation shop !
You may resize your file in your Animation shop :
Animation / Resize animation / choose the right size in pixels
***************
That's it !! You've done it !!
If you 've enjoyed doing my tutorial, it would be nice to write a few words in my guest book ! If you 've had the slightest problem, please, send me a mail so I can see to the problem !
Tutorial translated on the 18th of december 2010
*************
Other versions of that tag