Thank you for putting a link to this tutorial, whenever you display your realization of that tag on a website, on a group or in a mail !
**************************
You'll find some versions of that tag in my gallery here
***********************
To make that tag, you'll need the material zip down below :

**************
*It is forbidden to suppress watermarks on the material provided , to alter, mist or rename the tubes in order to respect the work of the tubers.
- The tube of the couple is by Jhanna
You may join her sharing group here
- The tube of the scenery is by Marif.
- The masks are by Linda Ferdinand, Maelle Dreams and by Shereen.
- The other elements that I haven't created, have been found on the net.
******************
Preparation
To be on the safe side, duplicate your tubes and image in your Psp :
-
Window / Duplicate
- Close the originals and work with the copies !
*****************
Click here to print the tutorial
**********************
You can use my arrow to follow your work
Click on it and drag it all along the tutorial !

***************
Tutorial made with PSP XIII
********************
1 - Open a new transparent image of 850 by 700 pixels.
2 - Select / select all.
3- Open the image "image fond" or an image of your choice matching your tubes.
- Copy it and paste it into the selection of your tag.
- Deselect all.
4- Adjust / Blur / Gaussian blur at 40.
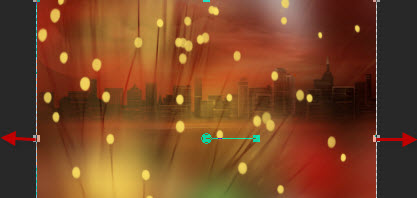
5- Open the scenery tube by Marif or a large tube of your choice.
- Copy it and paste it as a new layer on to your tag.
- The mode of that layer is on multiply but you may use any other mode that suits you better.
6- I have placed my tube that way :
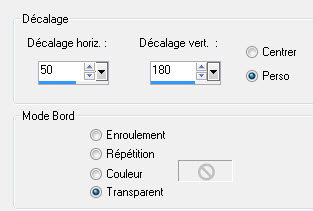
- Effects / Image effects / Offset :
7- ADD A NEW RASTER LAYER.
8- Flood fill that new layer with a brightful colour of your choice.
- I have chosen yellow f8dd62.
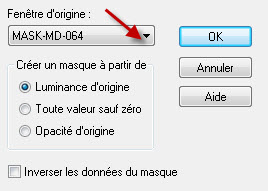
9- Open the mask "MASK-MD-064" and minimize it.
- On your tag : Layers / New mask layer / from image as below :
- Layers / Merge group.
- I have set the mode of the layer on to Dodge and lowered its opacity at 60.
10- Activate your deform tool (click on letter D on your keyboard).
- Stretch on each side to make the dots rounder :
- Click on letter M to get rid of your deform tool.
11- Effects / Edge effects / Enhance.
12- ADD A NEW RASTER LAYER.
13- Flood fill that layer in white.
14- Open the mask "LF-mask-210" and minimize it.
- On your tag : Layers / New mask layer / from image as below :

- Adjust / Sharpness / Sharpen more.
- Merge group.
- I have left the normal mode of that layer by lowered its opacity at 60.
15- ADD A NEW RASTER LAYER.
16- Flood fill that layer in white.
17- Open the mask "Washed out Mask by Shereen" and minimize it.
- On your tag : Layers / New mask layer / from image as below :
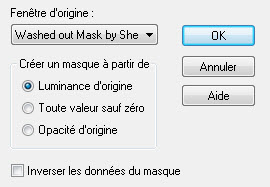
- Layers / Merge group.
18- Image / Resize at 140 % (Resize all the layers NOT checked).
19- Layers / Duplicate.
20- Open the tube "Snowy tree" or a tube of your choice in your Psp.
- Copy it and paste it as a new layer on to your tag.
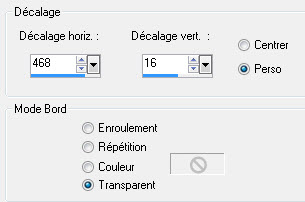
21- I have placed my tube that way :
- Effects / Image effects / Offset :
22- Open the tube "Title" in your Psp and copy it.
- Paste it as a new layer and place it like me or to your liking.
23- Open the tube "pancarte"or a tube of your choice in your Psp and copy it.
- Paste it as a new layer and place it like me or to your liking.
24- On that tube : Effects / 3d effects / drop shadow : - 4, 0, 35, 15, black
- And : - 6, 0, 80, 4, white.
25- We're now going to put some snow at the bottom of the "pancarte" :
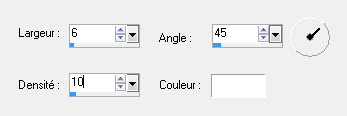
- In your Material palette, set your foreground with white.
- Activate your airbrush tool, set as below :

- Click once or twice at the foot of the "pancarte" to apply snow.
26- Open the tube "JHanna_801 tube"or a tube of your choice in your Psp and copy it.
- I have resized that tube at 50% (Resize all the layers NOT checked).
- Paste it as a new layer and place it like me or to your liking.
27- On that tube : Effects / 3d effects / drop shadow : - 4, 0, 35, 15, black
28- Open the tube "stars"or a tube of your choice in your Psp.
- Copy it and paste it as a new layer on to your tag.
- I have placed my tube that way :
- Effects / Image effects / Offset :
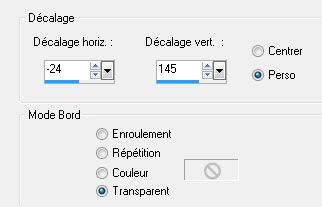
- I have set the mode of that layer on to Dodge and lowered its opacity at 52.
29- In your layers palette, activate the layer at the bottom of the pile (raster 1)
- Copy it, we will need that later on.
30- Image / add some symmetrical borders of 4 pixels with a colour of your choice.
- I have chosen brown 4a3228.
31- Image / add some symmetrical borders of 46 pixels in white.
32- With your magic wand, set as below , select that white border.

33- Paste (the copy of your background) into the selection.
34- Effects / Artistic effects / Topography as below :
35- Selections / Invert.
36- Effects / 3d effets / drop shadow as follows : 0, 0, 100, 40, black.
- Deselect all.
37- Aply your signature.
38- Open the tube "Etoile deco" or a tube of your choice in your Psp.
- Copy it and paste it as a new layer on to your tag.
- Place it like me or to your liking.
39- Image / add some symmetrical borders of 2 pixels in white or any other colour of your choice.
*********************
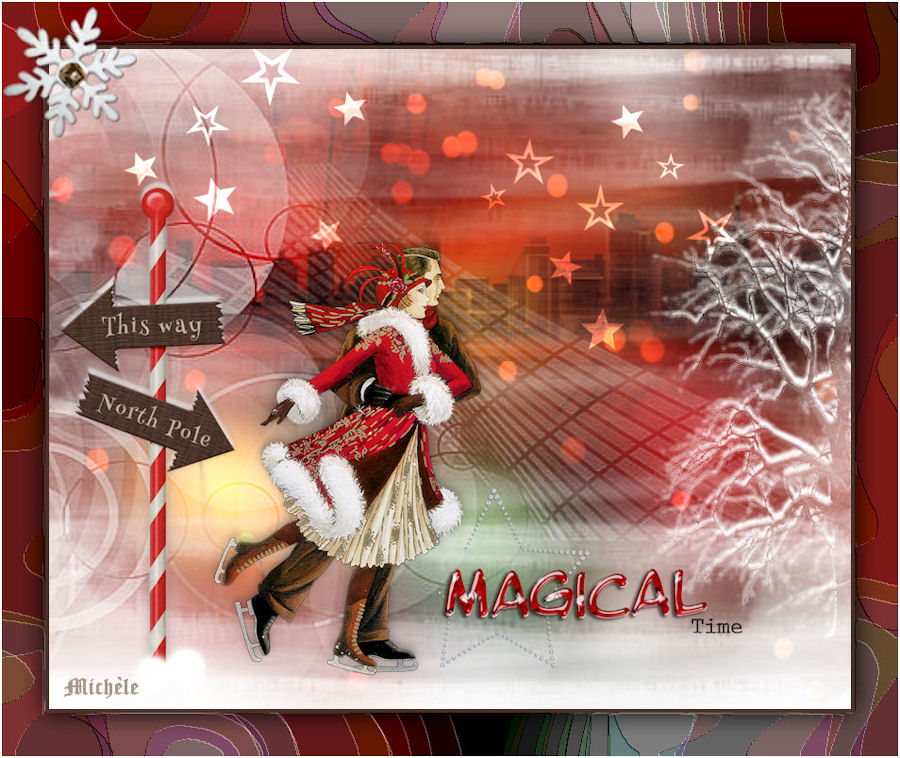
That's it, you have done it !
If you have the slightest problem, don't hesitate to get in touch with me !
Tuto translated on the 8th of december 2015
*******************
You'll find some versions of that tag in my gallery here