Thank you for putting a link to this tutorial, whenever you display your realization of that tag on a website, on a group or in a mail !
**********************
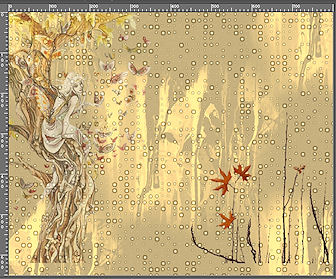
You'll find some versions of that tag in my gallery HERE
******************
To realize that tag, you'll need the plugin :
- VM natural
and the material zip down below :

**************
*It is forbidden to suppress watermarks on the material provided , to alter, mist or rename the tubes in order to respect the work of the tubers
- The tube of the girl is by Pita
- The tube of the angel is by Kikirou
You'll be able to get her tubes by joining in her sharing group here
- The tube of the branch is by Guismo
You'll be able to find her tubes on Dakara' s site here
and you can join in her sharing group here
- The tube of the flowers is by Jen
- The frame LIITA_30 is an element of Miss Erin's scraps
- The brush sad_days2 is by HJR
The brush Urban_Scrawl by Invisiblesnow is by Tamsin Baker
******************
Preparation
Duplicate your tubes. Close the originals and minimize the copies for now.
Export your brushes in your psp as custom brushes
*****************
Click here to print the tutorial
*******************
You can use my arrow to follow your work

***************
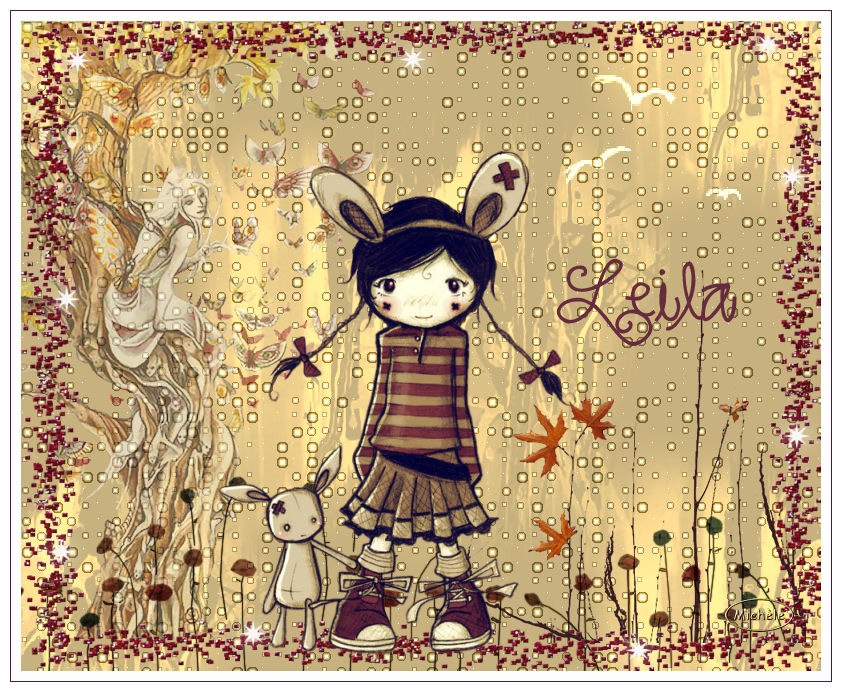
1- Open a transparent image of 800 by 650 pixels
2- Set your colour palette with two colours matching your main tube
My choice : Foreground : colour c7b17e 
Background : colour 672b3e 
3- Flood fill your transparent layer with your foreground colour
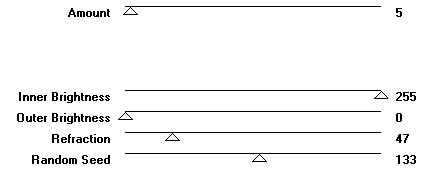
4- Effects / plugins /VM Natural / Acid rain as below :
5- Add a new raster layer
Activate your brush tool, set as below, and apply the brush Hjr_sad_days2, in the center of your tag, with your foreground colour

Set the mode of that layer to Dodge ( that will give some brightness to your brush and will allow you to see your brush !!)
I have lowered the opacity of that layer to 40 but you will have to decide what opacity suits your colours
( With a dark colour, you won't have to lower the opacity !)
6- Effects / image effects / Seamless tiling / default
7- Open the tube "Kikirou1009_Stephanie Pui-Mun Law whisper" or a tube of your choice, copy it and paste it as a new layer
I have resized that tube at 85% and Image / Mirror
Adjust / Hue and saturation / Hue map as below
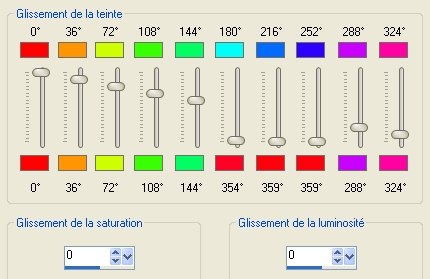
( The tube you have chosen may not need that treatment ! I just wanted to give my tube colours that match my background because if you colorize a tube you only get one colour in the end !!)
Place your tube against the left hand side border of your tag
I have lowered the opacity of that layer to 50 ( See what best for you !)
You'll notice that my tube doesn't touch the bottom of my tag but that doesn't matter as the frame we'll put later on will hide that bottom part of the tag !
8- Open the tube CalguisBranche1149 or a tube of your choice, copy it and paste it as a new layer
I did : Image / mirror and have resized that tube at 75%
Place your tube as shown below :
9- Open the tube Jen_fleurs or a tube of your choice, copy it and paste it as a new layer
Place the tube on the bottom left hand side of your tag
I have set the mode or that tube to Multiply ( see what is best for you !)
10- Layers / duplicate
Move that layer to the right hand side of the tag but leave an empty space for the main tube to stand there
11- Add a new raster layer and select all
Open the fantasy frame LIITA_30, copy it and paste it into the selection
Select none
Colorize the tube if necessary
12- Open the tube BunnyGirl or a tube of your choice, copy it and paste it as a new layer
Place the tube at the right place
13- Effects / 3d effects / drop shadow of your choice
I have chosen a light drop shadow : 0, 0, 30, 10, black
14- Add a new raster layer
Set your foreground with the same colour as your background ( for me : Marroon as on step 2)
Activate your text tool, set as below ,( thickness at 2 !!!!)

Write down your text with the font provided or a font of your choice
Place your text at the right place
15- Add a new raster layer
Activate your brush tool, set as below (size 180 for my brush !!!)

Apply at the top of your tag, the provided Birds brush or a brush of your choice, in white.
Set the mode of that layer to Dodge and lower the opacity if necessary ( 50 for me )
16- Add a new raster layer and apply your signature
17- Make sure everything is in place !
Image / add some symmetrical borders of 10 pixels with a colour of your choice ( white for me )
18- Image / add some symmetrical borders of 1 pixel with a colour of your choice ( marroon for me)
19- Image / add some symmetrical borders of 10 pixels with a colour of your choice ( white for me )
20- Save your work as a jpeg file and resize your tag if necessary
********
That's it !! You've done it !!
If you 've enjoyed doing my tutorial, it would be nice to write a few words in my guest book ! If you 've had the slightest problem, please, send me a mail so I can see to the problem !
Tutorial translated on the 20th of February 2010
***********
You'll find some versions of that tag in my gallery HERE