
Thank you for putting a link to this tutorial, whenever you display your realization of that tag on a website, on a group or in a mail !
**************************
You'll find some versions of that tag in my gallery HERE
***************
To realize that tag, you'll need the filter Alien Skin Eye Candy 5 / textures and Impact
and the material zip down below :

****************
*It is forbidden to suppress watermarks on the material provided , to alter, mist or rename the tubes in order to respect the work of the tubers
- The tube of the dancers is by Guismo
You'll be able to find her tubes on Dakara' s site here
and you can join in her sharing group here
The other elements have been found on the net
*******************
Preparation
Open you PSP, open the tubes, pictures and masks, duplicate them, close the originals and minimize the copies for now. Place the masks in your masks folder
Now, we're ready to start !
*****************
Click here to print the tutorial !
**********************
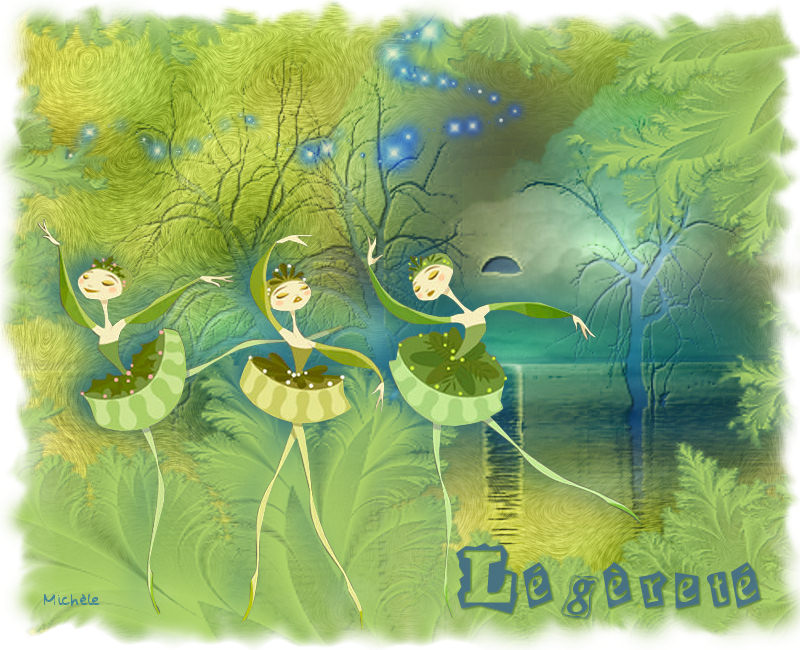
1- Open a new tranparent image of 800 by 650 pixels and select all
Add a new raster layer
2-Open your main tube( the dancers for me), copy it and paste it into the selection
Select none
3- Layers / duplicate
Image / mirror
Layers / merge down
4- Layers / duplicate
Image / flip
Layers / merge down
5- Effects / image effects / seamless tiling
6- Adjust / blur / gaussian blur at 20
7- Now, activate the bottom layer( raster 1)
Prepare, in your foreground a linear gradient, angle and repeats at 0, square Invert, not checked, with the following colours ( in fact choose two colours out of your tube)
Foreground : light color : for me, colour e5e58f 
Background : dark color : for me, colour add269 
8- Flood fill the raster 1 with that gradient
9- Merge all
10- Effects / plugins / Alien Skin Eye Candy 5 / textures / swirl / Features, Large loops ( or Random , large loops, long streaks if you prefer ! )
11- Add a new raster layer and select all
Open the tube "ambiance bleue" or a tube with sun, moon or clouds whose colour contrast with the colours used at the beginning of the tutorial; make sure you have at least 3 colours in your tag
Copy that tube and paste it in the selection
Select none
Move the tube to the top hand right part of your tag but you may have to move it again later on, according to the effect of the masks we're going to use
12- Add a new raster layer and flood fill it with your light colour (for me : Yellow e5e58f)
13- Layers / loadmask / load mask from disk / choose a mask of a countryside or the one provided in the zip : Skf mask 18 / check the 3 squares: Source luminance , Fit to canvas and Hide all mask
Merge the group
14- Set the mode of that layer on Hard light or any other mode that makes your colours contrast
15- Effects / 3d effects / drop shadow / 1, 1, 100, 2, black)
16- Add a new raster layer and flood fill it with your dark colour (green add269)
17- Layers / loadmask / load mask from disk / choose your mask fancy frame or the one I provided in the zip : masque sg fractual frame2 / check the 4 squares : Source luminance , Fit to canvas and Hide all mask and Invert
Merge the group
18- Effects / 3d effects / drop shadow / 1, 1, 100, 2, couleur 356e5b
19- You can set the mode of that layer to whatever suits you ( You have a go !)
I've left mine on Normal
20- Merge all
21- Open the main tube(the dancers for me) copy it and paste it as a new layer
Place the tube as you wish or like me
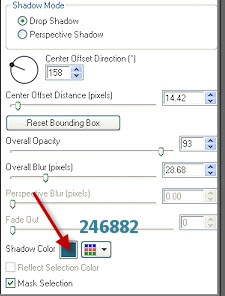
22- Effects / plugins / Alien Skin Eye Candy 5 / Impact / Perspective shadow / drop shadow blurry as below : click on the shadow colour square and choose the turquoise colour or a colour which contrasts and looks nice
23- Add a new raster layer and write a title to your tag with the fonts provided or any other of your choice
Write your first letter in capital letters , size 90 with the fonts Paste and cut
Add a new raster layer and write the rest of your word in small letters with the fonts size 60
If you don't feel like writing your own title, you can use the tube text I've put in the zip and colorize it if necessary
24 - Open the tube Accent BD, copy it and paste it as a new layer
Place the tube as shown on my tag
25- Set the mode of that layer to Hard light and lower the opacity to 62
26 - Merge all
27- It's up to you to finalize your tag with a frame of your choice
I've chosen to use the white frame provided in the zip; copy it and paste it as a new layer
28- Add a new layer and apply your signature
29- Save as a jpeg file
**************
That's it !! You've done it !!
If you 've enjoyed doing my tutorial, it would be nice to write a few words in my guest book ! If you 've had the slightest problem, please, send me a mail so I can see to the problem !
Tutorial translated on the 25th of february 2009
****************
Thank you to my friend Elusive for checking my translation
*****************
You'll find some versions of that tag in my gallery HERE
