

Thank you for putting a link to this tutorial, whenever you display your realization of that tag on a website, on a group or in a mail !
**************************
You'll find some versions of that tag in my gallery HERE
************************
To realize that tag, you'll need the plugin :
- Italian Editors Effects / Bordo con luci
and the material zip down below :

**************
*It is forbidden to suppress watermarks on the material provided , to alter, mist or rename the tubes in order to respect the work of the tubers
- The tube of the roses is by Guismo.
You'll be able to find her tubes on Dakara' s site here
and you can join in her sharing group here
- The other elements that I haven't created, have been found on the net.
******************
Preparation
To be on the safe side, duplicate your tubes and image in your Psp :
-
Window / Duplicate
- Close the originals and work with the copies !
- Place the texture in the texture folder of your Psp files unless it is already there !
- Place my selection in the selection folder of your Psp files.
*****************
Click here to print the tutorial
**********************
You can use my arrow to follow your work
Click on it and drag it all along the tutorial !

***************
Tutorial realized with PSP XIII
Step 1 : The background of the tag
1 - Open a new transparent image of 800 by 800 pixels.

2 - Set your Material palette with two colours of your choice (a light and a dark colour).
- My choice : Foreground : White
Background : Black

3 - Flood fill your transparent image with your light foreground colour.
4- ADD A NEW RASTER LAYER.
- Flood fill that new layer with your dark background colour (Right click).
5- Open the image "mask_174.jpg" in your Psp.
- Layers / new mask layer / From image / choose "mask_174.jpg" and set as below :

- Merge Group.
6- Adjust / Sharpness / Sharpen or sharpen more, as you wish.
- Merge visible.
7- ADD A NEW RASTER LAYER.
- Flood fill that new layer with your light foreground colour.
8- Layers / Arrange / Move down.
9- Activate the layer on top of the layers.
- Image / resize at 80% (Resize all the layers NOT checked).
10- Effects / 3d effects / drop shadow of your choice / 4, 4, 50, 5, black for me and then - 4, - 4, 50, 5, black.
10- Activate the layer at the bottom of the pile.
- Effects / Texture effects / Texture / grid as below :

11- Optionnal : Effcets / Edge effects / Enhance.
12- Effects / Plugins / Italian editors effect / Bordo con luci / 60, 62, 62.

Step 2 : The tubes
1- Activate the layer on top of the pile of layers.
- Open the tube " feuille automne.pspimage" or a tube of your choice and copy it.
2- Paste it as a new layer on to your tag.
- I have resized my leaf tube at 120% (Resize all the layers NOT checked).
- I have set the mode of that layer on to Luminance legacy. You may choose another mode, if you wish.
- Place the tube as on my tag or to your liking.
3- Open the tube "calguisroscoeur1319.pspimage"or a tube of your choice and copy it.
4- Paste it as a new layer on to your tag.
- Place the tube as on my tag or to your liking.
5- Effects / 3d effects / drop shadow of your choice / here are my choices below :

6- Open the tube " mariquita.pspimage"or a tube of your choice (insect or other) and copy it.
7- Paste it as a new layer on to your tag.
- Place the tube as on my tag or to your liking.
- My tube has already got a drop shadow.
Final step
1- ADD A NEW RASTER LAYER.
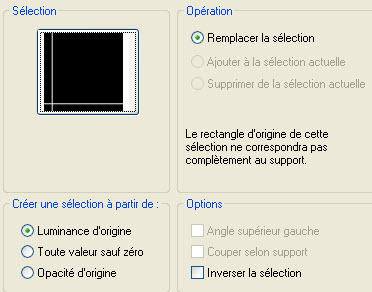
- Selections / Load a seection / From disque / choose "fairymist_ladybird" and set as below :
1- Flood fill that selection with a colour of your choice that matches your tubes.
- I have chosen the red colour 951114.
2- Effects / 3d effects / drop shadow / 0, 0, 50, 5, noir.
- Deselect all.
3- Image / add some symmetrical borders of 2 pixels with your dark colour.
4- Image / add some symmetrical borders of 40 pixels with your light colour.
5- Open the tube "fairymist_ladybird_text.pspimage" and copy it.
6- Paste it as a new layer on to your tag.
7- Effects / Image effects / Offset as below :

8- Colorize that text to your liking if you use other colours as mine (Adjust / Hue and saturation / colorize).
9- Layers / Duplicate.
10- Effects / Image effects / Offset as below :

11- Selections / select all.
- Selections / Float.
- Selections / Defloat.
12- ADD A NEW RASTER LAYER.
- Flood fill that selection on the new layer with your light colour (white for me).
- Deselect all.
- Delete the layer which is underneath (the one with the duplicated red text).
13 - Apply your signature
14- Layers / Merge all.
15 - Save your work as a jpeg file.
***************
That's it !! You've done it !!
If you 've enjoyed doing my tutorial, it would be nice to write a few words in my guest book ! If you 've had the slightest problem, please, send me a mail so I can see to the problem
Tutorial realized on the 9th of december 2007 and modified and translated on the 15th of September 2012
*************
You'll find some versions of that tag in my gallery HERE
