Thank you for putting a link to this tutorial, whenever you display your realization of that tag on a website, on a group or in a mail !
**************************
You'll find some versions of that tag in my gallery Here
***********************
To make that tag, you'll need the filters :
- VM Experimental / Needles and pins.
- Mura's Meister / Perspective Tiling.
- FM Tile Tools / Blend Emboss.
- VLD Adrenaline / Snowflakes.
and the material zip down below :

**************
*It is forbidden to suppress watermarks on the material provided , to alter, mist or rename the tubes in order to respect the work of the tubers.
- The tube of the lady is by Tatie.
- You will find some of Tatie's tubes here.
- The tube of the girl is by Betsy.
-The tube of the bird is by JHanna.
- The tube of the light has been tubed by Kikirou.
- The other elements that I haven't created, have been found on the net.
******************
Preparation
To be on the safe side, duplicate your tubes and image in your Psp :
-
Window / Duplicate
- Close the originals and work with the copies !
- Place the selections in the selections folder of your Psp files.
*****************
Click here to print the tutorial
**********************
You can use my arrow to follow your work
Click on it and drag it all along the tutorial

***************
Tutorial made with PSP X8
********************
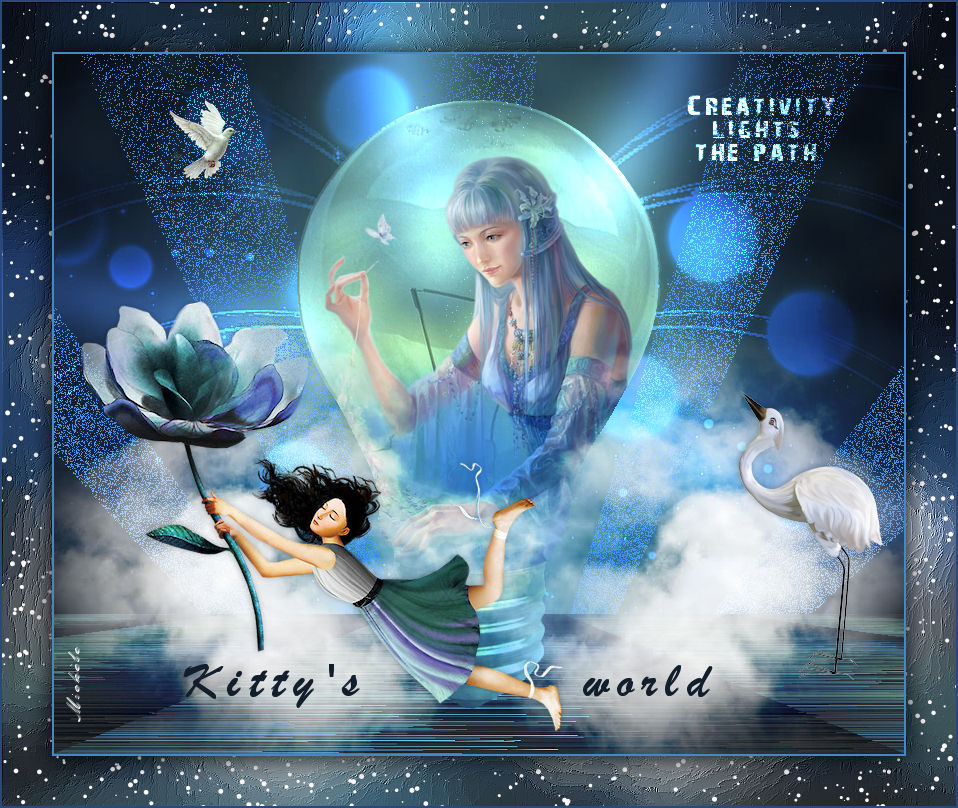
1 - Open the image "Bkg_Kitty".
- If you don't want to use the same colours as me,
you will have to use the effect "Hue map"
to get colours that match your tubes
- Adjust / Hue and saturation / Hue map.
- Here is the sort of result you can get.
- Don't use the colorize effect as you would only get one colour :
2- Layers / Duplicate.
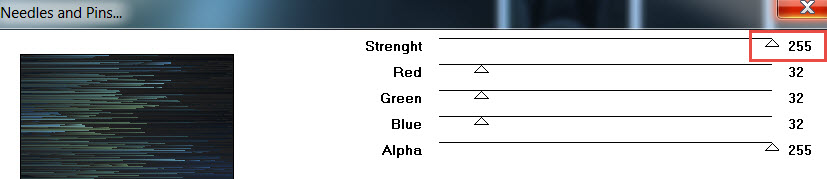
- Effects / Plugins / VM Experimental / Needles and pins as below :
3- Adjust / One step photo fix (in order to brighten up the floor) :
- Before and after :
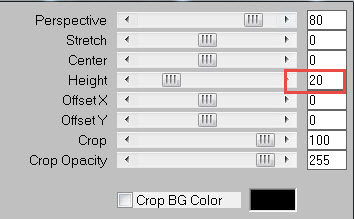
4- Effects / Plugins / Mura's Meister / Perspective Tiling as below :
5- In your layers palette, activate the layer at the bottom of the pile.
- ADD A NEW RASTER LAYER.
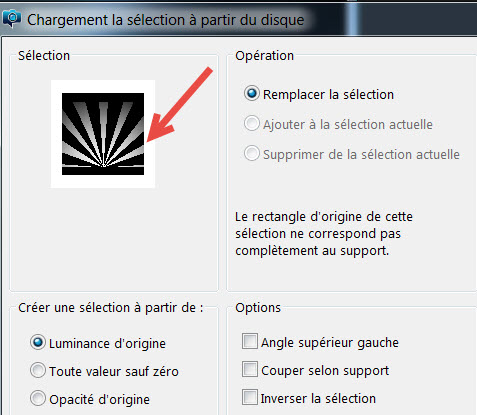
6- Selections / Load a selection / Load the selection from Disk / Choose "Fairymist_kitty" :
7- Flood fill that selection, on your new layer, in white or with a light colour matching your choices.
(blue 4883c2 for me).
8- I have set the mode of that layer on to Dissolve and lowered its opacity at 60.
- Selections / Select none.
9- ADD A NEW RASTER LAYER.
10- Flood fill that layer in white or any other light colour of your choice.
(blue 4883c2 for me).
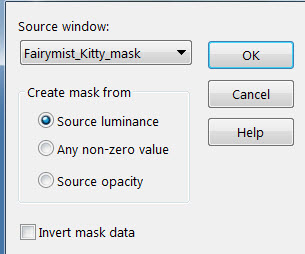
11- Open the mask "Fairymist_Kitty_mask" in your PSP and minimize it.
12- Layers / New mask layer / From image as below :
- Adjust / Sharpness / Sharpen more.
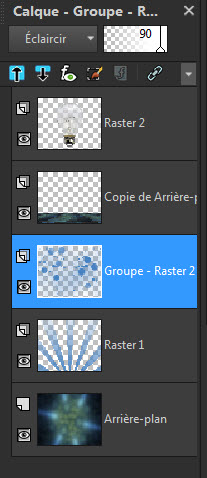
- Layers / Merge group.
13- I have set the mode of that layer on to Dodge and lowered its opacity at 90.
14- In your layers palette, activate the layer on top of the pile.
15- Open the tube "Kitty_light", in your PSP and copy it.
16- Paste it as a new layer on to your tag.
- It is at the right place.
I have set the mode of that layer on to Dodge and lowered its opacity at 60.
17- Selections / Select all.
- Selections / Float.
- Selections / Defloat.
18- Activate the layer of the mask and hit the delete key of your keyboard twice.
- Activate Raster 1 (just underneath) and hit the delete key several times in order to fade the light rays or suppress them.
- Activate the layer of the floor (just underneath the light bulb) and hit the delete key twice.
- Selections / Select none.
19- Activate the layer on top of the pile.
20- Open the tube "tubtatie_29907249" or a tube of your choice in your PSP and copy it.
21- Paste it as a new layer. Erase the watermark (Don't erase before as it will change the size of the layer tube before you paste it !)
22- I have resized the tube at 60% (Resize all the layers NOT checked)
and have moved it that way :
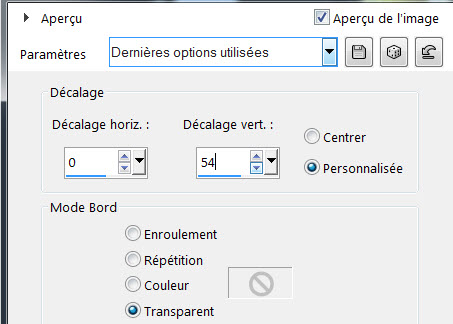
- Effects / Image effects / Offset as below :
23- Selections / Load a selection / Load the selection from Disk / Choose "Fairymist_Kitty_2"
with the same settings as for the previous selection.
- Hit the delete key of your keyboard.
- The parts of the tube that are outside the bulb will then be deleted.
24- Selections / Load a selection / Load the selection from Disk / Choose "Fairymist_Kitty_3"
with the same settings as for the previous selection.
- Hit the delete key of your keyboard.
- The bottom of the light bulb is then cleared up.
- Selections / Select none.
25- In your layers palette, activate the layer of the light bulb.
26- Open the tube " Sky_26.06.2011" in your PSP and copy it.
27- Paste it as a new layer on to your tag.
28- Place it like me :
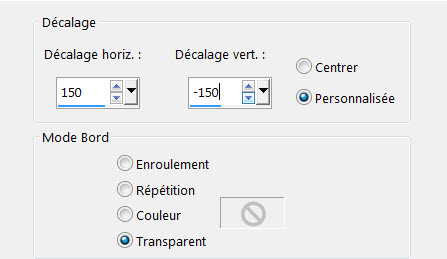
- Effects / Image effects / Offset as below :
29- I have set the mode of that layer on to Hard light.
30- Layers / Duplicate.
31- Image / Mirror / Horizontal Mirror.
32- Open the tube "Betsie 42-2013" in your PSP or a tube of your choice and copy it.
33- Paste it as a new layer on to your tag.
34- I have resized that tube at 90% (Resize all the layers NOT checked)
35- Place it like me :
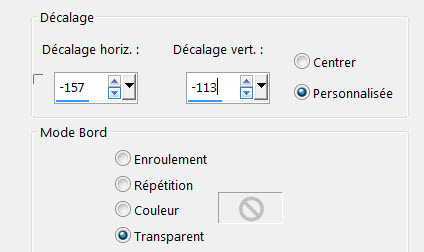
- Effects / Image effects / Offset as below :
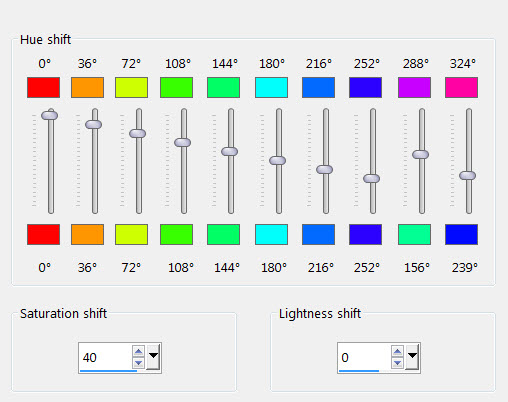
36- In order to change the colours of that tube so that it matches my other colours, I did this :
- Adjust / Hue and saturation / Hue map as below :
- For those that don't like playing with that effect, I have attached to my material the tube resized and altered.
37- Activate your text tool in order to write the title of the tag with a colour that shows up on your background.
38- I have written my text "Kitty's world" with the font Brush script MT, size 52 and with the dark blue colour : 121e2c.
39- Open the tube "Fairymist_Kitty_creativity_text" in your PSP and copy it.
40- Paste it as a new layer and place it in the top right hand side corner of your tag, like me.
- I have set the mode of that layer to Dodge and lowered its opacity at 90.
- I have written that text with the font 28 Days later, size 26 bold in white.
41- Open one by one, the tubes of the birds in your PSP and copy them.
42- Paste them as new layers on to your tag and place them like me.
43- I have added a slight drop shadow on all these tubes (girl that flies and birds) as below :
- Effects / 3D effects / Drop shadow / -1, -1, 27, 10, black.
44- Apply your signature.
45- Layers / Merge all and copy that merged layer.
46- Add some symmetrical borders of 2 pixels with a colour of your choice
( 29497c for me).
47- Layers / Promote background layer.
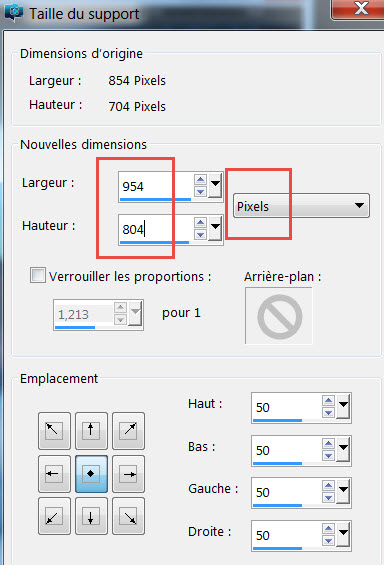
48- Image / Canvas size / Set as below :
49- ADD A NEW RASTER LAYER.
- Layers / Arrange / Send to bottom.
50- Selections / Select all.
- Paste into selection (the copy of your tag that is still in memory !).
- Selections / Select none.
51- Adjust / Blur / Gaussian blur at 20.
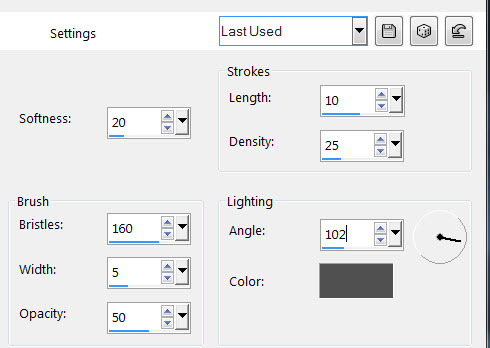
52- Effects / Art Media effects (Effet de traits ?) / Brush strokes as below :
53- Effects / Plugins / FM Tile Tools / Blend Emboss default.
54- ADD A NEW RASTER LAYER.
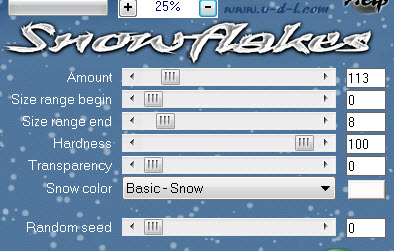
55- Effects / Plugins / VDL Adrenaline / Snowflakes as below :
56- In your layers palette, activate the layer on top of the pile.
57- Effects / 3D effects / Drop shadow / 0, 0, 100, 40, black.
58- - Add some symmetrical borders of 2 pixels with a colour of your choice
( 29497c for me).
59 - Save your work as jpg file.
***************
That's it !! You've done it !!
If you 've enjoyed doing my tutorial, it would be nice to write a few words in my guest book !
If you 've had the slightest problem, please, send me a mail so I can see to the problem
Tutorial translated on the ... January 2018
***********************
You'll find some versions of that tag in my gallery Here