
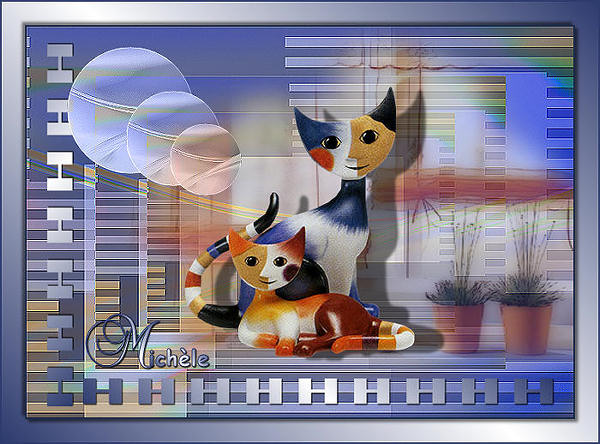
Thank you for putting a link to this tutorial, whenever you display your realization of that tag on a website, on a group or in a mail !
**********************
You'll find some versions of that tag in my gallery HERE
******************************
To realize that tag, you'll need the material zip down below :

*****************
*It is forbidden to suppress watermarks on the material provided , to alter, mist or rename the tubes in order to respect the work of the tubers
- The tube of the cats is by Ninaisu
You can join in her sharing group by clicking here
*****************
Preparation
Duplicate your tubes and the background. Close the originals and minimize the copies for now. Put the mask in your masks file. Put the selection in your selections file.
Click here to print the tutorial
*******************
You can use my arrow to follow your work

***************
1- Open a transparent image of 700 by 600 pixels and select all
Open the background "texture abstraite", copy it and paste it into the selection.
Select none .
2-Layers / load a mask / from disk as below :
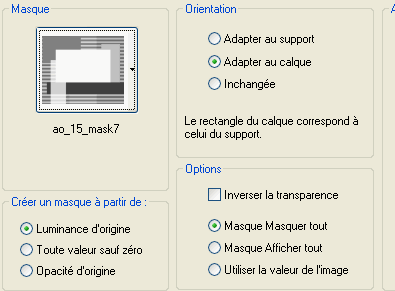
Merge group
3- Effects / 3d effects / drop shadow / 1, 1, 100, 2, black
4- Adjust / Hue and saturation / Hue map as below :
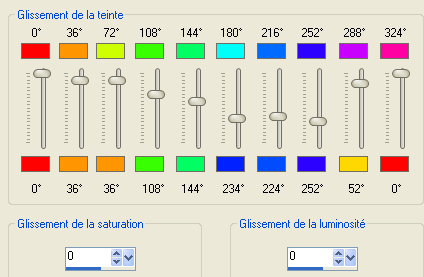
5- Add a new raster layer
Layers / arrange / move down
Flood fill that layer with the colour 2c3b6e 
Layers / merge all
6- Layers / duplicate
Image / resize at 75 %
7- Layers / duplicate
Image / resize at 75 %
8- Merge all
Effects / edge effects / enhance
9- Select all
Add a new raster layer
Open the tube "fenetre", copy it and paste it into the selection
Select none
Move the tube on the right of your tag as shown on my tag
Lower the opacity of that layer between 60 and 65
10- Open the tube Ninaisu_cats, copy it and paste it as a new layer
Leave it where it is
Effects / 3d effects / drop shadow / 4, 40, 50, 5 , black
11- Add a new raster layer
Selections / load from disk the selection "cerclekittens" as below :
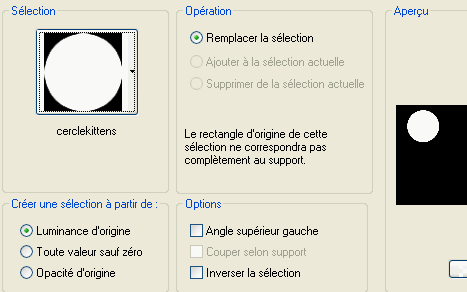
Activate your background "texture abstraite" , copy it and paste it into your selection
12- Select none
Set the mode of that layer to Luminance legacy
Effects / edge effects / enhance
13- Layers / duplicate
Image / resize at 75 %
14- Layers / duplicate
Image / resize at 75 %
Place your circles as shown on the tag
15- Layers / merge all
16- Add a new raster layer
Set your foreground with a linear gradient ( angle 45, repeats 1, do NOT check Invert ) using the colour 2c3b6e in your foreground and the colour f5f5f8 in your background
Activate your pen tool and draw a horizontal line at the bottom of your tag, as shown on my tag
Choose the style shown below, thickness of the line : 5

17- Layers / convert to a raster layer
Effects / 3d effects / drop shadow / 1, 1, 100, 2, black
18- Layers / duplicate
Image / free rotation 90 ° . Don't check any of the squares
Place that vertical line as shown on my tag
19- Add a new raster layer
Set your palette as below
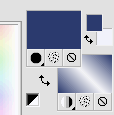
Write the first letter of your first name, in capital letters, with your text tool, set as below :
Use some fancy fonts of your choice ( I have chosen Balmoral D)

Effects / 3d effects / drop shadow / 1, 1, 100, 2, black
Select none
20- Add a new raster layer and write the rest of your first name, using another font, with your text tool set as below :

21- Place your letters as shown on my tag
Select none
22- Make sure everything is at the right place
23- Image / add some symmetrical borders of 2 pixels in dark blue
24- Copy your tag and put it aside for the moment
24 - Open a new transparent image of 764 by 564 pixels
Flood fill that layer with the same gradient as on line 16 of my tutorial
25- Paste the tag you've just copied, as a new layer
26- Effects / 3 deffects / drop shadow / 4, 4, 50, 5 , black
Repeat line 26 with - 4 vert and horiz
27 - Merge all
Image / add some symmetrical borders of 2 pixels in dark blue
28 - Save your work as a jpeg file
*****************
That's it !! You've done it !!
If you 've enjoyed doing my tutorial, it would be nice to write a few words in my guest book ! If you 've had the slightest problem, please, send me a mail so I can see to the problem !
Tutorial translated on the 30th of may 2009
**************
You'll find some versions of that tag in my gallery HERE
