Thank you for putting a link to this tutorial, whenever you display your realization of that tag on a website, on a group or in a mail !
************************
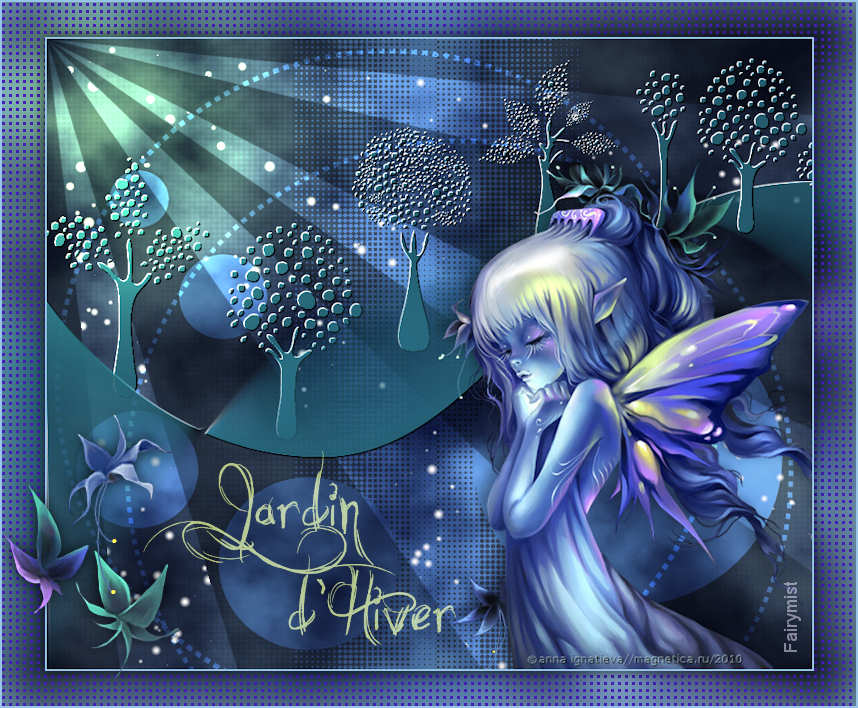
You'll find some versions of that tag in my gallery HERE
*******************
To realize that tag, you'll need the plugins :
- Mura's meister / Clouds
- VDL Adrenaline / Snowflakes
- Filters Unlimited 2.0 or Mura's seamess / Emboss at alpha
and the material zip, down below :

**************
*It is forbidden to suppress watermarks on the material provided , to alter, mist or rename the tubes in order to respect the work of the artists and of the tubers
- The mask I have used is by Cameron.
- The brushes "Gradient curves" and "Dotted trees" are by Melbrushes
- The brush "Vector2" is by Physical magic
The other elements are my own creation.
******************
Preparation
- To be on the safe side, duplicate your tube and image in your Psp :
-
Window / Duplicate
- Close the originals and work with the copies !
- Place all the brush files in the brush folder of your Psp files.
- Place the selection "fairymist_jardin_d_hiver_1.PspSelection" in your selection folder of your Psp files.
*****************
Click here to print the tutorial
**********************
You can use my arrow to follow your work
Click on it and drag it all along the tutorial !

***************
Tutorial realized with PSP XIII

Step 1 : The background of the tag
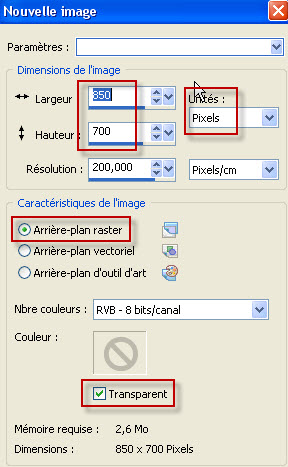
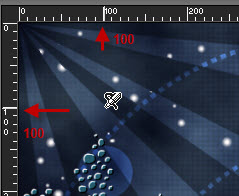
1 - Open a new transparent image of 850 by 700 pixels.
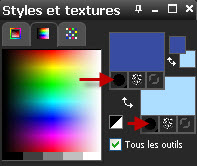
2 - Set your Material palette with two colours out of your main tube, as below :
My choice : Foreground : colour 394ca1
- Background : Light colour adddfe
3 - On your transparent layer :
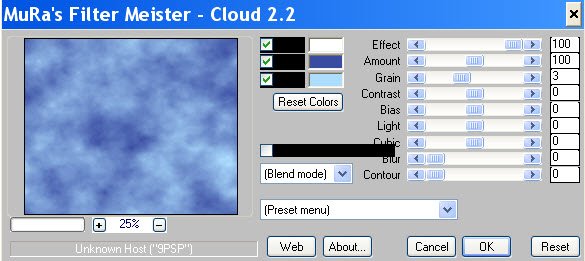
- Effects / plugins / Mura's Meister / Clouds as below :
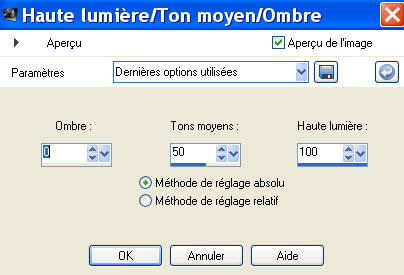
4- Adjust / Brightness and contrast / High light , MIdtone, Shadow as below :
5- ADD A NEW RASTER LAYER.
- Set your foreground in Black.
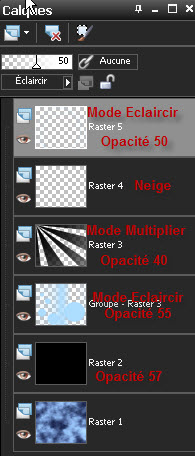
- Flood fill your new transparent layer in black and lower the opacity to your liking ( 57 for me ).
You will still be able to decrease or increase this opaciy later on, if needed.
6- ADD A NEW RASTER LAYER.
- Flood fill your new transparent layer with your light background colour ( Right click ).
7- Layers / New mask layer / From image, as below :

- Adjust / Sharpness / Sharpen more.
- Layers / Merge group.
- I have set the mode of that layer on to Dodge and have lowered its opacity to 55.
It is up to you to see which mode and opacity give a nicer effect with your own colours !
8- ADD A NEW RASTER LAYER.
Activate the brush tool, set as below :

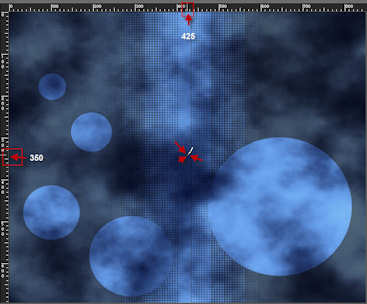
Apply the brush "Vector2_By_PhysicalMagie_5.PspBrush" with your black foreground colour ( left click ), in the middle of your tag as shown below :
If your Psp doesn't allow you to apply that big size brush, your may use the included layer "Vector2_By_PhysicalMagic_5.pspimage", copy it and paste it as a new layer on to your tag.
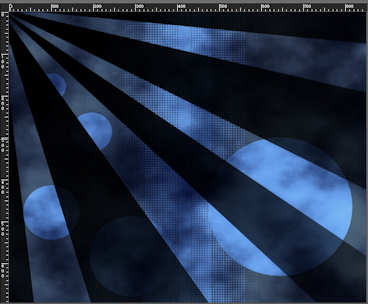
9- I have set the mode the mode of that layer on to Multiply and have lowered its opacity to 40.
See what is best for you .
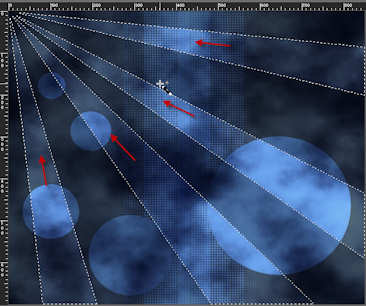
10- With your magic wand, set as below , click on the transparent rays of that layer, while keeping the shift key pressed.

11- ADD A NEW RASTER LAYER.
- Effects / Plugins / VDL Adrenaline / Snowflakes as below :

- DESELECT ALL.
12- ADD A NEW RASTER LAYER.
Selections / Load a selection / From disk / Choose "fairymist_jardin_d_hiver_1.PspSelection" and set as below :

13-With your flood fill tool, set as below, flood fill that selection with your light background colour ( Right click )

DESELECT ALL.
14- I have set the mode of that layer on to Dodge and lowered its opacity to 50.
It is up to you to see what looks nice with your colours .
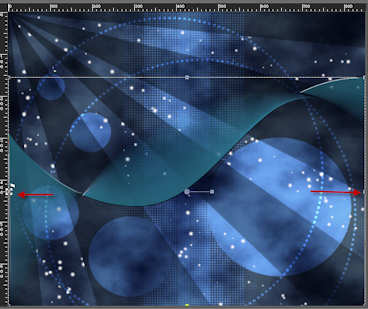
Here is what I have, at that stage :

Step 2 : The garden
1- ADD A NEW RASTER LAYER.
- Activate the brush tool, set as below and choose the brush "GradientCurves_by_melsbrushes_11.PspBrush" and apply it in the center of your tag (as on point 8 of step 1 ) with your black foreground colour ( Left click)

If your Psp doesn't allow you to apply that big size brush, your may use the included layer "GradientCurves_by_melsbrushes_11.pspimage", copy it and paste it as a new layer on to your tag..
2- Effects / Image effects d'image / offset as below :

3- Effects / Plugins / Filters Unlimited 2.0 / convolution filters / Engraver (inverse)
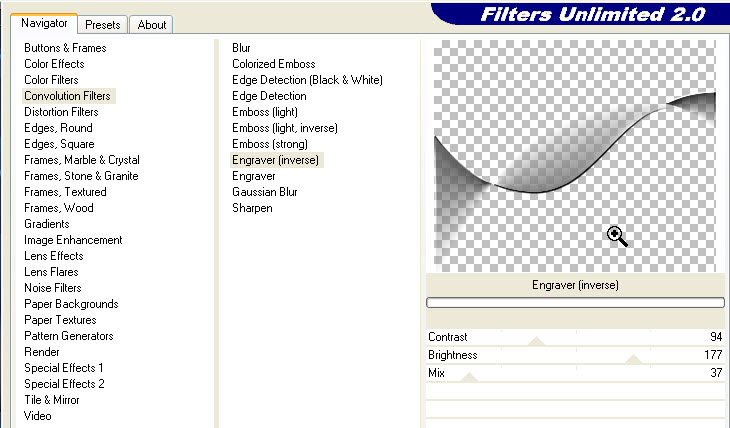
If you filters Unlimited doesn't work properly, you may replace my effect by using the Emboss at alpha effect of Mura's seamless but it won't be quite the same !
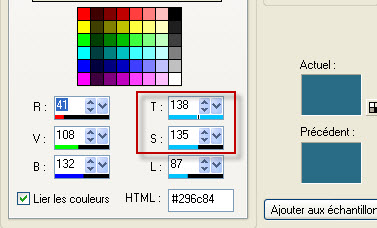
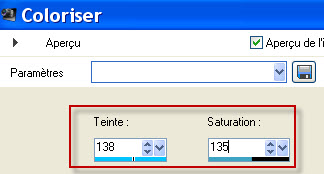
4- Choose a colour that nicely contrasts with the colours of your tag , to colorize that wavy shape ! Take note of the Hue and Saturation figures as shown down below :
- Adjust / Hue and saturation / colorize.
5- Activate your Deform tool.
If you can't find this one in your tool box, do this : View / Customize / tools / Deform as below :

- Keep the left click of your mouse pressed on the Deform tool and drag it to your tool box !
- With your Deform too activated, stretch the shape slightly towards the left and right hand sides of your tag ( just a few millimetres )
Click on the move tool to get rid of the Deform tool !
6 - ADD A NEW RASTER LAYER.
Activate your tool brush, choose the brush "Dotted trees by mel rodicq 5.PspBrush" and set as below :

- Apply the brush , where you want, with your black foreground colour.
7- Effects / Modules externes / Filters Unlimited 2.0 / convolution filters / Engraver (inverse) as previously.
8- Colorize that tree as previously.
9- Optionnal / Add a drop shadow of your choice ( I have left it as it is )
10- Repeat points 6, 7, 8 and 9 with some other tree brushes ( mine or yours !) Don't forget to add a new layer for each new tree !!!!!)
11- Place these different trees as on my tag or to your liking.
12- Optionnal : You can bring your shape "GradientCurves_by_melsbrushes_11.PspBrush"above the tree layers if you wish, afterwards .
Some of my trees are above that shape and some others are underneath it !!
13- ADD A NEW RASTER LAYER.
- Activate your Airbrush tool.

- Set it as below :

- Set your foreground with a light colour , to apply a sunburst spot.
I have chosen that yellow out of my main tube : f0febc

- Apply the airbrush tool as indicated below and click twice.
- I have set the mode of that layer on to Dodge and lowered its opacity at 70. It is up to you to see what is best for you.
Step 3 : The main tube
1- Open the tube " dae~02-25-11~ignatieva__trees.psp" or a tube of your choice, in your Psp and copy it
2- Paste it as a new layer on to your tag.
3- I have resized the tube at 65% ( Resize all the layers NOT checked !)
Place that tube like me or to your liking.
4- Effects / 3d effects/ drop shadow of your choice / - 4, - 8, 40, 20, black for me.
Step 4 : The borders
1- Make sure everything is at the right place as the borders are going to merge all the layers !
- Image / add some symmetrical borders of 2 pixels with your light background colour :
adddfe for me.
2- Layers / Duplicate
3- Image / Resize at 90% ( Resize all the layers NOT checked !)
4- Effects / 3d effects /drop shadow / 0, 0, 80, 20, black.
5- Activate your bottom layer ( background)
- Adjust / Blur / Gaussian blur / 20
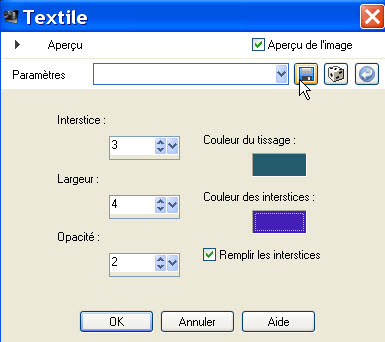
6- Effects / texture effects / Weave as below : ( colours : green 245b6d and purple 431fb7 )
7- In your layers palette, activate your top layer.
Open the tube "titre_jardin_d_hiver_fairymist.pspimage" in your Psp and copy it.
- Paste it as a new layer on to your tag.
- You may colorize that text or write your own text !
- Place to your liking.
8- Open , one by one, the 3 flower tubes of "dae~02-25-11~ignatieva__trees.psp" or tubes of your choice, in your Psp and copy them.
- Paste them as new layers on to your tag
- Place them like me or to your liking.
9- Optionnal : add a drop shadow of your choice / 0, 0, 80, 20, black for me.
10- Apply your signature
11- - Image / add some symmetrical borders of 2 pixels with your light background colour :
adddfe for me.
12 - Save your work as a jpeg file and resize it if necessary .
***************
That's it !! You've done it !!
If you 've enjoyed doing my tutorial, it would be nice to write a few words in my guest book ! If you 've had the slightest problem, please, send me a mail so I can see to the problem
Tutorial translated on the 14th of January 2012
****************
You'll find some versions of that tag in my gallery HERE