
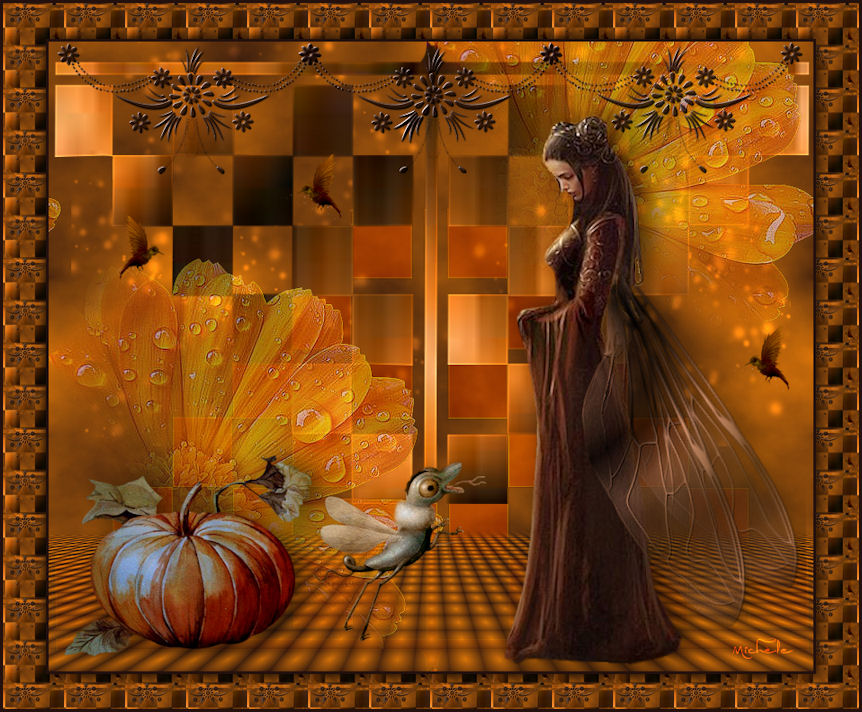
Thank you for putting a link to this tutorial, whenever you display your realization of that tag on a website, on a group or in a mail !
**************************
You'll find some versions of that tag in my gallery HERE
***********************
To realize that tag, you'll need the plugins :
- Mura's Meister / Clouds and Perspective tiling
- Mura's seamless / Emboss at Alpha
and the material zip down below :

**************
*It is forbidden to suppress watermarks on the material provided , to alter, mist or rename the tubes in order to respect the work of the tubers
- The tube of the woman has been tubed by Rêverie
- The tube of the flower has been tubed by Claudia Stirner
You can join in her sharing group here
- The tube of the animal has been tubed by Jenny
You can join in her sharing group here
- The tube of the pumkin has been tubed by Patries
The other elements that I haven't created, have been found on the net.
******************
Preparation
- To be on the safe side, duplicate your tube and image in your Psp :
-
Window / Duplicate
- Close the originals and work with the copies !
- Place the provided selections in the selection folder of your Psp files.
*****************
Click here to print the tutorial
**********************
You can use my arrow to follow your work
Click on it and drag it all along the tutorial !

***************
Tutorial realized with PSP XIII

Step 1 : The background of the tag
- If you have decided to use my colours, here is what you can do :
- Open the colour palette "Fairymist_Palette_Janella", in your Psp and using your dropper tool, pick out my colours to set your Material palette ( left click for your foreground / right click for your background )

1 - Open a new transparent image of 850 by 700 pixels.
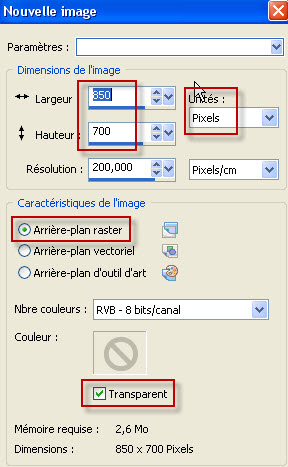
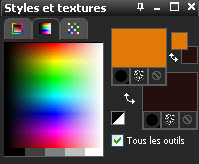
2 - Set your Material palette with two colours matching your main tube, as below :
My choice : Foreground : Bright Colour e17909
Background : Dark colour 24110e
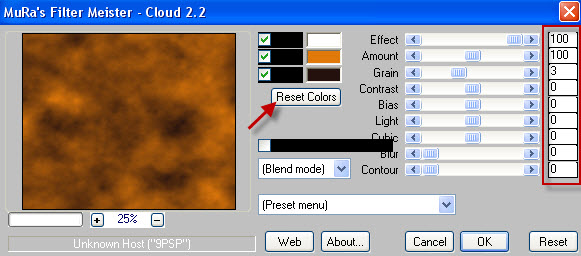
3 - On your transparent layer :
- Effects / Plugins / Mura's Meister / Clouds as below :
If your plugin doesn't show up your colours , click on Reset Colors.
4- Open the tube " Stars", in your Psp and copy it.
5- Paste it as a new layer on to your tag.
6- Effects / image effects / Offset as below :
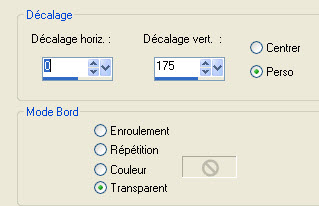
Make sure the mode of that layer is on Dodge and lower its opacity so that the stars are not too bright ( opacity at 60 for me )
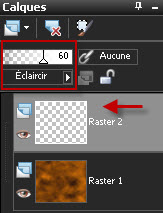
7- Add a new raster layer.
Selections / load a selection / from Disk / choose "fairymist_janella_1.PspSelection" and set as below :
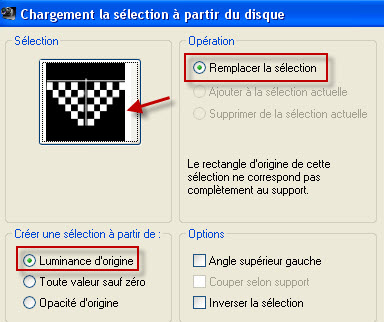
8- With your flood fill tool, flood fill the selection with your foreground colour.
- Deselect all.
9 - Image / Flip.
- Set the mode of that layer on to Soft light or any other mode that suits your colours better !
10- Effects / edge effects / enhance.
11- Add a new raster layer.
Selections / load a selection / from Disk / choose "fairymist_janella_1.PspSelection" again and set as previously.
12- Open the image "texture.jpg" in your Psp.
If you use other colours than mine , colorize that image in one of those colours :
( Adjust / Hue and saturation / Colorize )
13- Copy that image and paste it into the SELECTION of that tag.
- Deselect all.
14- Adjust / Sharpness / Sharpen more.
It is up to you to see if you wish to lower the opacity of that layer or if you prefer to put it on another mode which will look better with your colours ( I have left mine as it is )
Here is my layers palette at this stage :
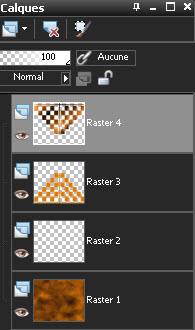

Step 3 : The floor
1- Add a new raster layer .
Selections / load a selection / from Disk / choose "fairymist_janella_2.PspSelection" and set as previously.
2- Set your Material palette as below, putting a sunburst gradient in your foreground.
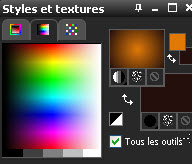
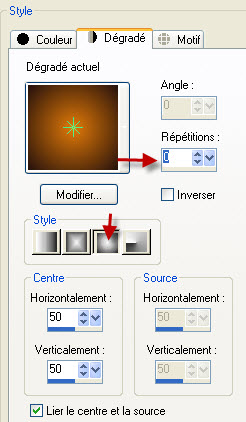
3- Flood fill the selection with that gradient.
- Deselect all.
4- Effects / Mura's Meister / Perspective tiling as below :
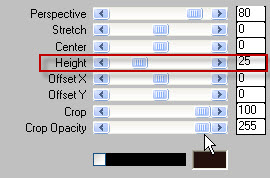
5 - Selections / load a selection / from Disk / choose "fairymist_janella_3.PspSelection" and set as previously.
6- Edit / Clear
- Deselect all.
7- I have lowered the opacity of that layer to 75 ( It is up to you to see what opaciy suits you )
8- Optionnal : Adjust / Sharpness / Sharpen more.

Step 3 : The flowers
1- Open the tube "by_stirner_afterrain.pspimage" or a similar tube, of your choice , in your Psp.
If you use other colours than mine and that the colour of the tube that you have chosen doesn't go with your tag, colorize that tube to your liking.
2- Copy that tube and paste it as a new layer on to your tag.
3- With your move tool ( Letter M ), move that tube into the left hand side corner of your tag.
4- Effects / image effects / Seamless tiling default.
I have lowered the opacity of that layer on to 55 ( See what opacity suits you )
5- Optionnal : Effects / edge effects / enhance.
6- Selections / load a selection / from Disk / choose "fairymist_janella_4.PspSelection" and set as previously.
7- Edit / Clear.
- Deselect all.

Step 4 : The other tubes
1- Open the tube "birds.pspimage" or a tube of your choice and copy it.
2- Paste it as a new layer on to your tag.
Place as on my tag or to your liking.
3- Repeat points 1 and 2 with the other bird or duplicate your own tube once or twice ( I did : Image / mirror )
Place as on my tag or to your liking.
********************
4- Open the tube of the woman "1228506055_feerie.pspimage" or a tube of your choice, in your Psp and copy it.
5- Paste it as a new layer on to your tag and place as on my tag or to your liking.
6- Effects / 3d effects / Drop shadow of your choice / My choice : 0, 10, 60, 40, black
*********************
7- Open the tube "Pumpkin.pspimage" ( It is the tube "fo_pompoen3-10_06pat.psp" that I have modified in size and brightness for my tag ) or a tube of your choice, in your Psp and copy it.
8- Paste it as a new layer on to your tag and place as on my tag or to your liking.
9- Effects / 3d effects / Drop shadow of your choice / My choice : 0, 10, 60, 40, black
****************
10- Open the tube "animal.pspimage" ( It is part of the tube "Jen_Vrouw 42_24-08-2009.pspimage" that I have modified in size and brightness for my tag ) or a tube of your choice, in your Psp and copy it.
11- Paste it as a new layer on to your tag and place as on my tag or to your liking.

Step 5 : The decorative band
1- Add a new raster layer.
2 - Selections / load a selection / from Disk / choose "fairymist_janella_5.PspSelection" and set as previously.
3- With your flood fill tool, set as below , flood fill your selection with your dark background colour ( right click ) or a colour of your choice.

- Deselect all.
4- Effects / Plugins / Mura's seamless / Emboss at alpha default.
5- Effects / 3d effects / Drop shadow / 1, 1, 100, 1,black.
6- Apply your signature.

Step 6 : The borders
1 - Make sure everything is at the right place and that the modes and the opacities of your layers suit you !
2 - Image / add some symmetrical borders of 3 pixels with your dark background colour or with a colour of your choice.
3- Layers / ¨Promote background layer.
4- Image / Resize at 90% ( Resize all the layers NOT checked )
5- Selections / load a selection / from Disk / choose "fairymist_janella_6.PspSelection" and set as previously.
6- Edit / copy
7- Paste as a new IMAGE ( To be on the safe side, I have saved my image as a jpeg file and called it "fond" )
We're going to use that new image ( new texture) to paint !
8- Go back to your tag.
Deselect all.
9 - Add a new raster layer.
Layers / Arrange / Move down.
10- Set your Material palette as shown below :
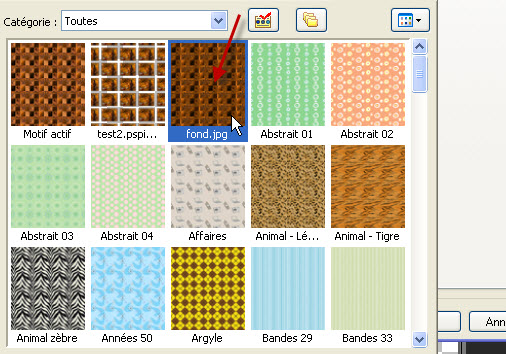
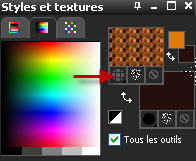
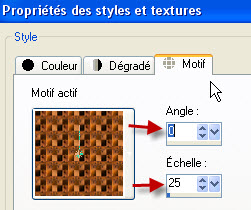
11- Flood fill your transparent layer with that texture.
Optionnal : Adjust / Sharpness / Sharpen more.
12- Activate the top layer ( your tag )
- Effects / 3d effects / drop shadow / 0, 0, 100, 20, black.
13- Image / add some symmetrical borders of 3 pixels with your dark background colour or with a colour of your choice.
14 - Save your work as a jpeg file and resize it if necessary .
***************
That's it !! You've done it !!
If you 've enjoyed doing my tutorial, it would be nice to write a few words in my guest book ! If you 've had the slightest problem, please, send me a mail so I can see to the problem
Tutorial translated on the 23rd of october 2011
*************
Other versions of that tag
