Thank you for putting a link to this tutorial, whenever you display your realization of that tag on a website, on a group or in a mail !
**************************
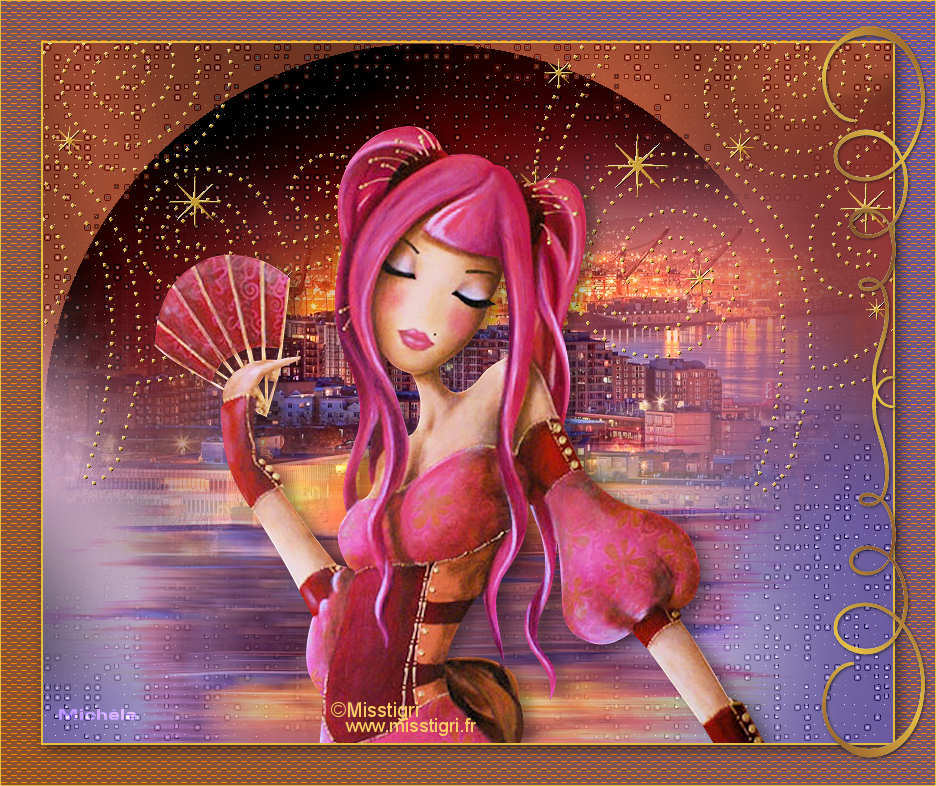
You'll find some versions of that tag in my gallery HERE
***********************
To realize that tag, you'll need the plugins :
- Graphic plus / Cross shadow
- VM Natural / Acid rain
- Mura's seamless / Emboss at alpha
and the material zip down below :

**************
*It is forbidden to suppress watermarks on the material provided , to alter, mist or rename the tubes in order to respect the work of the tubers
- The tube of the woman is by Katussia
- The tube of the scenery is by Hebe Argentina
The other elements that I haven't created, have been found on the net.
******************
Preparation
- To be on the safe side, duplicate your tube and image in your Psp :
-
Window / Duplicate
- Close the originals and work with the copies !
- Place the mask "pspcyber030.msk" in the mask folder of your Psp files.
*****************
Click here to print the tutorial
**********************
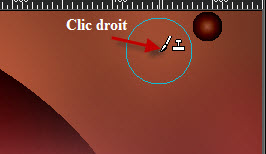
You can use my arrow to follow your work
Click on it and drag it all along the tutorial !

***************
Tutorial realized with PSP XIII

Step 1 : The background of the tag
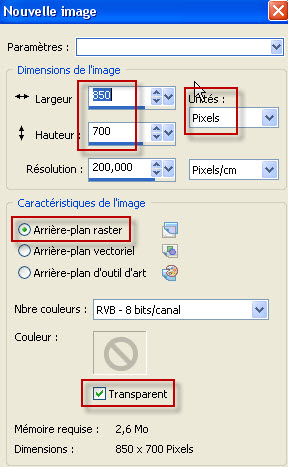
1 - Open a new transparent image of 850 by 700 pixels.
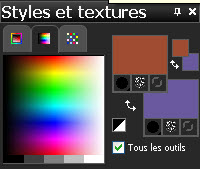
2 - Set your Material palette with two colours out of your main tube, as below :
My choice : Foreground : colour a997b2
Background : colour 701d19
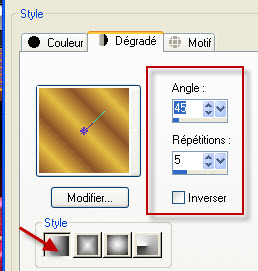
- Set your foreground with a linear gradient as below :

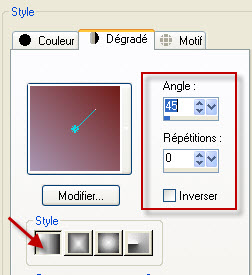
3 - Flood fill your transparent image with that gradient.
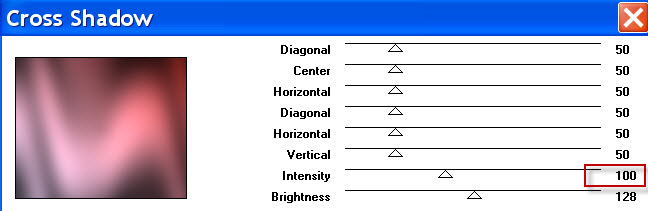
4- Effects / Plugins / Graphic plus / Cross shadow as below :
5- Set your Material palette with two colours out of your scenery tube ( that one must match your main tube !! ).
My choice : Foreground : Orange 9f4c32
Background : Purple 69599e
6- ADD A NEW RASTER LAYER
- Flood fill your new layer with your background colour ( right click )
7- Effects / Plugins / Graphic plus / Cross shadow as below :

8- Layers / Load a mask / from Disk / choose the mask "Pspcyber030" and set as below :
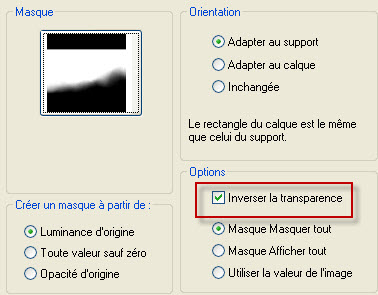
- Layers / Merge group.
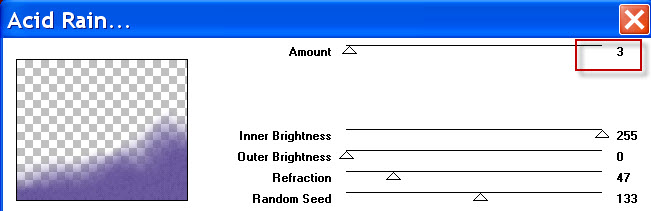
9- Effects / Plugins / VM Natural / Acid Rain as below :
ADD A NEW RASTER LAYER
10 - Flood fill that new layer with your foreground colour ( left click )
11- Effects / Plugins / Graphic plus / Cross shadow as on point 7.
12- Layers / Load a mask / from Disk / choose the mask "Pspcyber030" and set as on point 8.
Layers / Merge group.
13- Image / Flip
- Image / Mirror
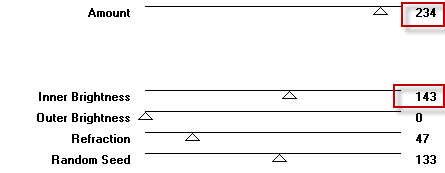
14- Effects / Plugins / VM Natural / Acid Rain as below :
15- Activate your clone brush ( letter C) and set it as below :

- Right click as shown below, next to the bubble ( that we want to get rid of), in order to get the colour with your clone brush.
- Left click on the bubble and slightly move the brush while pressing so that the bubble gets covered with your background colour..
16- Effects / Plugins / VM Natural / Acid Rain as on point 9 ( 3 - 255 - 0 - 47 - 133 )
Step 2 : The scenery
1- Open the tube "mistedpaisajes190_ByHebe.pspimage" or A VERY BIG SIZE tube of your choice and copy it.
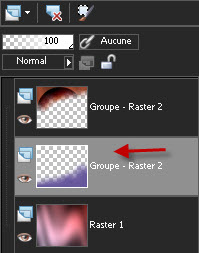
2- In your layers palette, activate the second layer as shown below :
3- Paste your scenery as a new layer.
4- I have placed it that way :
Beware that the two following offset effects may not suit the tube you have chosen ! So you may have to move it with your move tool so that it looks placed like my tube !.
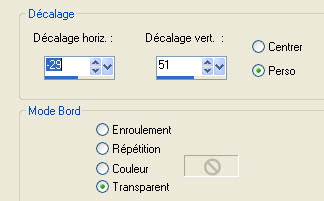
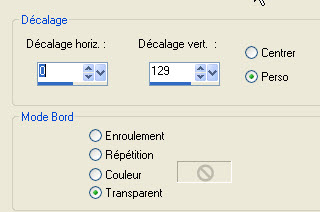
- Effects / image effects / Offset as below :
5- Layers / Duplicate.
6- Image / Flip
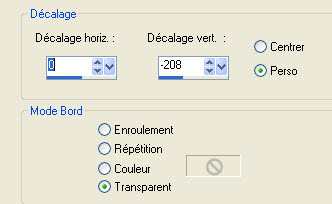
7- Effects / image effects / Offset as below :
8- Effects / Distortion effects / Wind as below :

- I have lowered the opacity of that layer to 80.
Step 3 : Decorations
Activate the layer on top of the pile of your layers !
1- Open the tube "deco_1_isabel_fairymist.pspimage" and copy it.
2- Paste it as a new layer on to your tag.
3- - Effects / image effects / Offset as below :
4- Selections / select all.
- Selections / Float
- Selections / Defloat.
5-ADD A NEW RASTER LAYER
- We're now going to paint that decoration with a colour matching your main tube.
- I chose the colour e5bd43
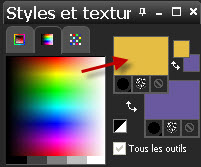
6- With your flood fill tool , set as below , flood fill the selection with your colour.

- Selections / Deselect all.
7- Effects / Plugins / Mura's seamless / Emboss at alpha default.
I have lowered the opacity of that layer to 85.
8- I have closed the layer which is underneath where the white decoration was but your may prefer to leave it open !.
Step 4 : The main tube
1- Open the tube "kTs_©MissTigri_29.psp" or a tube of your choice and copy it.
2- Paste it as a new layer on to your tag.
- Place it as on my tag or to your liking.
3- I have chosen to make my tube look brighter but may prefer to leave your tube as it is !
I did it that way :
- Adjust / One step Photo fix.
- If you don't have that option in your Psp, you can do this :
Adjust / Brightness and contrast / Brightness and contrast / Brightness : 38 / Contrast : 29
4 - Effects / 3d effects / Drop shadow of your choice / 4, 10, 40, 20, black for me.
Step 5 : The borders
1- Apply your signature
- Make sure everything is at the right place !
2 - Image / add some symmetrical borders of 2 pixels with a colour of your choice:
e5bd43 for me.
3- In your layers palette, double click on the background layer to promote it to a raster layer.
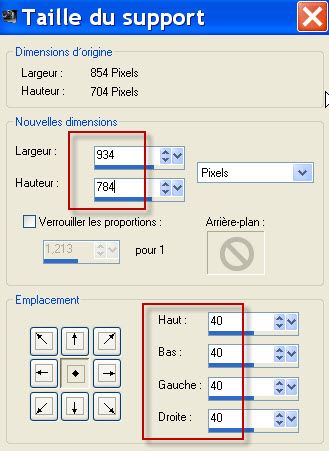
4- Image / Canvas size as below :
5- ADD A NEW RASTER LAYER
6- Layers / Arrange / Move down.
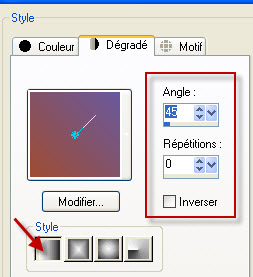
7- Set your Material palette as below with a linear gradient in the foreground :
- I have used the same colours as on point 5 of Step 1.

8- Flood fill your new layer with your foreground gradient..
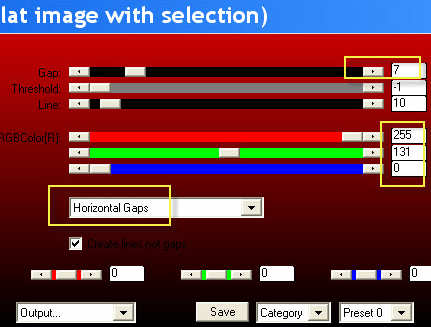
9- Effects / Plugins / AP01 ( Innovations ) / Line Silver lining as below :
10- Activate the layer that is on top your pile of layers.
- Effects / 3d effects / Drop shadow / 4, 4, 60, 20, black
Step 6 : Finale decoration
1- Open the tube "deco_2_isabel_fairymist.pspimage"or a tube of your choice and copy it.
2- Paste it as a new layer on to your tag.
- Place it as on my tag or to your liking.
3- We're now going to paint that decoration so that its colour matches the colours of your tag.
- Selections / select all.
Selections / Float
Selections / Defloat.
4-ADD A NEW RASTER LAYER
Set your Material palette as below with colours of your choice :
My choice :
- Foreground : 8a522a
- Background : e5bd43
- Set your foreground with a linear gradient as below :
- Flood fill your selection with your foreground gradient.
- Deselect all.
- I have closed the layer where the grey original tube is.
5- Effects / 3d effects / drop shadow / 1, 1, 70, 5, black
6- Image / add some symmetrical borders of 1 pixel with a colour of your choice :
e5bd43 for me.
7 - Save your work as a jpeg file and resize it if necessary .
***************
That's it !! You've done it !!
If you 've enjoyed doing my tutorial, it would be nice to write a few words in my guest book ! If you 've had the slightest problem, please, send me a mail so I can see to the problem
Tutorial translated on the 7th of April 2012
*************
You'll find some versions of that tag in my gallery HERE