
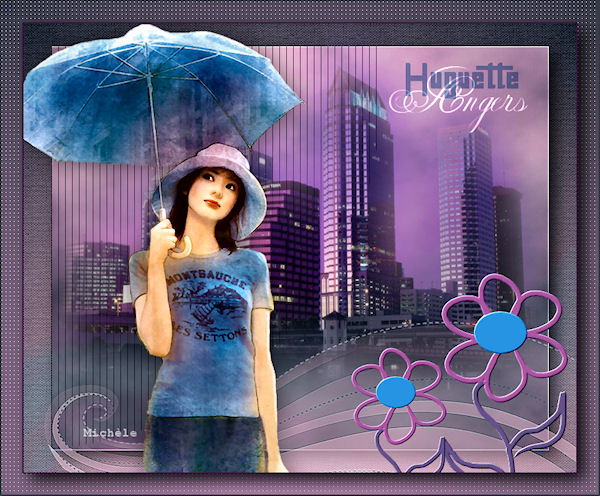
Thank you for putting a link to this tutorial, whenever you display your realization of that tag on a website, on a group or in a mail !
**************************
You'll find some versions of that tag in my gallery HERE
******************
To realize that tag, you'll need the plugins
- Filters Unlimited 2.0 here
- Murameister here
- Alien skin Eye Candy 5 / Impact
- AP01 Innovation here
and the material zip down below :

**************
*It is forbidden to suppress watermarks on the material provided , to alter, mist or rename the tubes in order to respect the work of the tubers
- The tube of the woman is by Kikirou
You'll be able to get her tubes by joining in her sharing group here
- The tube of the scenery is by Guismo
You'll be able to find her tubes on Dakara' s site here
and you can join in her sharing group here
- One of the brushes is by Coby17
- The other one is by Ghost_fight
******************
Preparation
Duplicate your tubes. Close the originals and minimize the copies for now.
Export your brushes in your Psp as custom brushes
*****************
Click here to print the tutorial
*******************
You can use my arrow to follow your work

***************
1- Open a transparent image of 800 by 650 pixels
2- Set your colour palette with two colours matching your main tube
My choice : Foreground : light colour e9bad0 
Background : Dark colour 212c3b 
- Set your foreground with a sunburst gradient as below :

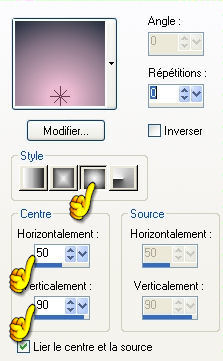
3- Flood fill your transparent layer with your gradient
4- Layers / duplicate
- Image / flip
- Image / resize at 90%
- Effects / edge effects / enhance more
5- Activate your bottom layer ( Raster 1)
- Effects / plugins / Filters Unlimited 2.0 / Paper texture / Canvas fine / 156, 87
6- Activate now your top layer ( copy of raster 1)
- Selections / select all
- Selections / Float
- Selections / Defloat
7- Add a new raster layer
- Effects /plugins / Murameister / clouds as below :

- Set the mode of that layer to Hard light or to a mode that suits you
Lower the opacity of that layer if necessary
8- Stay on that layer ( it is still selected : the next selection will cancel the previous one !!)
- Selections / load a selection from disk / choose "selection_huguette_fairymist" / check Source Luminance and Replace the selection
- Effects / plugins / AP01 Innovations / Lines Silverlining as below :
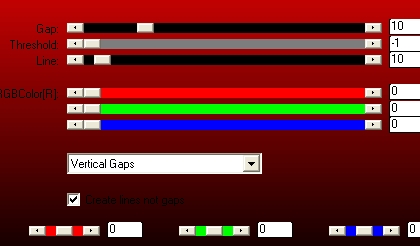
9- - Selections / select all
- Selections / Float
- Selections / Defloat
10- Add a new raster layer
- Open the tube "calguismisted3049" or a tube of your choice matching your colours, copy it and paste it into the selection
- Select none!
I did Image / mirror and have slightly moved up the scenery tube (Effects / Image effects / offset / Horiz 0, Vert 50, check transparent )
11- Activate now the layer where the clouds are :
Effects/ plugins / Alien Skin Eye Candy 5 / Impact / Perspective shadow / drop shadow blurry as below :
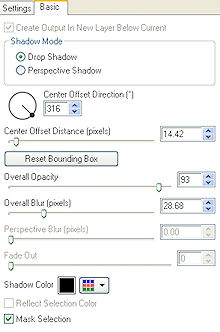
12- At this stage, your layers palette should be like this :
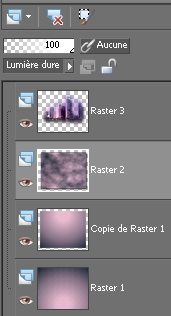
13- Activate your top layer ( the one with the scenery )
- Add a new raster layer
14- Activate your brush tool, set as below and apply the brush "dream_design_by_ghost_fight3r_6" in the bottom of your tag, with your dark background colour (right click )

I have set the mode of that layer to Colour Legacy to get a bluish tone which you can find in my tube ...it 's up to you !
** If your Psp doesn't accept that big brush, you can use the layer of that brush that is included in my zip, copy it and paste it as a new layer
15- Add a new raster layer
- Activate your brush tool, set as below and apply the brush "Swirl_brushes_by _Coby17_53" in the center of your tag, with your light foreground colour (undo the gradient ) and a left click

- Image / flip
- Place that brush as shown below :
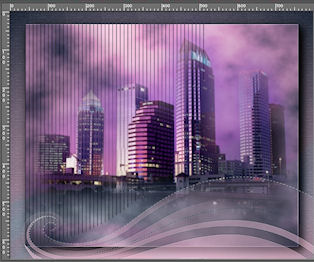
- Effects / edge effects / enhance
** If your Psp doesn't accept that big brush, you can use the layer of that brush that is included in my zip, copy it and paste it as a new layer
16- Open the tube" Kikirou_1097_femme"or a tube of your choice, copy it and paste it as a new layer
Place your tube at the right place
17- Effects / 3d effects / drop shadow of your choice
My choice : 0, 0, 50, 50, black
18- Open the tube " fleur_huguette_fairymist"
If you use it as it is , merge the visible layers , copy that merged layer and paste it as a new layer on your tag
**** If you want to change the colours, keep the two layers !
Activate the layer where the heart of the flower : colorize to you liking ( Adjust /Hue and saturation / colorize )
Activate the other layer : Select the petals with your freehand selection tool and colorize to your liking
On the same layer, select now the stem of the flower with your freehand selection tool and colorize it to your liking
19- Place the flower to your liking
Effects / 3d effects / drop shadow / 1, 1, 80, 100, black
20- Layers / duplicate
Resize at 75%
Place that second flower to your liking
21- Instead of using my flower, you may choose another element of decoration : tube, brush , shape ...
22- Add a new raster layer and write down one or two words of your choice on the tag with fonts of your choice, in the top right hand side of your tag
Don't forget to change the size and the style of the fonts as well as the mode of your layers
You may prefer to use a brush or a tube instead !
23- Add a new raster layer and apply your signature
24- Make sure everything is at the right place
Image / add some symmetrical borders of 2 pixels with a colour of your choice
My choice : my dark background colour
25- Image / add some symmetrical borders of 30 pixels with any contrasting colour
26- Layers / Promote Background layer !!
27- With your magic wand, set as below, select your border

Hit the delete key to suppress the border
Select none
27- Effects/ plugins / Alien Skin Eye Candy 5 / Impact / Perspective shadow / drop shadow blurry as on step 11
28- Add a new raster layer
Set your colour palette with two colours matching your tag
My choice : Foreground : ac80a8
Background : 363a46
Same gradient as on step 2

29- Flood fill your transparent layer with that gradient
30- Layers / arrange / move down
31- Effects / plugins / AP01 Innovations / Lines Silverlining as below :
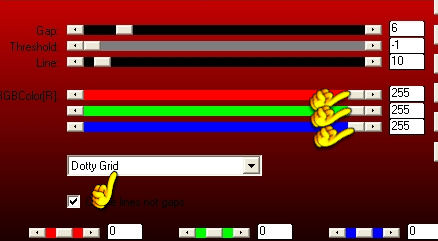
32- Image / add some symmetrical borders of 2 pixels with a colour of your choice
My choice : my dark background colour
33- Save your work as a jpeg file and resize it if necessary
***************
That's it !! You've done it !!
If you 've enjoyed doing my tutorial, it would be nice to write a few words in my guest book ! If you 've had the slightest problem, please, send me a mail so I can see to the problem !
Tutorial translated on the 6th of march 2010
*************
You'll find some versions of that tag in my gallery HERE
