
Thank you for putting a link to this tutorial, whenever you display your realization of that tag on a website, on a group or in a mail !
**************************
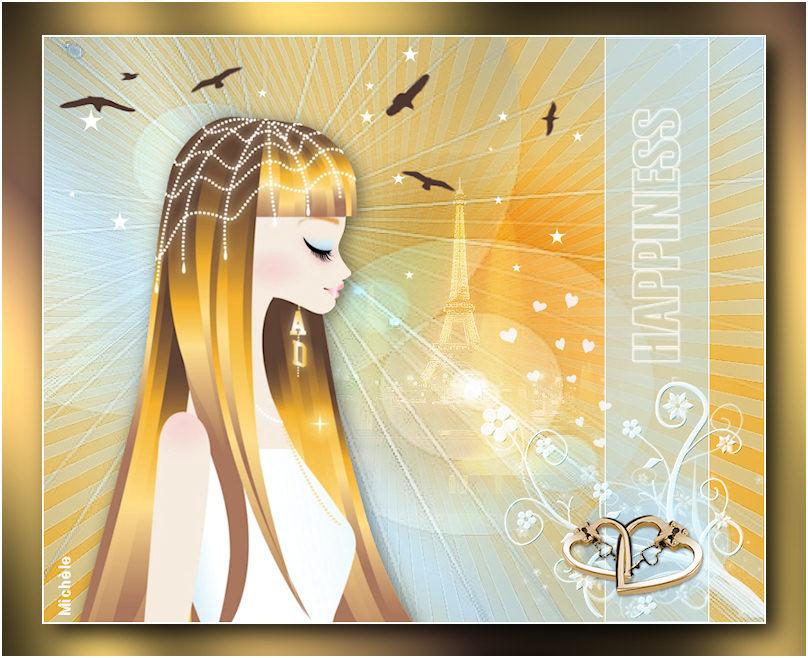
You'll find some versions of that tag in my gallery HERE
***********************
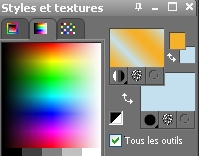
To realize that tag, you'll need the plugins Graphic plus, Mura's seamless, Alien skin skin Eye candy 5 Impact
and the material zip down below :

*******************
*It is forbidden to suppress watermarks on the material provided , to alter, mist or rename the tubes in order to respect the work of the tubers
- The tube of the woman is by Dini
- The tube of the Eiffel Tower is by Suzi Sgaï
- The brushes used and enclosed are by Coby 17, This Electric Heart ( the birds ) and by G Valkirie
The other elements have been found on the web
*******************
Preparation
Duplicate your tubes and mask , close the originals and minimize the copies for now. Place the selection in your selections file. Export your brushes in your psp as custom brushes
*****************
Click here to print the tutorial
*******************
You can use my arrow to follow your work

************************
1- Open a new transparent image of 800 by 650 pixels
2- In your palette layers, prepare a linear gradient, angle 45, repeats 2, Invert NOT checked, with two colours out of your main tube
My choice : Foreground : colour f5b12b 
Background : colour c4dfec 
3- Flood fill your transparent image with that gradient
4- Add a new raster layer
With your brush tool , set as below, apply, right in the center of your tag, the brush Simple Brush 5 by Coby with your back ground colour (right clic )

5- Copy that layer and close it !
6- Add a new raster layer and select all
Paste into the selection
Your brush is now perfectly in the middle of your tag !!
Select none
7- Effects / Edge effects / enhance
8- Add a new raster layer and flood fill it with your background colour ( right clic )
9- Effects / plugins / Graphic plus / cross shadow / 50 everywhere but Brightness at 128
10- Layers / new mask layer / from image / choose Nik GammaRays4 mask / check Source Luminance
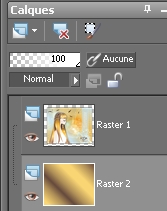
Layers / merge group
11- Effects / Edge effects / enhance
12- Layers / duplicate
Layers / Merge down
13- Open the tube Tour Eiffel, copy it and paste it as a new layer
Place as shown on my tag
Set the mode of that layer to Soft light
14- Add a new raster layer
Selections / load from Disk / my selection Selecthappinessfairymist
15- Flood fill the selection in white
16- Selections / modify / contract by 1 pixel / Hit delete to suppress the inside
17- Selections / Promote selection to layer
Flood fill your selection with the background colour you chose on point 2
Select none
Lower the opacity of that layer between 60 and 65
18- Layers / Merge down
19- With the deform tool , stretch your vertical band upwards and downwards so that the small white borders disappear !
20- Add a new raster layer and activate your brush tool ( set as on point 4). Apply the brush Gvl VinesBrushesSet2, size 356 in the bottom right hand corner of your tag with your white colour in the foreground ( left clic )
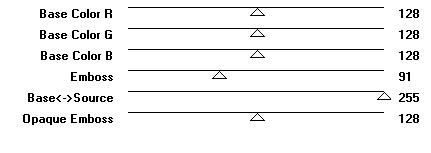
21- Effects / Plugins / Mura's seamless / Emboss at Alpha as below :
22- Add a new raster layer
Set your foreground with white , close your background
With your text tool, set as below, write your text ( mine : HAPPINESS )

23- Image / free rotation as below :

Place the text in the middle of your vertical band
24- Open the tube Dini-cutie, copy it and paste it as a new layer
Resize it at 80 % (All layers not checked )
Place it as on my tag
25- Effects / 3d effects / drop shadow of your choice ( my choice was : 4, 4, 50, 20, dark brown )
26- Add a new raster layer
Set your foreground with a dark colour ( I've chosen dark brown ) and activate your brush tool set as on point 4, appy the brush birdbrushes to your liking
If you want to use the other brush Birdbrushes, don't forget to add a new raster layer so that you can move your two layers easily
27- Add a new raster layer
Activate the preset shape tool, choose a star, set the white colour in your background and close your foreground
Draw a few stars of different sizes on the top of your tag
28- Add a new raster layer
Do the same thing as on point 27 but with a heart shape or any other form you fancy Draw a few hearts as shown on my tag with a colour of your choice in your background
29- Add a new raster layer and apply your signature
30- Make sure everything is in the right place
31- Image / add some symmetrical borders of 1 or 2 pixels in white
32- Layers / Promote background layer ( your background layer will be converted to a raster layer )
33- Image / resize at 90% ( Resize all the layers NOT checked !)
34- Add a new raster layer
Layers / arrange / move down
35- Preparer a gradient similar to point 2 but with the following colours
Foreground : colour f9d573 
Background : colour 664a3c 
Flood fill your layer with your gradient
36- Effects /plugins / Graphic plus / cross shadow / 50 everywhere but Brightness at 128
37- Activate the top layer
Effects /plugins / alien skin eye candy 5 / Impact / Perspective shadow / Drop shadow blurry / colour black
38- Image / add some symmetrical borders of 1 or 2 pixels in white
39- Resize your tag if necessary
Save your work as a jpeg file
***************
That's it !! You've done it !!
If you 've enjoyed doing my tutorial, it would be nice to write a few words in my guest book ! If you 've had the slightest problem, please, send me a mail so I can see to the problem !
Tutorial translated on the 13th of April 2009
****************
You'll find some versions of that tag in my gallery HERE