

Thank you for putting a link to this tutorial, whenever you display your realization of that tag on a website, on a group or in a mail !
**************************
You'll find some versions of that tag in my gallery HERE
***********************
To make that tag, you'll need the plugins :
- Factory C / Versa-Tile et Tile Mix.
- Flaming pear / Flexify 2.
- Mura's Meister / Tone
and the material zip down below :

**************
*It is forbidden to suppress watermarks on the material provided , to alter, mist or rename the tubes in order to respect the work of the tubers
- The tube of the woman is by Kikirou
Thank you my friend for tubing that nice image for me.
- The tube of the frame has been created by Elizabeth.
- The brushes I have used are by Coby17
- The other elements that I haven't created, have been found on the net.
******************
Preparation
To be on the safe side, duplicate your tubes in your Psp :
-
Window / Duplicate
- Close the originals and work with the copies !
- Place the pattern "Corel_08_007" in the pattern folders of your Psp files.
- Place the selection in the selection folder of your Psp files.
- Place the brush files in the brush folder of your Psp files.
- Open the font outside your Psp if you have Windows Xp or place it in the Font folder of Windows if you have Win7.
*****************
Click here to print the tutorial
**********************
You can use my arrow to follow your work
Click on it and drag it all along the tutorial !

***************
Tutorial made with PSP XIII
- If you have decided to use my colours, here is what you can do :
- Open the colour palette "Fairymist_Palette_Hanna", in your Psp and using your dropper tool, pick out my colours to set your Material palette ( left click for your foreground / right click for your background )

- If you have decided to use your own colours, don't hesitate to change the mode and opacity of your layers.
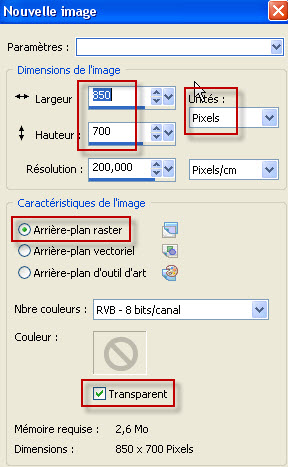
1- Open a transparent image of 850 by 700 pixels
2 - Set your Material palette with two colours of your choice.
My choice : Foreground : dark colour 424649
Background : Light colour 94a1aa
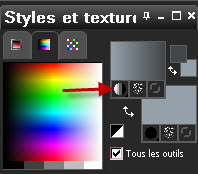
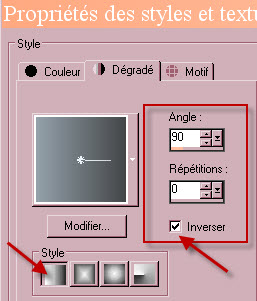
3- Flood fill your transparent layer with your foreground gradient.
4- Effects / Plugins / Filter Factory C / Versa-Tile default (43, 7).
5- Effects / Plugins / Filter Factory C / Tile Mix as below :

6- In your Material palette change your gradient as shown below :
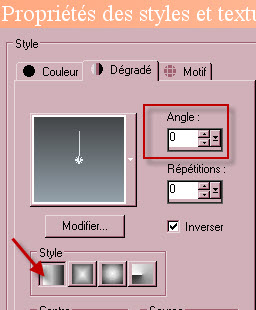
- ADD A NEW RASTER LAYER.
7- Flood fill that new layer with your new foreground gradient.
8- Effects / Geometric effects / Circle as below :
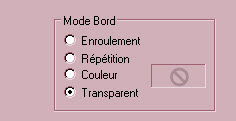
9- Selections / Select all.
- Selections / Float.
- Selections / Defloat.
10- Selections / Modify / Contract by 50 pixels.
- Hit the delete key of your keyboard. Keep selection !
11- In your layers palette, activate the layer Raster 1.
- Adjust / Blur / Gaussian blur at 50.
12- Selections / Modify / Contract by 20 pixels. Keep selection !
13- ADD A NEW RASTER LAYER.
14- Open the image "Country_Living" or a similar image of your choice (choose a drawing rather than a picture).
- Copy that image and paste it INTO THE SELECTION of your tag.
- Deselect all.
- In my layers palette , I have set the mode of that layer on to Luminance Legacy.
15- Activate the top layer as shown below :
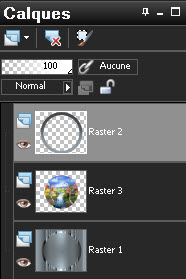
- Optionnal : - Effects / edge effects / Erode.
- ADD A NEW RASTER LAYER.
16- Set your Material palette as below :
- Set your foreground with white (or a very light colour), instead of the dark colour there was before :
- Keep the same style gradient in foreground.
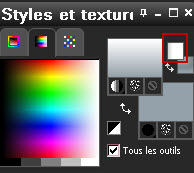
17- Flood fill your new layer with that new foreground gradient.
18- Effects / Plugins / Filter Factory C / Versa-Tile default (43, 7).
19- Effects / Plugins / Flaming pear / flexify 2 as below :
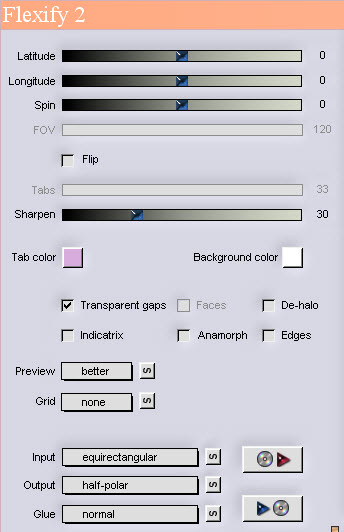
20- Image / Resize at 120 % (Resize all the layers NOT checked).
21- Effects / Image effects / Offset as below :
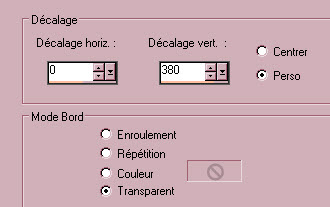
- I have set the mode of that layer on to Soft light.
22- Layers / Duplicate.
23- Effects / Image effects / Offset / 0, 110.
24- We're now going to create a background as shown below, that matches the colours of our main tube.

- In order to do that, choose two contrasting colours of your tube (pink and blue for me)
and two colours which go nicely with the first ones to make two gradients (salmon and bright pink / dark blue and light blue for me).
- Here is my Material palette with my pink / salmon gradient :
- Foreground : pink e14874
- Background : salmon f1c4a7
- It is the same style gradient as on step 2 (Linear / Angle 90 / Repeats 0 / Invert checked).
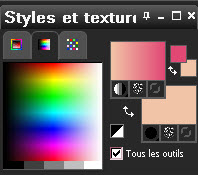
25- Activate Raster 2 (the circle).
- ADD A NEW RASTER LAYER.
26- Activate your rectangular selection tool and set the custom selection as shown below :

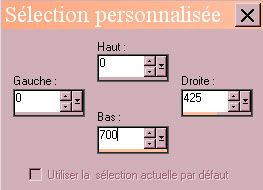
27- Flood fill that selection, on the new layer, with your foreground gradient.
28- Selections / invert.
- ADD A NEW RASTER LAYER.
29- Set your Material palette with the dark and light blue gradient :
- Foreground : light blue 99b5ca
- Background : dark blue 3d4045
- Same style of gradient as on step 2.
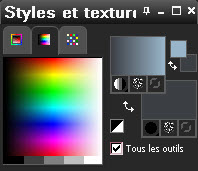
30- Flood fill that selection, on the new layer, with your foreground gradient.
- Deselect all.
31- Layers /Merge down.
- I have set the mode of that layer on to Hard light.
32- Optionnal : We're going to fade the contrast line between the two colours :
- Selections / Load a selection from disk, choose "Fairymist_Hanna selection" and set as below :
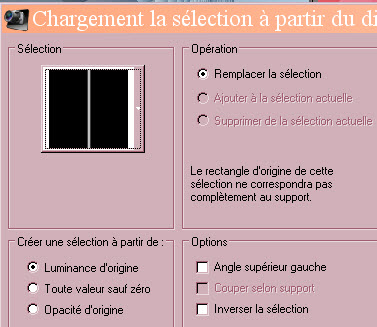
- Adjust / Blur / Gaussian blur at 1. Deselect all.
33- Stay on that layer as shown below :
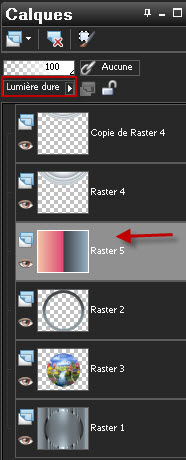
- ADD A NEW RASTER LAYER.
34- With your rectangle selection tool, select the light blue vertical band on the right side of your tag as shown down below.
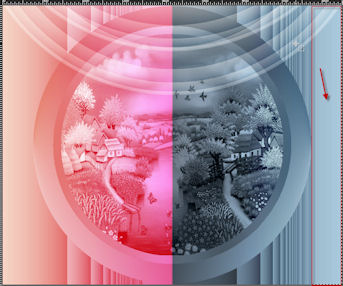
35- Set your foreground with white (take the gradient off!)
- Activate your brush tool and choose the brush "Swirls 1" or a brush of your choice.
- With your white foreground colour, apply (on your new layer !) this brush several times all along the vertical band, so that it is fully covered.

- I have set the mode of that layer on to Soft light !
- If you have any problem applying that brush, you may use Image 7 that I have added to my brush folder, copy it and paste it into the selection !
36- ADD A NEW RASTER LAYER.
-With your rectangle selection tool, select the salmon vertical band on the left of your tag.
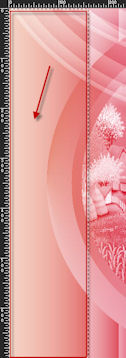
37- Set your Material palette as below :
- Set your foreground with the pattern "Elegant 04 / Corel 08 07" that I have chosen or another pattern that matches your colours better.

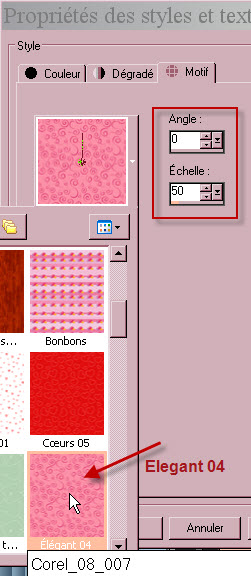
38- Flood fill your selection, on your new layer, with your foreground pattern.
- I have set the mode of that layer on to Luminance.
39- We're now going to delete the parts of the applied pattern that show on the circle of your tag :
- Activate raster 2 (the circle) :
- Selections / Select all.
- Selections / Float.
- Selections / Defloat.
- Go back to the layer on which you have applied your pattern (on the left hand side of your tag) :
- Hit the delete key of your keyboard. Deselect all.
- With your rubber tool, delete what is left of the pattern in the middle of your circle.
40- Activate your top layer.
41 - ADD A NEW RASTER LAYER.
42- Activate the brush tool, set as below and choose the brush "Flowers and waves by Coby17 1" or a brush of your choice.

- Set your foreground in black or any other colour of your choice (take the previous pattern off).
- Apply the brush in the top right hand side half of your tag, as shown below.
43- Repeat steps 41 to 42 with the brush "Flowers and waves by Coby17 7" (or another brush)
and apply that brush in the bottom right hand side half of your tag :
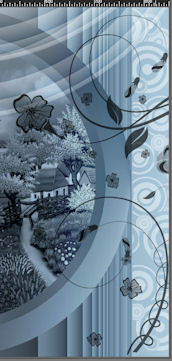
44- Open the tube "Fairymist_Hanna_Yin", copy it and paste it as a new layer on to your tag.
- Place it like me or to your liking.
- I have set the mode of that layer on to Soft light.
- I have written that word with the font Hobo Std, attached to my zip.
45- Open the tube "Fairymist_Hanna_Yang", copy it and paste it as a new layer on to your tag.
- Place it like me or to your liking.
- I have set the mode of that layer on to Soft light.
46- Open the tube "KikiRou221" or a tube of your choice, in your Psp and copy it.
47- Paste it as a new layer on to your tag.
- I have resized that tube atà 75% then at 90% (Resize all the layers NOT checked).
- Place it like me or to your liking.
48- Effects / 3d effects / drop shadow of your choice / 4, 4, 60, 20, black for me.
49- Open the tube "Fairymist_Hanna" in your Psp and copy it.
- I have written that word with the font "P22ZanerOne" included in my zip
50- Paste it as a new layer on to your tag..
- I have set the mode of that layer on to Soft light.
- I have duplicated that layer.
51- Apply your signature
52 - Make sure everything is in the right place !
- Image / add some symmetrical borders of 1 pixel with a colour of your choice :
- black for me.
53- Layers / Promote background layer.
54- Image / Canvas size as below :
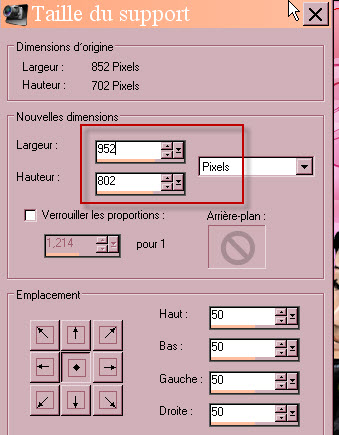
55- ADD A NEW RASTER LAYER.
- Layers / arrange / move down.
56- Set your Material palette with two contrasting colours of your tag :
- For me: blue adbece for the foreground and pink eeaba2 for the background
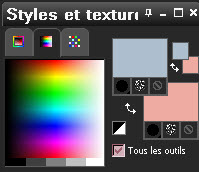
57- Flood fill your new layer with your foreground colour.
58- ADD A NEW RASTER LAYER.
59- Flood fill your new layer with your background colour.
60- Activate your Deform tool (letter D)
- Pull the handle that is situated in the middle of the left hand side of that frame, towards the right until you reach the middle of your tag, as shown below :

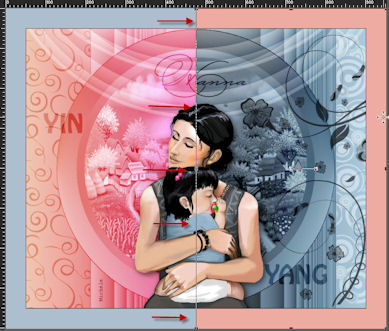
- Click on another tool to get rid of your deform tool.
61- Layers / Merge down.
62- Effects / Plugins / Mura's Meister / Tone as below :
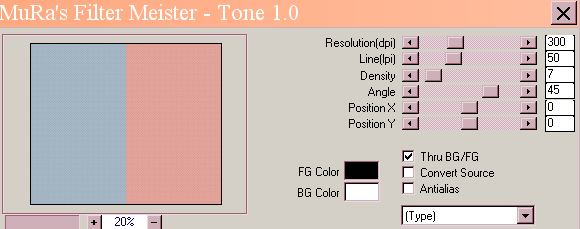
63- Open the tube "cadre dentelle" (Don't use the small frame Elizabeth made and that I have included in my zip as this one would be too small !),
- Copy it and paste it as a new layer.
64- Image / add some symmetrical borders of 1 pixel with a colour of your choice :
- black for me.
65 - Save your work as a jpeg file.
***************
That's it !! You've done it !!
If you 've enjoyed doing my tutorial, it would be nice to write a few words in my guest book !
If you 've had the slightest problem, please, send me a mail so I can see to the problem
Tutorial translated on the 1st of november 2013
*************
You'll find some versions of that tag in my gallery HERE
