
Thank you for putting a link to this tutorial, whenever you display your realization of that tag on a website, on a group or in a mail !
**************************
You'll find some versions of that tag in my gallery HERE
***********************
To realize that tag,you'll need the plugins Graphic plus, Eye candy 4000,
Alien skin Eye candy5 Impact, Simple
and the material zip down below :
****
The tubes I have used have been found on the net
****
Preparation
Duplicate your tubes. Close the originals and minimize the copies for now.
Placer the masks and the selection in the right folders
****
1- Open a new black image of 750 by 600 pixels
2- Add a new raster layer
Set your material palette with the colour orange d26f02 in your foreground and black in your background
Set your foreground with a linear gradient (angle 45, repeats 1, invert checked )
Flood fill your new layer with that gradient
3- Layers / load a mask / from disk / choose SKF mask48 as below :

Layers / merge group
4- Layers / duplicate
5- Add a new layer and flood fill it with your foreground colour
6-Layers / load a mask / from disk ( same settings as on step 3 but choose masquefeu
Layers / merge group
7- Effects / plugins / graphic plus / cross shadow default
8- Image / add some symmetrical borders of 3 pixels with the orange colour d26f02
Image / add some symmetrical borders of 2 pixels in black
9-Open the tube spiderweb, copy it and paste it as a new layer
Place the spider on the top left hand side of your tag
10-Open the tube of the witch, copy it and paste it as a new layer , place it on the top right hand side of your tag
11-Open the tube text, copy it and paste it as a new layer , place it on the top left hand side of the tag, on top of the spider
12-Add a new raster layer
Your background colour is black: close your foreground
With your text tool and the fonts KR Boo lane set as below, draw a bat by writing the letter a
![]()
13- Layers / duplicate
Image / resize at 75 %
14- Image / free rotation / check left and write 45
Place that second bat underneath the first one
15-Layers / arrange / move down
16- Activate your top layer ,( where the big bat is )
and add a new raster layer
17- With your select tool on circle, draw two little circles where the eyes of the bat should be ( you must keep the shift key pressed )
18- With your flood fill tool, set as below, flood fill that selection with your orange colour
![]()
Name that layer "Orange eyes"
19- Keep selection ! and add a new raster layer
Flood fill in white
Name that layer "White eyes"
20-Select none
21-Open the tube citrouille ( pumkin ) , copy it and paste it as a new layer
Place it at the bottom right hand side of your tag
22- Effects / plugins / Alien skin Eye candy 5 Impact / perspective shadow / drop shadow blurry default
23- Add a new raster layer and name it "flames 1"
With your free hand select tool, draw the inside of the eyes and the mouth of the pumpkin, while keeping pressed the shift key
***
( You may use my selection if you prefer but you'll have, then, to move your pumkin so the selection is at the right place !
Selections / load from disk / choose selecthalloween1 )
***
24- Make sure you are on your top layer called flames 1
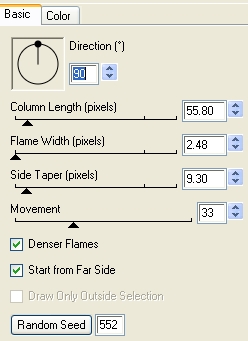
Effects / modules externes / Eye Candy 400 / fire as below

25- Keep the selection
Add a new raster layer and name it flames 2
Effects / plugins / Eye Candy 400 / fire / set as on step 24 but
click on Random seed
26- Select none
Open the tube coin, copy it and paste it as a new layer
27- Image / flip
Place the corner in the top left hand corner of your tag but don't hide the border
28 -Effets / plugins / Simple / top left mirror
29- Add a new raster layer and apply your signature
If you don't wish to do the animation, you can merge all and save your work as a jpeg file
*****
We're now going to do the animation
1-Close your layers White eyes and flames 2 and activate the layer Orange eyes
2- Edit / copy special / copy merged
3- Open your Animation shop
In animation shop / right click : paste as a new animation
or Edit / paste as a new animation
4- Go back to your Psp :
Close the layers Orange eyes and Flames 1, open the layers White eyes and flames 2 and stay on the layer White eyes
5- Edit / copy special / copy merged
6- In your Animation shop : right click ( or Edit) : paste after current frame
7- In your Animation shop :
Edit / Select all
16- Check your animation, in your animation shop, by clicking here
![]()
Stop the animation by clicking at the same place
8- If the result suits your : Edit / save a gif file in your Animation shop
9- You may resize your file in your Animation shop :
Animation / Resize animation / choose the right size in pixels
*********
That's it !! You've done it !!
If you 've enjoyed doing my tutorial, it would be nice to write a few words in my guest book ! If you 've had the slightest problem, please, send me a mail so I can see to the problem !
Tutorial translated on the 24th of october 2009
**************
