Thank you for putting a link to this tutorial, whenever you display your realization of that tag on a website, on a group or in a mail !
**************************
You'll find some versions of that tag in my gallery HERE
***********************
To realize that tag, you'll need the plugin :
- Alien skin eye candy 5 / Impact
and the material zip down below :

**************
*It is forbidden to suppress watermarks on the material provided , to alter, mist or rename the tubes in order to respect the work of the tubers
- The tube of the woman is by Jhanna
- You can join her sharing group here
- The tube of the scenery is by Guismo
You'll be able to find her tubes on Dakara' s site here
and you can join in her sharing group here
- The other elements that I haven't created, have been found on the net.
******************
Preparation
- To be on the safe side, duplicate your tube and image in your Psp :
-
Window / Duplicate
- Close the originals and work with the copies !
- Place the mask "sg_perspective-flooring-3.PspMask" in the mask folder of your Psp files.
- Place the texture files in the texture folder of your Psp files..
- Place the selections in the selection folder of your Psp files.
- Place the preset Deformation in the Bump maps of your Psp files.
- Double click on the preset Perspective shadow for Alien skin eye candy 5 so that it installs itself in the right folder.
*****************
Click here to print the tutorial
**********************
You can use my arrow to follow your work
Click on it and drag it all along the tutorial !

***************
Tutorial realized with PSP XIII

Step 1 : The background of the tag
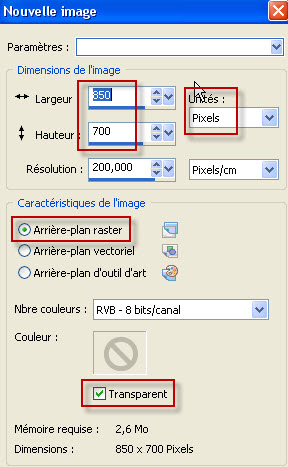
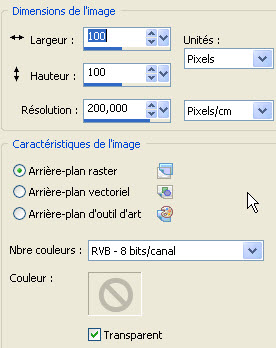
1 - Open a new transparent image of 850 by 700 pixels.
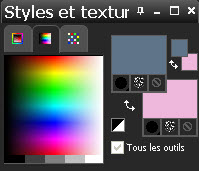
2 - Set your Material palette as explained below :
- Foreground : I have used my dropper tool to pick some blue of the sky out of my scenery tube : 5e7489.
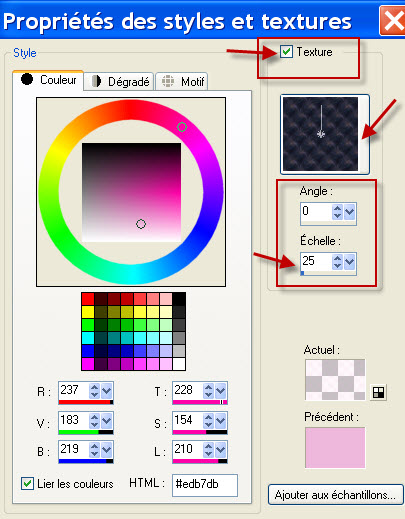
- Background : A contrasting colour to apply a texture on the sky : I have used my dropper tool to pick some pink out of the lady tube : edb7db.
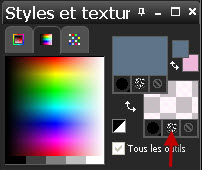
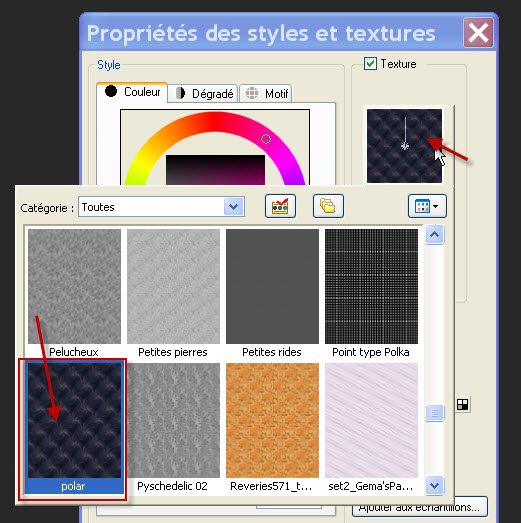
- Set the Polar texture with your background colour as shown below :
3 - Flood fill your transparent image with your foreground colour.
4- ADD A NEW RASTER LAYER.
- Flood fill your new layer with your background texture (Right clik).
- If you wish to emphasize the effect of the texture, you may duplicate that layer or set it on a mode that makes it come out nicely (I have left it as it is).
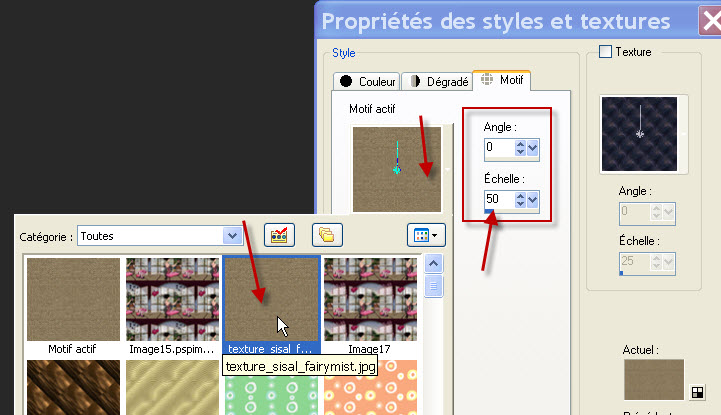
5- Open the image "texture_sisal_fairymist.jpg" in your Psp. (You can minimize it).
- Set your Materials palette as below :
- Foreground with a colour of your choice /Maroon 2b0914 for me (Colour out of the tube of the lady).
- Background with your Sisal Texture .
6-ADD A NEW RASTER LAYER.
- Selections / Load a selection / from Disk / Choose the selection "Fairymist_Gonnie1.PspSelection" with the settings below :
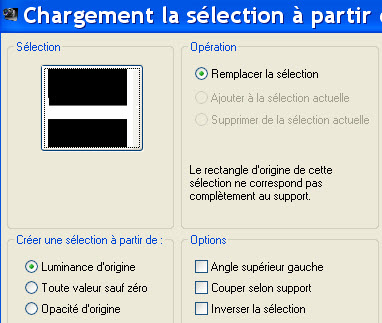
7- Flood fill that selection with your foreground colour. Don't deselect !
8-ADD A NEW RASTER LAYER.
- Flood fill that new layer with your background Sisal texture (Right click).
9- Layers / Load a mask / from disk / Choose the mask "sg_perspective-flooring-3.PspMask" with the following settings :

- Layers / Merge group.
10-ADD A NEW RASTER LAYER.
- Selections / Load a selection / from Disk / Choose the selection "Fairymist_Gonnie2.PspSelection" with the previous settings.
11- Flood fill the seection with your foreground colour.
- Deselect all.
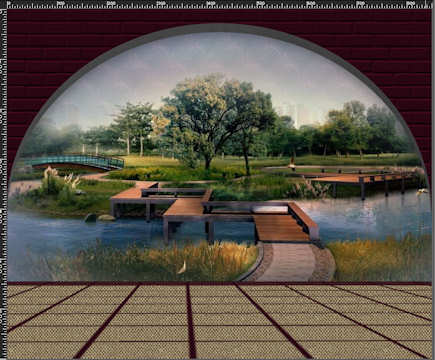
- Here is what I get at that stage :

Step 2- The wall
1-ADD A NEW RASTER LAYER.
2 - Selections / Load a selection / from Disk / Choose the selection "Fairymist_Gonnie3.PspSelection" with the previous settings.
3- Flood fill the seection with your foreground colour.
4- Effects / texture effects / Texture "Briques- Corel-15-033" or any other texture of your choice with the following settings :

5- Effects / Plugins / Alien skin eye candy 5 / Impact / Extrude as below :

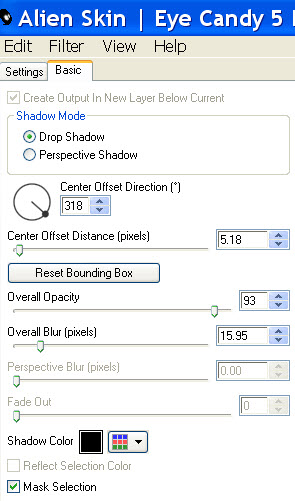
6- Effects / Plugins / Alien skin eye candy 5 / Impact / Perspective shadow as below :
- You may change my settings if you wish to get a different shadow and change the colour of the shadow too.
- Deselect all ( Ctrl + Lettre D)
Step 3 : The scenery
1- Open the tube "calguismistedjpgcityDanae09012012.pspimage" or a large tube of your choice and copy it.
2- In your layers palette, activate Raster 2.
- Paste your scenery tube as a new layer on to your tag.
- With your move tool, drag ( a little) that tube vertically towards the top of the tag :
3- Open the tube "Pink_blossom_tree.pspimage" or a tube of your choice and copy it.
4- In your layers palette, activate the layer which is on top of the pile.
- Paste the tube of the tree as a new layer on to your tag.
- Instead of a tube, you may prefer to use a brush of a tree on a new layer !.
5- I have resized the tube of the tree at 120% (Resize all the layers, NOT checked).
- Place that tree on the right hand side of your tag or to your liking.
Step 4 : The screens
1-ADD A NEW RASTER LAYER.
- Selections / Load a selection / from Disk / Choose the selection "Fairymist_Gonnie4.PspSelection" with the previous settings.
2- Set your Material palette as explained below :
- Foreground : Colour you will use to paint the frame of your screens. My choice : beige b09274.
- Background : White
3- Flood fill your selection with your foreground colour.
4- Selections / Modify / Contract by 8 pixels.
- Hit the delete key of your keyboard. Keep selection!
5-ADD A NEW RASTER LAYER.
- Flood fill the inside of the frame in white (Right Click).
- In your layers palette, lower the opacity of that layer ( 55 for me). Deselect all.
6- Layers / Arrange / Merge down.
7- Activate the layer which is just above (The layer where the frame is).
- Effects / 3d effects / Drop shadow as below or to your liking.
8- Layers / Arrange / Merge down.
9- Layers / Duplicate.
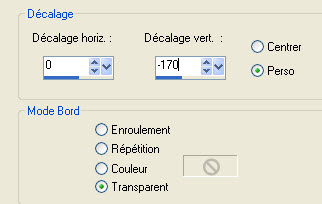
10- Effects / Image effects / Offset as below :
11- Layers / Arrange / Merge down.
- Leave that work on the side for the moment.
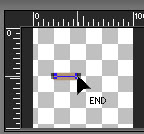
12- Open a new image of 100 by 100 pixels;
13 - Activate your Pen tool and set it as below :

- Draw a line similar to mine ( width slightly inferior to 2 squares ) :
- Click on the green arrow to apply.

- Layers / Convert to raster layer.
14- Copy that line you have just drawn and paste it as a new layer on the tag you have put on the side at point 11.
15- With your move tool, place that line as shown below :
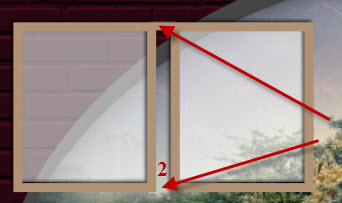
16- Layers / Duplicate.
- Place that duplicated line as shown above (2)
- You may use the Zoom (Lettre Z) as well as the arrows of your keyboard to help you place these lines.
17- Activate the layer on top of the pile.
- Layers / Merge down. / Twice so that all the elements of these two frames are on the same layer
18- Layers / Duplicate.
19- Effects / Image effects / Offset as below :
20- Layers / Duplicate.
21- Effects / Image effects / Offset as previously.
22- Activate the layer on top of the pile.
- Layers / Merge down. Twice so that all the frames are on the same layer
23- Paste your line ( It is still there !) as a new layer on to your tag.
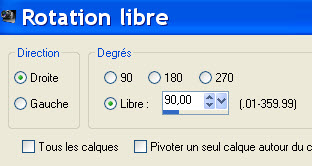
24- Image / free rotation as below :
25- Place as shown below.
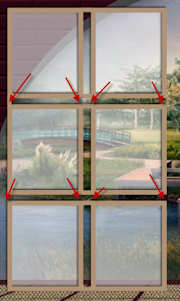
26- Layers / Duplicate / Seven times.
- Place all the elements as shown below :
27- Activate the layer on top of the pile of layers.
- Layers / Merge down / 8 times (So that all the elements of the screen are on the same layer)
28- Activate your Raster Deform tool (Letter D) and proceed as explained below to apply my Deformation preset :

- Click on the blue arrow to apply the effect and click on any other tool to get rid of the Deform tool !
- You'll find down below the settings of this preset, in case the preset itself wouldn't work :

29- Layers / Duplicate / twice.
- Image / mirror.
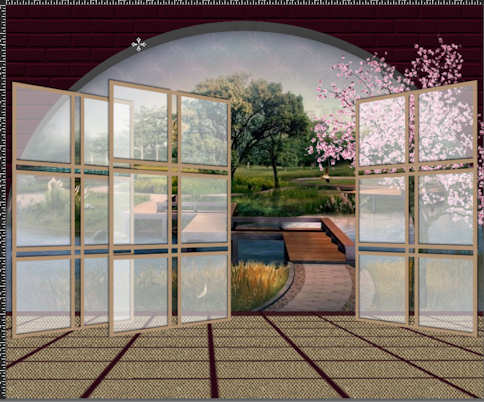
- Place the 3 screens as on my tag or to your liking.
Step 5 : The main tubes.
1- Open the tube "JHanna_577©G.Boissonnard.pspimage" or a tube of your choice and copy it.
2- Paste it as a new layer on to your tag.
- I have resized the tube at 75% (Resize all the layers, NOT checked).
- Adjust / Sharpness / Sharpen.
- Place as on my tag or to your liking.
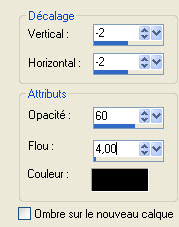
3- Effects / 3d effects / Drop shadow of your choice / - 4, 4, 60, 20, black for me.
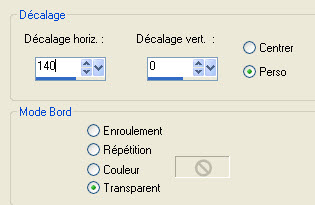
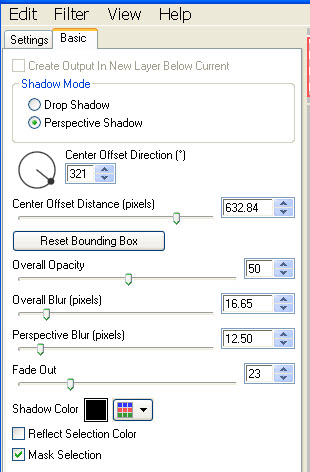
4- Effects / Plugins / Alien skin eye candy 5 / Impact / Perspective shadow / Tab Settings : choose the preset Perspective_shadow_Gonnie1
- Here are the settings of my preset :
5- Open the tube "Lanterns"or a tube of your choice and copy it.
6- Paste it as a new layer on to your tag.
- Place as on my tag or to your liking.
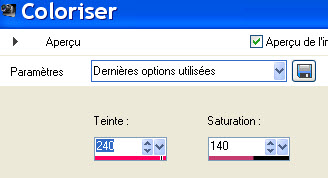
7- This is how I have changed the Hue and Brightness of these lamps :
- Adjust / Hue and saturation / Colorize as below :
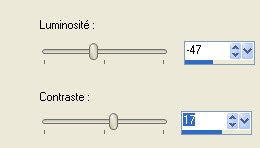
- Adjust / Brightness and contrast as below :
8- Open the tube " Chinoiseries"or a tube of your choice and copy it.
6- Paste it as a new layer on to your tag.
- I have resized the tube at 50% (Resize all the layers, NOT checked).
- Place as on my tag or to your liking.
10- Voilà comment j'ai changé les couleurs de ce tube :
- Adjust / Hue and saturation / Hue map :
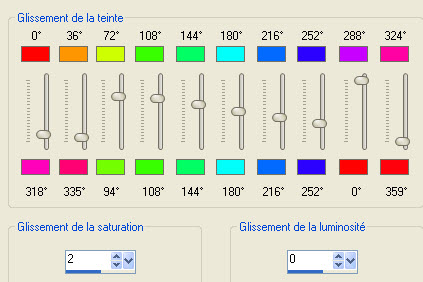
- It is up to you to play with the different cursors to get a result that matches your colours.
11- Effects / 3d effects / Drop shadow of your choice / - 4, 4, 60, 20, black for me.
12- Effects / Plugins / Alien skin eye candy 5 / Impact / Perspective shadow as on point 4.
13 - Apply your signature signature
- Make sure everything is at the right place.
- Image / add some symmetrical borders of 5 pixels with a colour of your choice :
- 2b0914 for me.
- Save your work as a jpeg file.
***************
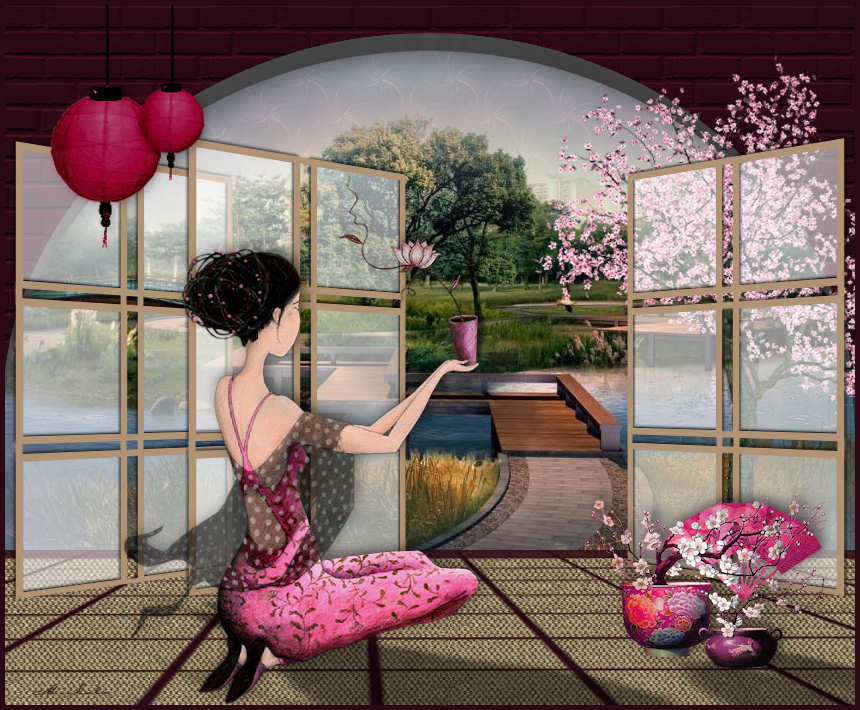
That's it !! You've done it !!
If you 've enjoyed doing my tutorial, it would be nice to write a few words in my guest book ! If you 've had the slightest problem, please, send me a mail here so I can see to the problem
Tutorial translated on the 16th of June 2012
*************
You'll find some versions of that tag in my gallery HERE