Thank you for putting a link to this tutorial, whenever you display your realization of that tag on a website, on a group or in a mail !
**************************
You'll find some versions of that tag in my gallery HERE
************************
To realize that tag, you'll need the plugins :
- Transparency / Eliminate black
- FM tools / Blend emboss
- Mura's seamless / Tile frame
- Graphic plus / Cross shadow
and the material zip down below :

**************
*It is forbidden to suppress watermarks on the material provided , to alter, mist or rename the tubes in order to respect the work of the tubers
- The tubes of the girl, of the flowers and of the Buddha are by Guismo
You'll be able to find her tubes on Dakara' s site here
and you can join in her sharing group here
- The brush "Curtain farmestochter 3.PspBrush" is by Farmerstochter
******************
Preparation
Duplicate your tubes. Close the originals and minimize the copies for now
- Export your brush in your Psp as a custom brush if you wish to use the brush which is in the zip rather than the curtain psp layer enclosed
- Put the selection in the Selections folder of your Psp files
- Put the "Corel_08_094.jpg" pattern in the pattern folder of your Psp files ( unless you've already got it in your Corel files )
*****************
Click here to print the tutorial
*******************
You can use my arrow to follow your work

***************
1- Open a transparent image of 800 by 650 pixels
2- Set your Materials palette with two colours matching your main tube
My choice : Foreground : colour d6c35b
Background : colour c87a71
Set your foreground with a linear gradient as below
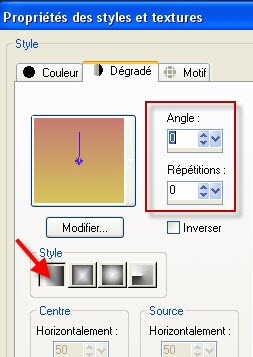
3- Flood fill your transparent layer with that gradient
4- Set your Materials palette as below with the "Corel_08_094.jpg" pattern or a small pattern of your choice with the same settings as below

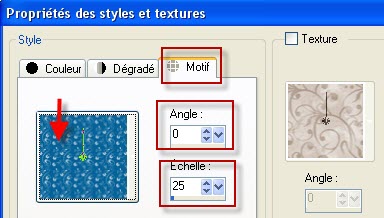
5- Add a new raster layer and flood fill it with the pattern
6- Effects / plugins / Transparency / Eliminate Black
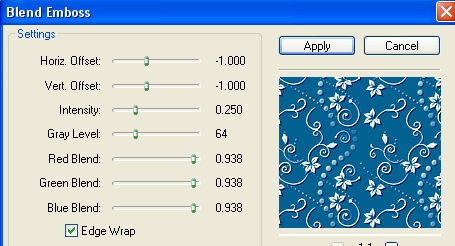
7- Effects / plugins / / FM Tools / emboss as below ( default)
8- Set the mode of that layer to Luminance Legacy and lower its opacity to your liking ( I have lowered it at 75 )
9- Activate my layer "fleurs_gloria_fairymist.pspimage", copy it and paste it as a new layer on to your tag
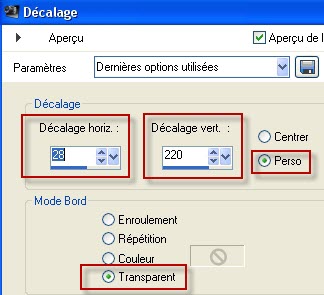
10- Effects / image effects / Offset as below :
Set the mode of that layer on to Dodge and lower its opacity to your liking ( I have lowered it at 75)
As I don't merge all these layers , you can play on the opacity at any time, according to the final desired result
11- Add a new raster layer
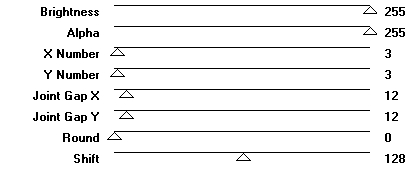
Effects / plugins / Mura's seamless / Tile frame as below
If you have a problem, making that grid, you can use mine which I have included in my material zip ( Just copy it as a new layer on to your tag )!
12- With your magic wand, set as below , select the white grid

13- Set your material palette as below with another colour matching your previous colours, in your background ( green 81a62f for me )
14- No use adding a new raster layer !
Flood fill your selected grid with that new background colour ( right clic of your mouse )
Keep the selection !!
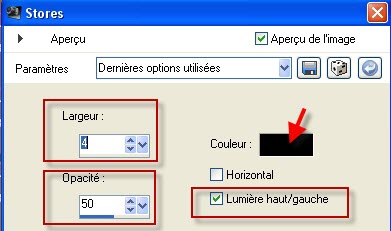
15- Effects / texture effects / Blinds as below with a colour of your choice ( black for me )
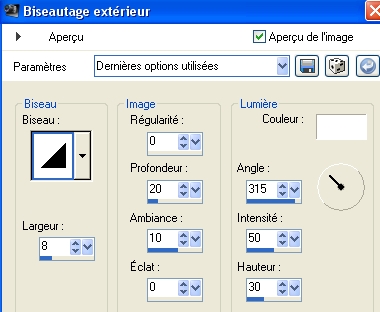
16- Effects / 3d effects / Outer bevel as below :
Selections / Select none
17- Add a new raster layer
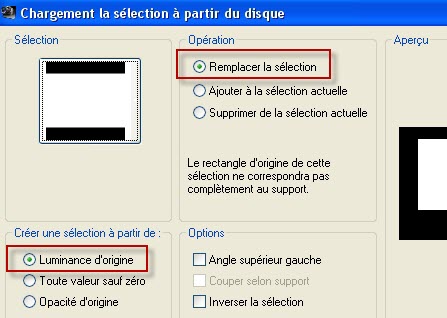
Selections / Load a selection / from disk / choose "fairymist_gloria.PspSelection"/ Set as below
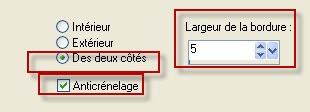
18- Selections / Modify / Select Selection borders as below :
Flood fill that selection with your background colour ( green for me )
19- Repeat steps 15 and 16 on that frame
Select none
20- With your magic wand, set as previously, select the inside of that frame
Selections / Modifyr / Expand by 2 pixels
Add a new raster layer
Set your Materials palette as on step 2
Flood fill the selection with your foreground gradient
Keep the selection !
21- Activate the tube " calguisrbouddha100211.pspimage" or a misted tube of your choice, copy it and paste it as a new layer on to your tag
With your move tool , place the most interesting part of your misted tube in the center of the selection
We could copy the tube into that selection but the tube gets very often distorted that way and I prefer doing it this way I'm showing you !!!
Selection / invert / Hit the delete key of your keyboard
Select none
Layers / Merge down
Layers / Arrange / Move down
22- Activate now your top layer ( the one with the frame )
With your magic wand , select the inside of that frame
Selections / Modify / Expand by 10 pixels
Selections / Invert
23- Add a new raster layer
Flood fill that selection in White
Select none
Set the mode of that layer on to Dodge and lower its opacity to your liking ( I have lowered it to 25), This step should enlighten your background but it mustn't be too bright ! Depending on your colours, you may not need doing it !
24-Activate the tube "calguisrlotus100211.pspimage"or a tube of your choice, copy it and paste it as a new layer on to your tag
I have resized that tube at 25%
Place as on my tag
Effects / 3d effects / Drop shadow of your choice / 4, 4, 40, 20, black for me
25- Layers / Duplicate
Place as on my tag or to your liking
26- Activate the tube "rideau_gloria_fairymist.pspimage"or a curtain tube of your choice, copy it and paste it as a new layer on to your tag
I have included in my zip the brush file I have used in case you wish to create your own curtain with a different colour.
Place as on my tag
27- Make sure everything is at the right place
Image / add some symmetrical borders of 1 pixel with a colour of your choice ( black for me )
28- Layers / Promote Background layer
29- Image / resize at 90% ( Resize all the layers NOT checked )
30- Add a new raster layer
Layers / arrange / move down
Flood fill that new layer with your foreground gradient set on step 2 but INVERT your colours
31- Layers / Duplicate
Set the mode of that layer to Dodge and lower its opacity to your liking ( 15 for me )
32- Activate the layer which is at the bottom of your pile of layers
Effects / Plugins / Graphic plus / cross shadow default or to your liking ( you may reduce the intensity if it is too bright !)
Make sure your background isn't too brightful ! Reduce the opacity of the duplicated layer if necessary
33- Activate now your top layer
Activate the tube "calguisrchinoiselotus100211.pspimage"or a tube of your choice, copy it and paste it as a new layer on to your tag
I have resized my tube at 85 %
Place as on my tag
34- Effects / 3d effects / Drop shadow of your choice / 4, 4, 40, 20, black for me
35- Activate the tube "calguisblooms280211.pspimage"or a tube of your choice, copy it and paste it as a new layer on to your tag
I have resized that tube at 85 %
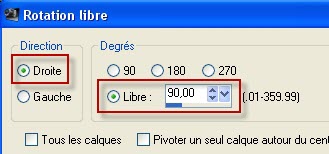
Image / free rotation as below
Place as on my tag
36- Effects / 3d effects / Drop shadow of your choice / 4, 4, 40, 20, black for me
37- Add a new raster layer and apply your signature
38- Image / add some symmetrical borders of 1 pixel with a colour of your choice ( black for me )
39- Save your work as a jpeg file and resize it if necessary
***************
That's it !! You've done it !!
If you 've enjoyed doing my tutorial, it would be nice to write a few words in my guest book ! If you 've had the slightest problem, please, send me a mail so I can see to the problem
Tutorial translated on the 12th of March 2011
*************
Other versions of that tag