
Thank you for putting a link to this tutorial, whenever you display your realization of that tag on a website, on a group or in a mail !
**************************
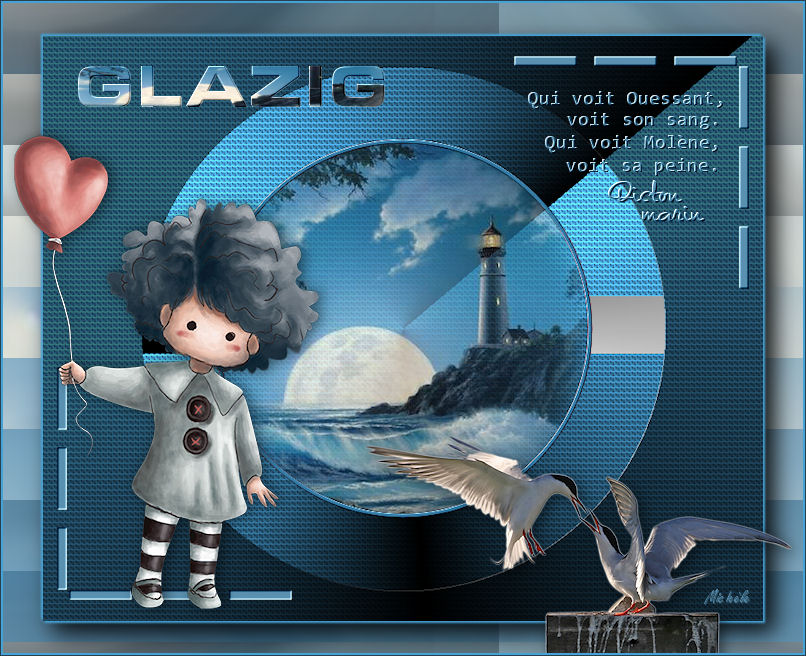
You'll find some versions of that tag in my gallery HERE
************************
To realize that tag, you'll need the plugins
- VM distortion,
- Filter Factory Gallery A,
- Alien skin Eye Candy 5 / Impact,
- Mura's seamless
and the material zip down below :

**************
*It is forbidden to suppress watermarks on the material provided , to alter, mist or rename the tubes in order to respect the work of the tubers
- The tube of the girl is by Katussia
You can join in her sharing group here
- The tube of the birds is by Sabine
you can join in her sharing group here
The other elements have been found on the net
******************
Preparation
Duplicate your tubes and your image. Close the originals and minimize the copies for now.
Place your selection in your selections folder
*****************
Click here to print the tutorial
*******************
You can use my arrow to follow your work

***************
1- Open a new transparent image of 800 by 650 pixels
2- Select all
Open the picture "texture_titre" (which is a selected part of the scenery tube that I will use to put in the center of the tag later on ), copy it and paste it into the selection
(If you don't use my scenery tube, you'll have to make your own selection from the tube you have chosen by using your rectangular selection tool )
Select none
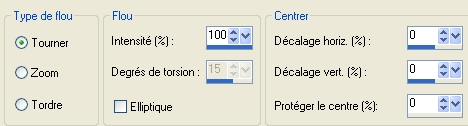
3- Adjust / Blur / radial blur as below :
4- Effects / plugins / VM distortion / Flip chop / 138, 28
5- Add a new raster layer
Set your material palette with two colours out of your scenery tube
My choice : Foreground : colour 367ba4 
Background : black
6- Set your foreground with a radial gradient as below :
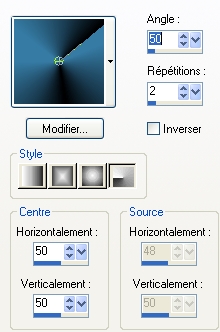
Flood fill your transparent layer with that gradient
7- Effects / plugins / Filter Factory Gallery A / Holidays in Egypt / 2
8- Add a new raster layer
Selections / load selection / from disk / choose "selection_glazig_fairymist" / check Source Luminance and Replace the selection
Flood fill that selection in black
Select none
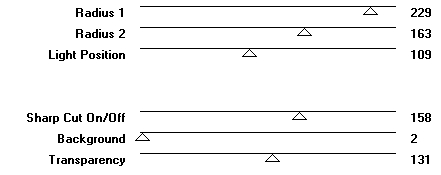
9- Effects / plugins / Filter Factory Gallery A / Round button / default as below :
10- Open the scenery tube ( Lighthouse for me ), copy it and paste it as a new layer; it is at the right place, in the center of your tag.
11- Open my tube cercle_glazig_fairymist, copy it and paste it as a new layer
You may colorize that cercle so that it matches your colours
12- With your magic wand, set as below, select the inside of the cercle

13- Activate now the layer where there is the selection that you have painted in black ( Layer Raster 3)
Hit delete
Keep the selection !
14- Selections / invert
Activate now the layer where your scenery is
Hit delete
Select none
15- Close your bottom layer( layer raster 1)
Activate now one of the other layers as below :
You should get this :
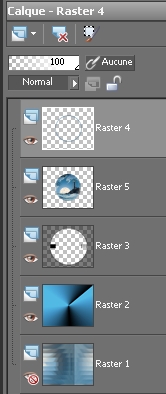
Merge visible
16- Image / resize at 90 % ( Resize all the layers NOT checked !)
17- Effects /3d effects / drop shadow as below : colour 46a1d4 for me
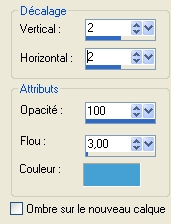
And the same thing with - 2 horiz and vert
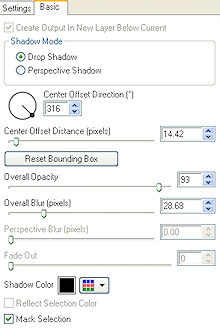
18- Effects / Alien skin Eye candy 5/ Impact / Perspective shadow / drop shadow blurry / default / as below :
19- You can open Layer raster 1 by clicking on the eye !
Activate now the top layer
20- Open my tube "coin_glazig_fairymist" or a tube of your choice, copy it and paste it as a new layer
Colorize it if necessary
Place as on my tag
21- Layers / duplicate
Image / mirror
Image / flip
22- Open my tube "dicton_glazig_fairymist", le copier et le coller comme un nouveau calque
Colorize if necessary
Place as on my tag
You may use a text or a decoration of your choice (brush, tube, text tool )
23- Open the tube Graphsabine_design32 or a tube of your choice, copy it and paste it as a new layer
I have resized that tube at 75%. Adjust / sharpen
Place the tube at the right place
24- Effects /3d effects / drop shadow of your choice ( for me : 4, 4, 50, 20, black )
25- Open the tube KTs_@fonon83 or a tube of your choice, copy it and paste it as a new layer
I have resized that tube at 75% and Image / mirror
I have placed the feet of my little girl on the bar which is in the left hand side corner of the tag
26- Effects /3d effects / drop shadow of your choice / my choice : 0, 4, 50, 20, black
27- Add a new raster layer
Activate your text tool set as below , write your title with white in your background ( foreground closed ! )

Keep the selection of your floating text
28- Open the picture "texture -titre", copy it and paste it into the selection
Select none
Place your text at the right place
29- Effects / plugins / Mura's seamless / Emboss at alpha / default
30- Add a new raster layer and apply your signature
31-Image / add some symmetrical borders of 2 pixels with the colour 46a1d4 used at step 17
32- Image / add some symmetrical borders of 1 pixel with a dark colour
33- Save your work as a jpeg file and resize the tag if necessary
***************
That's it !! You've done it !!
If you 've enjoyed doing my tutorial, it would be nice to write a few words in my guest book ! If you 've had the slightest problem, please, send me a mail so I can see to the problem !
Tutorial translated on the 17th of october 2009
********************
You'll find some versions of that tag in my gallery HERE