

Thank you for putting a link to this tutorial, whenever you display your realization of that tag on a website, on a group or in a mail !
**************************
You'll find some versions of that tag in my gallery HERE
***********************
To realize that tag, you'll need the plugins :
- Unlimited
and the material zip down below :

**************
Préparation
Duplicate your images and your tube. Close the originals and minimize the copies for now.
- Place the brush files in the brush folder or your psp files
*****************
Click here to print the tutorial
*******************
You can use my arrow to follow your work

***************
THE BACKGROUND
1- Open a transparent image of 850 by 700 pixels
Selections / select all
2- Activate the image "givre_fairymist1.jpg" or an image of your choice
Copy it and paste it into the selection
Selections / Select none
3- Adjust / Blur / Gaussian blur / 10
4- Effects / plugins / Filters unlimited / Paper textures / Striped paper coarse / 74, 87
...................
THE PICTURES
5- Activate the image "givre_fairymist2.jpg" or an image of your choice
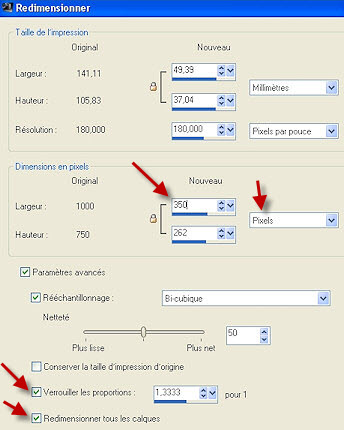
Image / resize by 350 pixels width as below :
6- Adjust / Sharpness / Sharpen
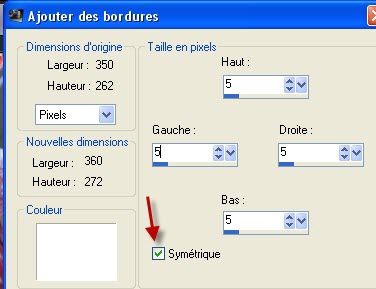
7- Image / add some symmetrical borders of 5 pixels in white
8- Copy your resized image and paste it as a new layer onto your tag
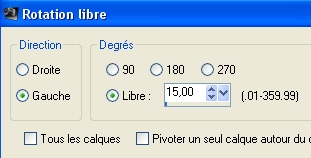
9- Image / free rotation 15° on the left as below
Place as on my tag
10- Activate the image "givre_fairymist3.jpg"or an image of your choice
Image / resize by 350 pixels width as on step 5
Repeat steps 6, 7 and 8
Image / free rotation, 7° on the right ( same settings as on step 9)
Place as on my tag
11- Activate the image "givre_fairymist4.jpg"or an image of your choice
Image / resize by 350 pixels width as on step
Repeat steps 6, 7 and 8
Image / Free rotation 10°on the right ( same settings as on step 9)
Place as on my tag
12- Activate the image "givre_fairymist5.jpg"or an image of your choice
Image / resize by 350 pixels width as on step
Repeat steps 6, 7 and 8
No rotation for that image which will remain in the center
13- Activate the image "givre_fairymist6.jpg"or an image of your choice
Image / resize by 350 pixels width as on step
Repeat steps 6, 7 and 8
Image / Free rotation 5° on the left ( same settings as on step 9)
Place as on my tag
....................
THE LABELS
14- Add a new raster layer
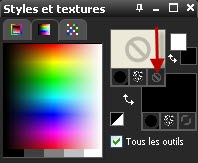
Activate your selection tool / custom selection as shown below :

Click where the red arrow is
Set as below :

15-With your flood fill tool, flood fill the selection in white
Keep the selection
16- Selections / Modify / Contract by 2 pixels
Hit the delete key
Keep the selection
17- Add a new raster layer
Flood fill the selection in white
In your layer palette , lower the opacity of that layer to about 55
Selections / select none
18- Layers / Merge / Merge down
19- Layers / Duplicate / 4 times to get 5 labels
20- With your move tool, move the label which is on the top, a bit further
21- Set your material palette as below :
My choice : Foreground : White / it's already there as I have used it to create my labels
Background : Black (colour to write my text with )
Close your foreground
22- With your text tool , set as below , and the font of your choice, write down the name of the plant ( if your pictures are plants !)
I have chosen the font Eras Demi ITC, size 22 pixels

Click on the round green button to valid your writing
Layers / convert to raster layer
With your move tool , place your word right in the middle of your label
23- Layers / Merge / Merge down
Your word is now merged with the label
24- Image / Free rotation : apply the same rotation as on the picture
Place the label at the right place
25- Activate your Eraser tool, set as below and rub off both ends of your label so that it looks like a piece of scotch tape !

26-Repeat steps 22 to 25 for the other labels
*******************
THE BORDERS
27- Add a new raster layer and apply your signature
28- Make sure everything is in the right place
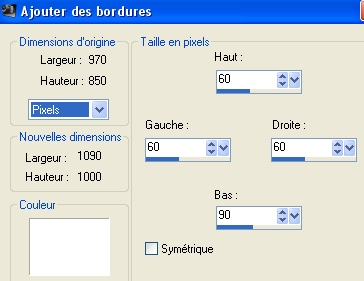
Image / add some NOT symmetrical borders in WHITE as below :
90 pixels for the bottom !
29- Activate the tube "dots_givre_fairymist.pspimage", copy it and paste it as a new layer
30- Effects / image effects / Offset as below :

You may colorize that tube ( Adjust / Hue and saturation / colorize )
To get a darker shade , before you colorize the tube, you can do : Image / Negative image !
31- Effects / distortion effects / Wave as below :

32- Set your material palette with a new colour in your background to write your text and apply the brush ( Use the same colour as the one you have used for the dots )
I have chosen the grey colour 909094
33- Add a new raster layer
Apply the brush "coin fleuri" set as below, with your background colour ( right click !) in the bottom right hand side corner of your tag

In order to get a darker colour, you may click several times ( but don't move !!!!) or duplicate your layer once or twice or use another mode to emphasize your colour.
34- Layers / Duplicate
Image / mirror
35- Activate your text tool, set as on step 22 but with a bigger size
Write down your text with the same colour as your corners
Click on the round green button to valid your writing
Layers / convert to raster layer
36- -Save your work as a jpeg file and resize it if necessary
***************
That's it !! You've done it !!
If you 've enjoyed doing my tutorial, it would be nice to write a few words in my guest book ! If you 've had the slightest problem, please, send me a mail so I can see to the problem !
Tutorial translated on the 29th of January 2011
*******************
Other versions of that tag
