
Thank you for putting a link to this tutorial, whenever you display your version of that tag on a website, on a group or in a mail !
**************************
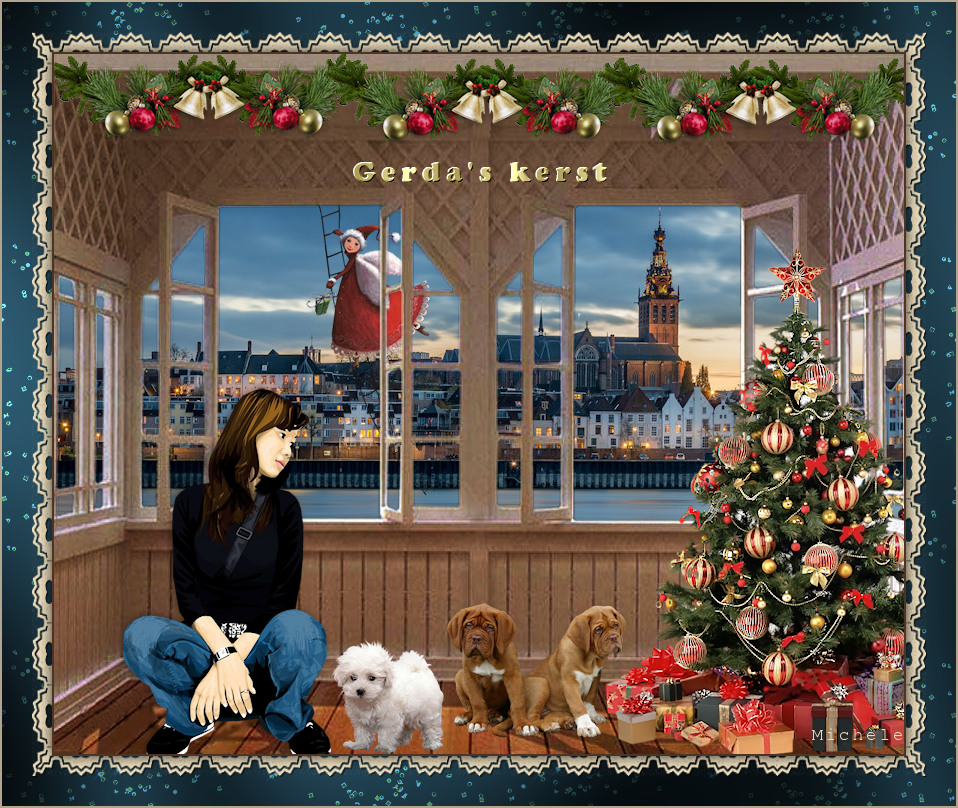
You'll find some versions of that tag in my gallery Here
***********************
To make that tag, you'll need the filter
- Graphic plus / Cross shadow.
and the material zip down below :

***************
It is forbidden to suppress watermarks on the material provided , to alter, mist or rename the tubes in order to respect the work of the tubers
- The tube of the woman is by Guismo.
- The tube of Mother Christmas is by Tatie.
- You can find her blog here and you can get her tubes from here.
- The tube of the christmas tree is by Thafs.
- The tube of the white dog is by Grace.
- The tube of the brown dogs is by Maryse.
- The other elements that I haven't created, have been found on the net.
******************
Preparation
To be on the safe side, duplicate your tubes and image in your Psp :
-
Window / Duplicate
- Close the originals and work with the copies !
**************
Click here to print the tutorial
**********************
You can use my arrow to follow your work
Click on it and drag it all along the tutorial !

***************
Tutorial made with PSP X8
***************
1 - Open a new transparent image of 850 by 700 pixels.
2 - Open the scenery image "Gollandiia-niderlandy-nijmegen" or an image of your choice, in your PSP and copy it.
3 - Paste it as a new layer.
- I have chosen to move up my image that way :
- Effects / Image effects / Offset / Horizontal offset 0 / Vertical offset 60 /
- Boxes "Custom" and "Transparent" checked.
4- Open the tube "Mou_summerwindow" in your PSP and copy it.
5- In your layers palette, activate the transparent layer at the bottom of the pile and drag it above your scenery image.
6- Selections / Select all.
7- Paste into the selection, the window tube that is still in memory.
- Selections / Select none.
- I have resized that layer at 101 % in order to delete the white line that appears on top of the tube of the window.
(Resize all the layers NOT checked).
8- Layers / Duplicate.
- I have set the mode of that layer on to Multiply, opacity at 70, to darken the window.
9- Open the tube "Sapin-de-Noel_tubed_by_thafs" or a tube of your choice, in your PSP and copy it.
10- Paste it as a new layer.
- I have resized my tube at 75% (Resize all the layers NOT checked).
11 - Place it to your liking.
- I have placed mine as below :
- Effects / Image effects / Offset / Horizontal offset 320 / Vertical offset - 110/
- Boxes "Custom" and "Transparent" checked.
12- Effects / 3D effects / Drop shadow of your choice / -2, -2, 60, 10 and black for me.
- A little note : I have used two tubes of dogs as I know my friend Gerda loves them but it it up to you to choose tubes that inspire you !
13- Open the tube "MR_Dogues de Bordeaux petit _small" (tube resized for the tutorial) or a tube of your choice and copy it.
- Paste it as a new layer and place it like me or to your liking.
14- Open the tube of the woman"calguisvector06072012" or a tube of your choice, in your PSP and copy it.
15- Paste it as a new layer.
- I have resized that tube at 50%.
- Place it in the bottom left hand side part of your tag or to your liking.
16- Effects / 3D effects / Drop shadow of your choice / -2, -2, 30, 10 and black for me.
17- Open the tube "Grace's_TLC_DogsHouse petit_small" (tube resized for the tutorial) or a tube of your choice in your PSP and copy it.
18- Paste it as a new layer and place it like me or to your liking.
19- Open the tube "Guirlande" or a tube of your choice, in your PSP and copy it.
20- Paste it as a new layer and place it like me or to your liking.
21- You may add some more tubes if you wish.
22- Open the tube "tubtatie_455c24188e" or a tube of your choice, in your PSP and copy it.
23- Activate the scenery layer.
- Paste your tube as a new layer.
- Erase the watermark of that tube.
- I have resized my tube at 50% and applied Image / Mirror on it.
- Place the tube like me or to your liking.
24- Activate the layer on top of the pile.
- Apply your signature.
25- Image / Add some symmetrical borders of 2 pixels with a colour of your choice
(brown 4d3425 for me).
26- Layers / Promote background layer.
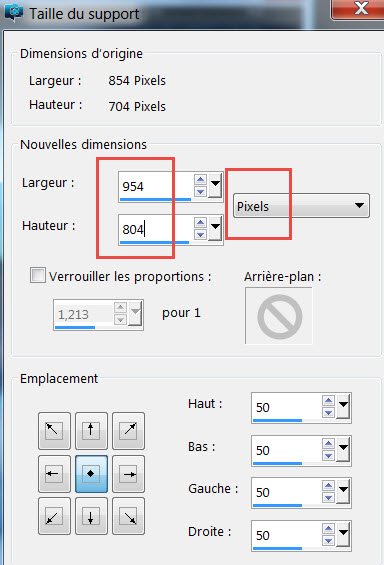
27- Image / Canvas size / Set as below :
28- ADD A NEW RASTER LAYER.
- Layers / Arrange / Send to bottom.
29- Flood fill that new layer with a colour that matches your own tubes and image.
(dark blue 1c3846 for me).
30- In order to enligthen that background I did this :
- Effects / Plugins / Graphic plus / Cross shadow default.
31- Open the tube "Fairymist_Gerda_confettis" or a similar tube, in your PSP and copy it.
32- Paste it as a new layer on your tag.
- I have set the mode of that layer on to Dodge and lowered its opacity at 67.
33- ADD A NEW RASTER LAYER.
34- Flood fill that layer with a colour of your choice
( ecdcbb for me).
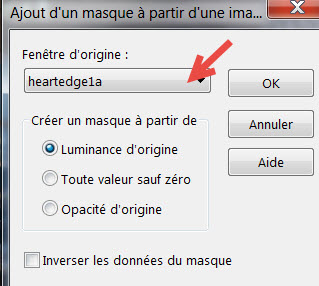
35- Open the mask "heartedge1a" in your PSP and minimize it.
- On your tag :
- Layers / New mask layer / From image / Choose "heartedge1a" and set as below :
- Layers / Duplicate.
- Adjust / Sharpness / Sharpen more.
- Merge group.
36- Edit / Cut.
37- Selections / Select all.
- Selections / Modify / Contract by 30 pixels.
38- Paste into the slection (the copy of your lace that you have just cut!).
- Selections / Select none.
38- Effects / 3D Effects / Drop shadow / 1, 1, 80, 1 and black.
39- Activate the layer on top of the pile (your tag) :
- Effects / 3D Effects / Drop shadow / 0, 0, 80, 20, black.
40- Open the tube "Fairymist_Gerda_title" , copy it and paste it as a new layer..
- Place it at the right place.
- I have written that text with the font Cooper Black, size 30 and with the texture "Fairymist_Gerda_texture_or".
- It is up to you to choose the font and colour that suit you.
41- Image / Add some symmetrical borders of 2 pixels with a colour of your choice
(cream colour b1a58d for me).
- Save your work as a jpg file.
***************
That's it, you have done it !
If you have the slightest problem, don't hesitate to get in touch with me !
Tuto translated on the 20th of devember 2017.
*******************
You'll find some versions of that tag in my gallery Here