Thank you for putting a link to this tutorial, whenever you display your realization of that tag on a website, on a group or in a mail !
**************************
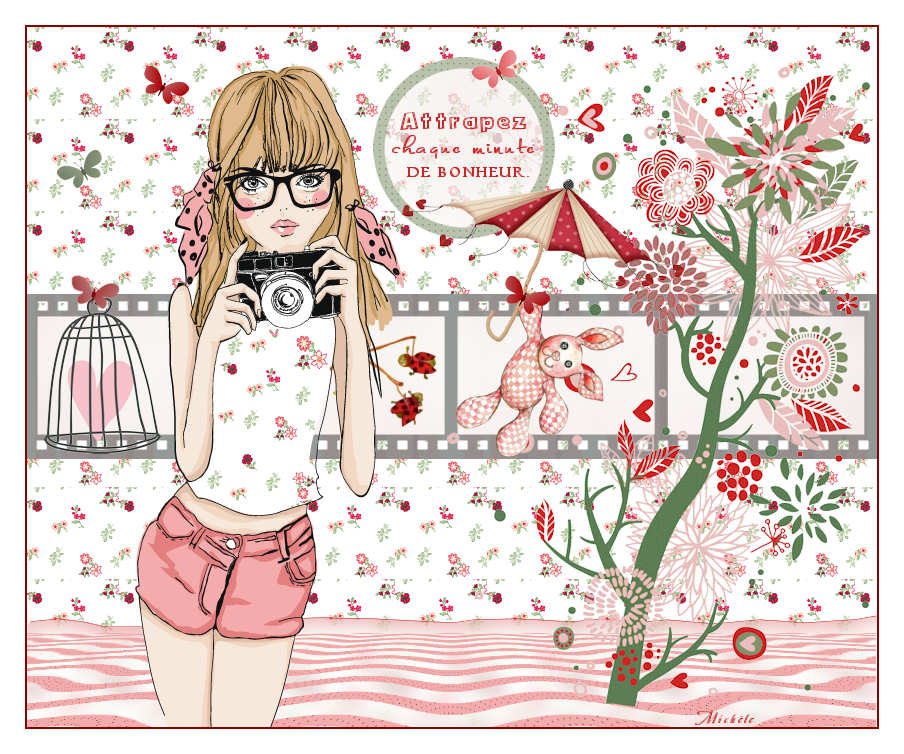
You'll find some versions of that tag in my gallery here
************************
To realize that tag, you'll need the plugin :
- Mura's Meister / Perpective tiling
and the material zip down below :

**************
*It is forbidden to suppress watermarks on the material provided , to alter, mist or rename the tubes in order to respect the work of the tubers.
- The tube of the young woman is by Bichito.
-The tube of the teddy bear is part of a tube by Guismo. The whole tube is attached to the material.
You'll be able to find her tubes on Dakara' s site here
and you can join in her sharing group here
- The tubes of the butterflies have been made from a tube by Sabine.
- The mobile is part of a tube by Jenny. The whole tube is included in the material.
- You can join Jenny' sharing group here.
- The other elements that I haven't created, have been found on the net.
******************
Preparation
To be on the safe side, duplicate your tubes and image in your Psp :
-
Window / Duplicate
- Close the originals and work with the copies !
- Place the pattern "Fairymist_frieda_motif.jpg" in the pattern folder of your Psp files.
- Place the selections in the selection folder of your Psp files.
*****************
Click here to print the tutorial
**********************
You can use my arrow to follow your work
Click on it and drag it all along the tutorial !

***************
Tutorial realized with PSP XIII

Step 1 : The background of the tag
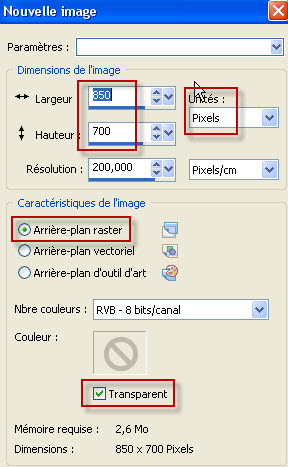
1 - Open a new transparent image of 850 by 700 pixels.
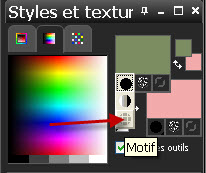
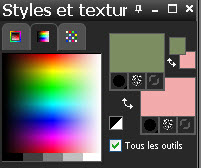
2 - Set your Material palette with two colours out of your main tube.
- My choice : Foreground : colour green 7c8d62
- Background : colour pink f3abab
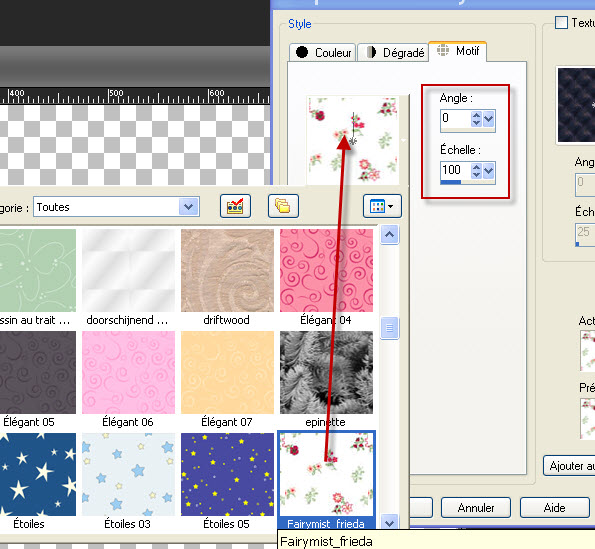
- Activate the Pattern tab of your foreground and choose the "Fairymist_frieda" pattern or a pattern of your choice.
- Proceed as shown below :
- If you don't want to use my pattern, you may create your own pattern that will match your main tube. You can do it that way :
- With your SQUARE selection tool , select a part of a pattern out of your main tube, copy that selection and paste it as a new mage. This new image will appear with all your patterns when you click on the pattern tab of your Material palette ! You may have to apply the effect / seamless tiling on that new created image before you use it as a pattern.
3 - Flood fill your new transparent image with that foreground pattern.
4- Set now your Material palette as shown below :
5- ADD A NEW RASTER LAYER.
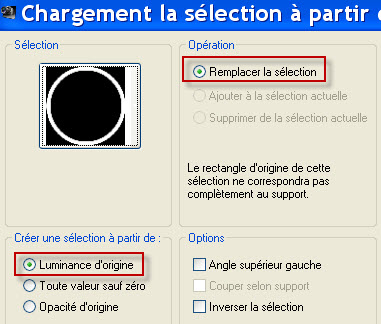
6- Selections / Load a selection / From disk / choose the selection "fairymist_frieda_0.PspSelection" / set as below :
7- With your flood fill tool, set as below, flood fill the selection with your background colour (Right click).

- Selections / deselect all.
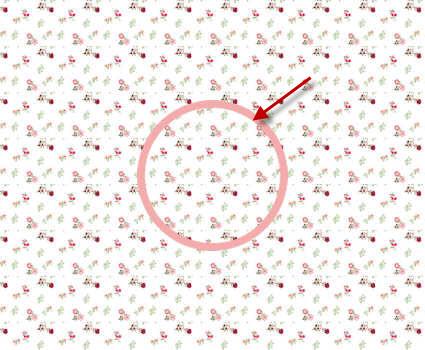
8-Effects / Distortion effects / Polar coordinates as below :

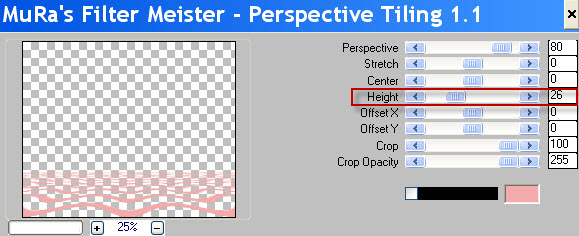
9- Effects / Plugins / Mura's meister / perspective tiling as below :
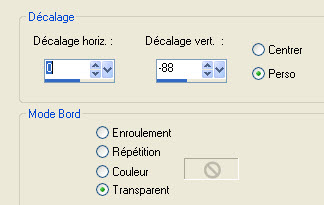
10- Effects / Image effect / Offset as below :
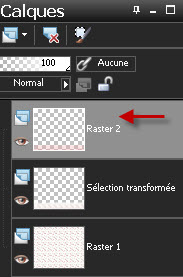
11- Activate the layer at the bottom of the pile (Layer Raster 1).
- Selections / Load a selection / From disk / choose the selection "fairymist_frieda_1.PspSelection" / set as previously :
12- Selections / Promote selection to layer.
13- Adjust / Blur / Gaussian blur at 10.
- Deselect all.
14- Activate the layer on top of the pile of layers (Layer raster 2) as below :
- Layers / Merge down.
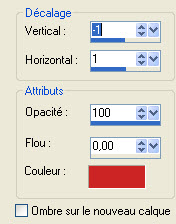
15- Effects / 3D effects / drop shadow as below :
- You may add the same drop shadow with - 2 vertical If you wish.
- Use a colour that matches your pattern (red cc2424 for me).
Step 2 : The pellicle
1- Open the tube "pellicule.pspimage", copy it and paste it as a new layer on to your tag.
- You may colorize that tube if necessary.
- It is at the right place !
2- Activate the layer at the bottom of the pile (Raster 1).
- Selections / Load a selection / From disk / choose the selection "fairymist_frieda_2.PspSelection" / set as previously.
3- Selections / Promote selection to layer.
4- Adjust / Blur / Gaussian blur at 15 this time.
- Keep selection !!
- Lower the opacity of that layer at 85.
- Keep selection !!
5- Activate the layer at the bottom of the pile (Raster 1).
- Hit the delete key of your keyboard.
- Now, you can deselect !!
Step 3 : The tree
1- Activate the layer on top of the pile of layers.
2- Open the tube "004.psp" or a tube of your choice and copy it.
3- Paste it as a new layer on to your tag.
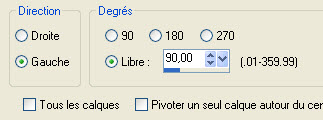
4 - For this tube : Image / free rotation as below :
- Image / mirror.
5- For this tube : Image / Resize at 90% (Resize all the layers NOT checked)
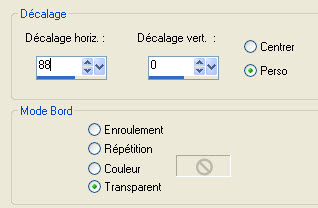
6-For this tube : Effects / Image effect / Offset as below :

7- For this tube : Selections / Load a selection / From disk / choose the selection "fairymist_frieda_3.PspSelection" / set as previously.
- Hit the delete key of your keyboard.
- Deselect all.
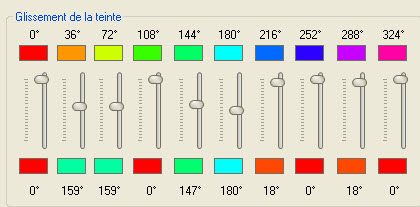
8- For this tube : Adjust / Hue and saturation / Hue map as below :
- It is up to you to play with the different cursors if you wish to obtain other colours that match your background.
Step 4 : The message
1-ADD A NEW RASTER LAYER.
- Selections / Load a selection / From disk / choose the selection "fairymist_frieda_4.PspSelection" / set as previously.
2- Flood fill that selection with your foreground colour (green for me).
3- Selections / Modify / Contract by 10 pixels.
- Hit the delete key of your keyboard.
- Keep selection !!
4- I have lowered the opacity of that layer at 60.
5- Selections / modify / expand the selection by 1 pixel.
6- Activate the layer at the bottom of the pile (Raster 1).
- Selections / Promote selection to layer.
- Keep selection !!
7- Adjust / Gaussian blur at 15.
- Deselect all.
- I have lowered the opacity of that layer at 80.
8- Activate the layer on top of the pile of layers.
- Open the tube "Fairymist_text_frieda.pspimage" and copy it.
9- Paste it as a new layer on to your tag and place it in the center of your cercle.
- That text may be colorized or you may choose to write your own message !
Step 5 : The objects
1- Open the tube "teddy.pspimage"or a tube of your choice and copy it.
2- Paste it as a new layer on to your tag.
3- I have placed my tube that way :
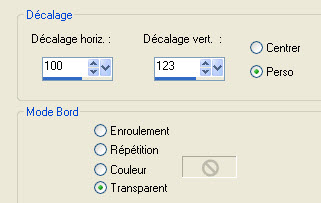
- Effects / Image effect / Offset as below :
4- Open the tube "ombrelle.pspimage"or a tube of your choice and copy it.
5- Paste it as a new layer on to your tag.
6- I have placed my tube that way :
- Effects / Image effect / Offset as below :
7- Open the tube "papillons", activate the layer " Papillon 1" and copy it.
- You may prefer to use a tube of your own choice, of course.
8- Paste it as a new layer on to your tag and place it as on my tag (See my screen shot after point 14).
9- Open the tube"mobile.pspimage"or a tube of your choice and copy it.
10- Paste it as a new layer on to your tag and place it as on my tag.
11- Open the tube"cage.pspimage"or a tube of your choice and copy it.
12- Paste it as a new layer on to your tag and place it as on my tag.
13- Open the tube "papillon 2 " or a tube of your choice and copy it. (Beware, you must be on layer 2 !!).
14- Paste it as a new layer on to your tag and place it as on my tag.
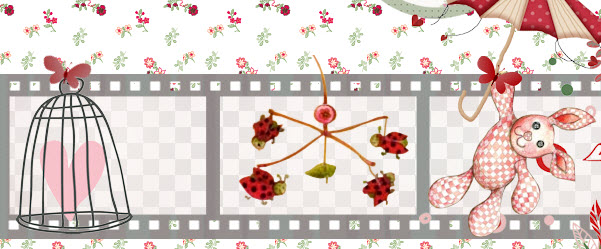
15- Activate the other butterflies, one by one, copy them and place them as on my tag or to your liking.
Step 6 : The main tube
1- Open the tube "bichito_vEcToRiUs_[XIII]_por__barullo.psp"or a tube of your choice and copy it.
2- Paste it as a new layer on to your tag.
3 - Place it as on my tag or to your liking.
- I haven't put any drop shadow on my tube but you may prefer to put one on your tube.
Step 7 : The borders
1- Apply your signature
2 - Image / add some symmetrical borders of 2 pixels with a colour out of your tag.
- I have chosen the red b73c40.
3- Image / add some symmetrical borders of 25 pixels with a colour out of your tag.
- I have chosen White.
- Save your work as a jpeg file.
***************
That's it !! You've done it !!
If you 've enjoyed doing my tutorial, it would be nice to write a few words in my guest book ! If you 've had the slightest problem, please, send me a mail so I can see to the problem
Tutorial translated on the 15th of October 2012
*************
You'll find some versions of that tag in my gallery HERE