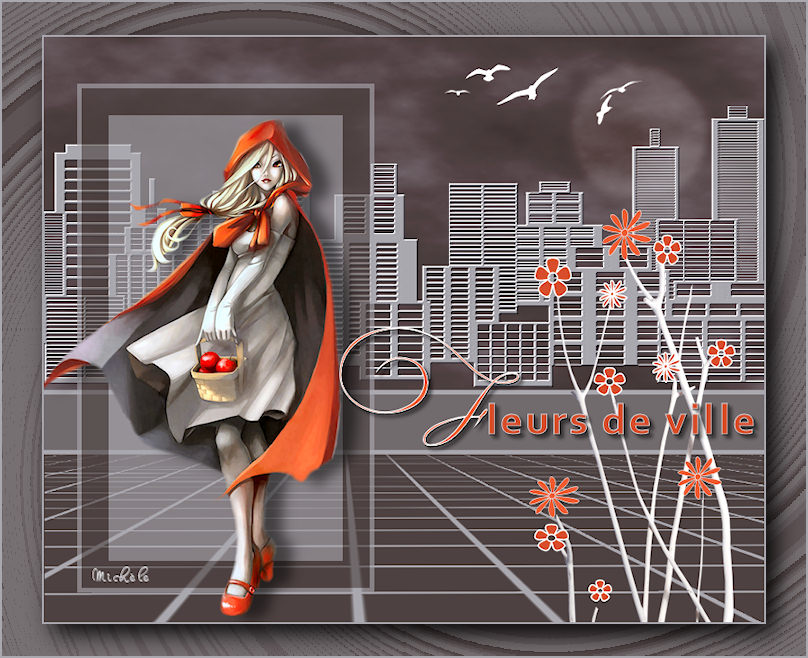

Thank you for putting a link to this tutorial, whenever you display your realization of that tag on a website, on a group or in a mail !
**************************
You'll find some versions of that tag in my gallery HERE
***************
To realize that tag, you'll need the plugins Mura's Meister, Mura's seamless, Alien skin Eye candy Impact, VM Extravaganza
and the material zip down below :

***********************
*It is forbidden to suppress watermarks on the material provided , to alter, mist or rename the tubes in order to respect the work of the tubers
- The tube of the woman is Kikirou
-One of the masks I have used is by HJR
The tube of the tree branches is by Brigitte
You can join in her sharing group by clicking here
- The tube of the birds has been made from a brush from thiselectricheart
The other elements have been found on the net
******************
Preparation
Duplicate your tubes and the mask by Hjr. Close the originals and minimize the copies for now. Put the shapes of the flowers in your shape file unless you've already got them in your Corel ! Put the mask Sg_Perspective_flooring3 in your masks file. Put the selections in your selections file. Export the brush birdbrush in your psp as a custom brush
*****************
Click here to print the tutorial
*******************
You can use my arrow to follow your work

**********************
1- Preparer your Materials palette with two colours out of your main tube ( If you don't use my tube, choose a tube with three colours , ( a light colour, a dark one and a bright one!!)
My choice :
Foreground : 4d4241 
Background : aaa8af 
2- We'll start with the creating of the tube Buildings
Open a transparent image of 900 by 350 pixels ( yes, it is longer than the tag itself !)
Flood fill that image with your light colour
3- Layers / new mask layer / from image / choose Hjr_mask_ Buildings/ only check Source Luminance
Adjust / sharpness / sharpen more
Merge group
4- Effects / plugins / Mura's seamless / Emboss at alpha default
Put this image on the side ( you can save it as a psp file just to be safe !)
5- Let's see to the tag itself now !
Open a new transparent image of 800 by 650 pixels
Flood fill that image with your dark colour
6- Add a new raster layer
Selections / load from disk / choose the selection Fairymistfleursdeville1. Check Source Luminance and replace the selection
Flood fill that selection with your light colour
Select none
7- Layers / Load a mask from disk / choose the mask Sg-Perspective-flooring3 as below :

Adjust / sharpness / sharpen more
Merge group
8- Add a new raster layer
Activate the selection tool and click on the Custom selection

Fill in with these settings

9- Effects / plugine / Mura's Meister / Clouds as below :

Depending on the colours you have in your Materials palette, the colours of you sky might be different ! That's fun !!
Select none
10- Set the mode of that layer with clouds, on Hard Light and lower the opacity to your liking (between 60 and 70 for me )
11- If you wish to add some touches of light in your sky or to draw the moon for example : activate the Dodge brush ( all you have to do is press on the letter j to activate that tool ! )
You may use the same settings as me but your can play around with these settings to get different effects !

12- Add a new raster layer
Selections / load from disk / choose Fairymistfleursdeville2. Check Source Luminance and replace the selection
Flood fill that selection with your light colour
Keep the selection
13- Add a new raster layer
Selections / modify / contract by 5 pixels
Flood fill that new selection with your dark colour
Select none
14- Lower the opacity of that layer between 60 and 70
With your deform tool , stretch that horizontal band on both sides so that your light coloured border disappear
15- Activate your tube Buildings, copy it and paste it as a new layer
Place that tube a few millimeters above your horizontal band
16- Add a new raster layer
Selections / load a selection / from disk / choose Fairymistfleursdeville3. Check Source Luminance and replace the selection
Flood fill that selection with your light colour
17 - Selections / Modify / contract by 5 pixels
Flood fill that selection with your dark colour
18- Selections / Modify/ contract by 30 pixels
Flood fill that selection with your light colour
Select none
19- Lower the opacity of that layer between 60 and 70
20- With your move tool , move slightly your layer down, so that the "door" seems to be resting on one the horizontal lines of the floor
21- Open the tube Kikirou_236_chaperon_rouge, or a tube of your choice; copy it and paste it as a new layer
Resize the tube so it isn't taller than the door ! I have resized my tube at 60 %
Adjust / sharpen if necessary !
22- Place your tube at the right place
Effects / 3d effects / drop shadow of your choice ; my choice : 4, 20, 50, 20, black
23- Open the tube Mtm_bomen29-19- feb2008, copy it and paste it as a new layer
Image / resize at 50 %
Place the tube as on my tag
You may choose to create your own tree branches with brushes of your choice !
24- Set your Materials palette with two bright colours which match your main tube ( That is to draw your little flowers )
My choice :
Foreground : my light colour or white
Background : d84d2c 
25- Activate the preset shape tool, set as below

Add a new raster layer and draw your flowers; you may use different shapes of flowers ; invert your colours if you wish; change the width of the line... Have fun !
26- Add a new raster layer
Activate your text tool and write the first letter of your text in capital letters with a fancy font ; I have chosen the fonts Copper Alts cap expert, size 80, width of the line : 1, orange colour in my background and light colour in foreground !
27- Effects /3d effects / drop shadow of your choice; my choice : 1, 1, 70, 1, black
and Drop shadow : 4, 4, 50, 5, black
28- Add a new raster layer
With your text tool and a classical font, write the rest of your text; I have chosen the fonts Corbel, same settings as on line 26 but size at 48 !!!!
Repeat point 27 for the drop shadows
Place your text in the middle of the horizontal band
29- Add a new raster layer and with your brush tool, and my birdbrush , draw some little birds in the sky with a light colour; you may use the birds tube I have made if you prefer
You can decorate your tag as you wish !
30- Add a new raster layer and apply your signature
31- Make sure everything is in the right place
Image / add some symmetrical borders of 2 pixels with your light color
32- Layers / Promote background
33- Image / resize at 90 °% (resize all the layers NOT checked)
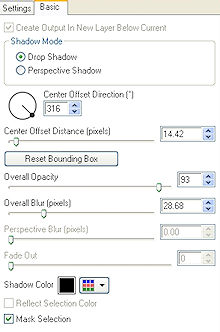
34- Effects / plugins / Alien skin Eye candy 5 / impact / Perspective shadow / Drop shadow blurry default, as below :

35- Add a new raster layer and flood fill it with a quite dark colour ;
My choice : 
36- Layers / arrange / move down
37- Effects / texture effects/ blinds / 5, 50, check Horizontal only and use your light color ( aaa8af for me )
38- Effects / plugins / VM Extravaganza / James Bondage / 128, 128, 0
39 - Effects / Edge effects / dilate
40-Image / add some symmetrical borders of 2 pixels with your light color
41- Save your work as a jpeg file
*****************
That's it !! You've done it !!
If you 've enjoyed doing my tutorial, it would be nice to write a few words in my guest book ! If you 've had the slightest problem, please, send me a mail so I can see to the problem !
Tutorial translated on the 17th of May 2009
*************
You'll find some versions of that tag in my gallery HERE
